CheckoutWC 11.4.0: Add Your Own Checkout Fields and Trust Badge Collections

Table of Contents
- Add your own fields to checkout
- Charge for the options your customers choose
- Where the answers go
- A few details worth knowing
- Show a row of trust badges with one badge collection
- Size, wrap and color the icons
- Create and edit every trust badge in the editor
- Find anything in the Add item menu
- Size your header logo
- A clearer Checkout Editor
- Address field settings
- Fixes worth knowing about
- Updating
- Full list of changes in 11.4.0
11.4.0 is a feature release shaped by merchant feedback – two new things you can place on your checkout, a round of Checkout Editor improvements, and a good set of fixes.
The theme running through it is building your checkout in one place. You can now add your own fields to checkout – text, text area, dropdown, radio buttons and checkboxes – and charge a fee for them, all from the Checkout Editor’s slots. A new kind of trust badge, the badge collection, puts a row of payment logos, security marks and guarantees into any slot in one step. Every trust badge is now created and edited without leaving the editor, the Add item menu can be searched, your header logo can be sized, and the settings sidebar has been regrouped into clearer sections.
All of it is waiting in your Checkout Editor once you update.

The simplicity of Shopify with the power of WooCommerce. Replace your WooCommerce checkout page with CheckoutWC to boost sales and reduce cart abandonment.
Add your own fields to checkout
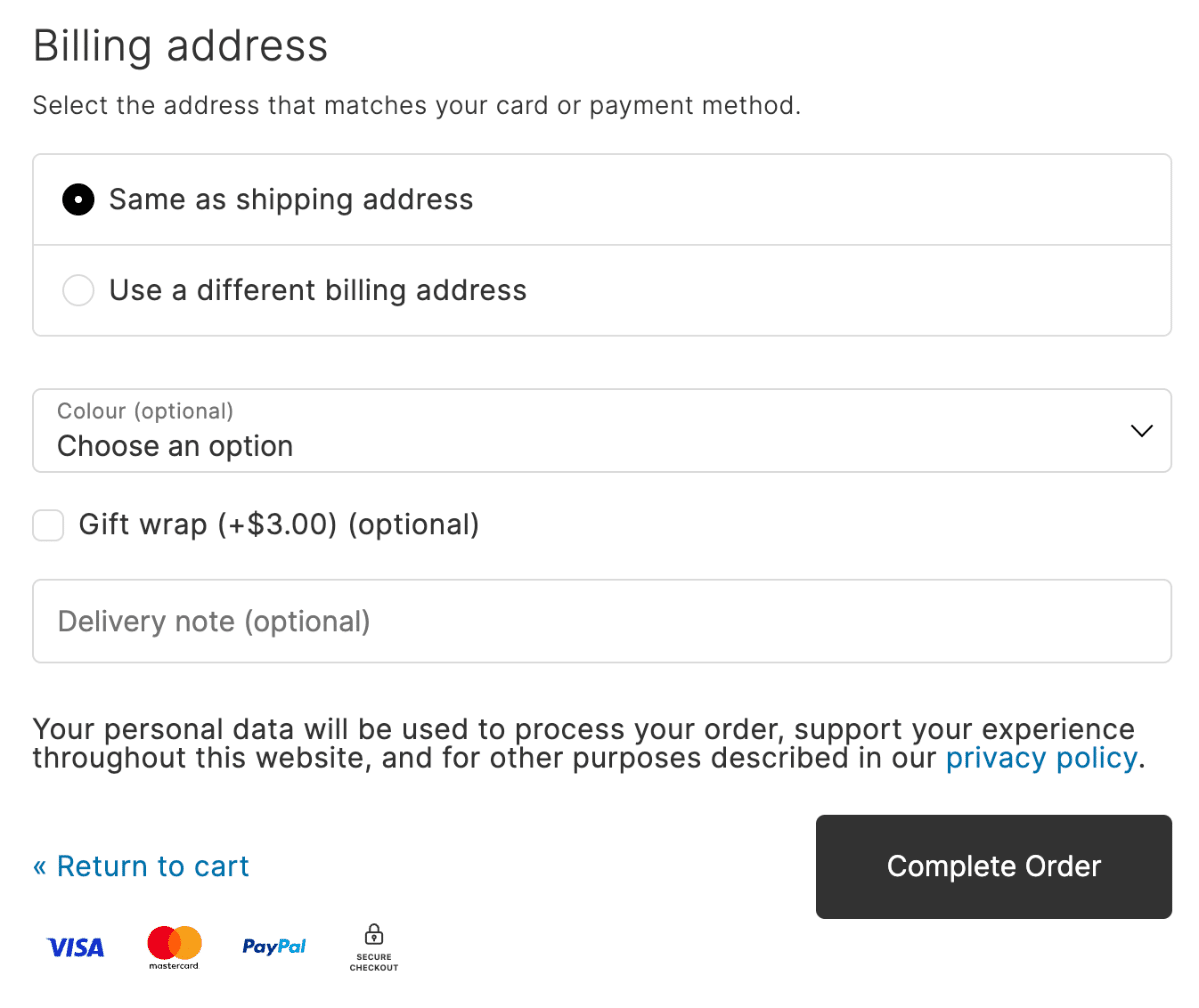
Open a slot in the Checkout Editor’s Slots panel and click +. The Add item menu now has a Custom Fields group, and + New custom field opens a dialog with five field types:
- Text – a single-line input for a PO number, a gift message or a reference
- Text area – room for longer notes, such as delivery instructions
- Dropdown – a list of options your customer picks one from
- Radio buttons – the same choice, with every option visible at once
- Checkbox – a single yes or no, such as gift wrapping
Available on: text fields on every plan, including Lite. Text area, dropdown, radio button and checkbox fields on Plus, Pro and Agency. Fees and display conditions work on every field type you can use.
Every field has a Label, a Margin and a Required checkbox. Text and text area fields also take a Placeholder and a Character limit – customers see a live counter as they type, typing stops at the limit, and an over-length answer that reaches your store is rejected with an error rather than cut short. A required field holds the customer on that step until it is answered, and an answer made only of spaces counts as empty.
A custom field is a slot item, like an order bump or a trust badge. You drag it into order alongside anything else in the slot, and it takes display conditions, so you can show a field only for the carts and customers it applies to. A field hidden by its conditions is neither enforced nor charged. Fields can go in any slot inside the checkout form; the two footer slots do not offer them, since those positions sit outside the form and an answer there would never be submitted.
Charge for the options your customers choose
Any field can add a fee. Set Adds a fee to Fixed amount or Percentage, and the fee follows the field type:
- On a dropdown or radio buttons, each option carries its own amount
- On a checkbox, the fee applies while the box is ticked
- On a text or text area field, the fee applies once the customer enters anything
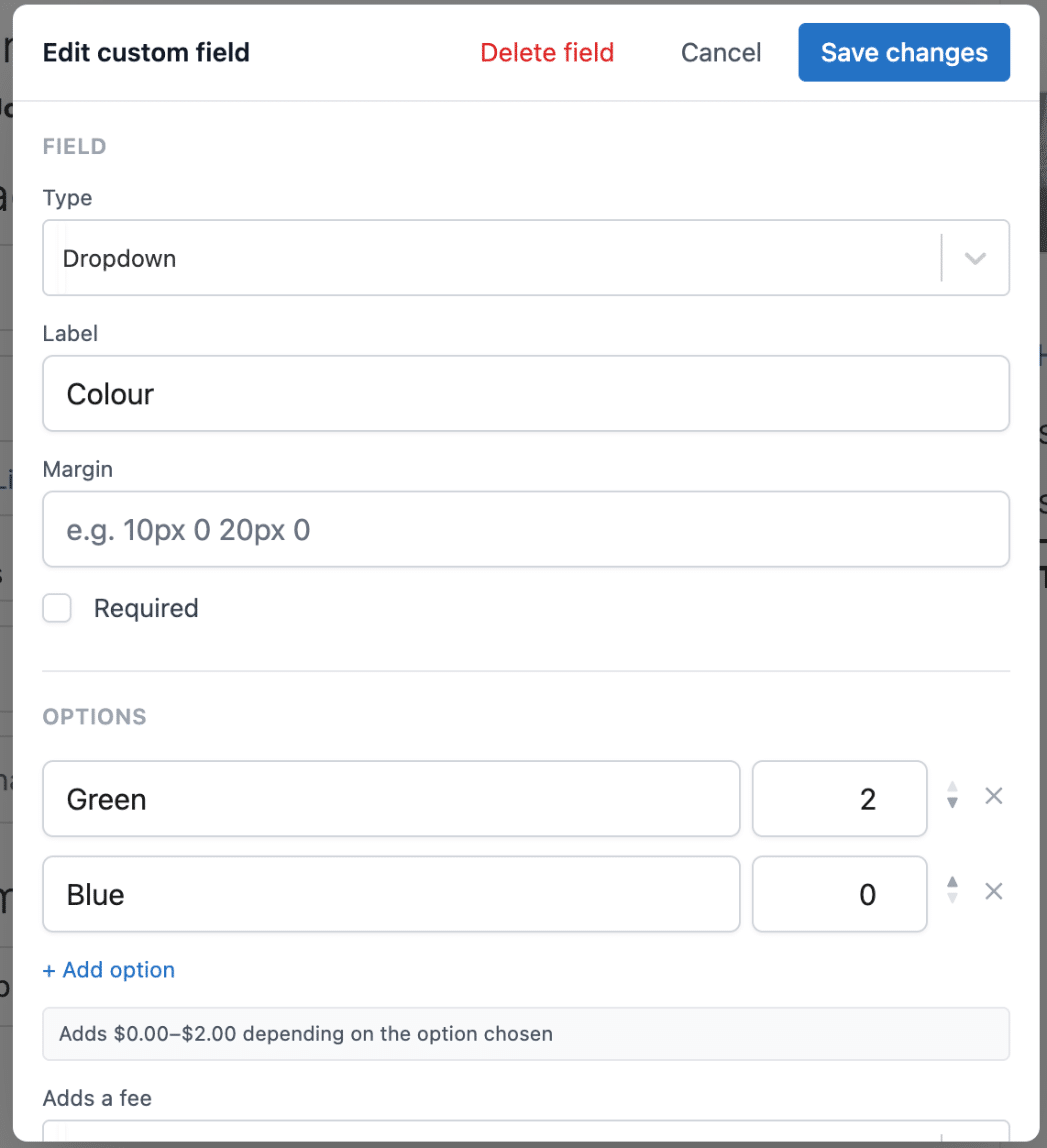
The editor sums up what a field will cost as you set it – “Adds $0.00–$2.00 depending on the option chosen”. A percentage fee can be based on order items before or after discounts, with or without shipping, and you choose whether tax is included in that base. Charge tax on this fee applies the tax class you pick, and you decide whether the fee appears in the field label (or in each option), and what the fee line is called.
At checkout, each priced field adds its own line to the order summary, and the placed order carries the same lines and the same total. When your store shows prices in another currency, a fixed fee is converted, so the amount in the label and the amount charged match.
Where the answers go
What your customer enters is saved to the order. It appears on the order screen in WooCommerce, in the customer’s order details and in order emails. Dropdown and radio answers show the option label, and a ticked checkbox shows “Yes”. Answers are recorded on the order at checkout, so removing a field later does not take them off past orders.
A few details worth knowing
- Express checkout: while a required custom field is shown, express checkout buttons are held back so the field cannot be skipped. To keep them visible, turn on Ignore Required Custom Fields in the editor’s Express Checkout section – it appears once a required custom field exists, and the field’s own dialog tells you which way it is set
- Mobile: a field placed in a cart summary slot moves into the payment section on narrower screens, keeping what the customer typed, and moves back when the screen widens
Show a row of trust badges with one badge collection
Click + New trust badge in a slot’s Add item menu and the dialog now asks what kind of badge you want: Custom badge – your own image and copy – or the new Badge collection. If you pick the wrong one, a Back button returns you to the choice.
A badge collection is a single slot item that shows a row of ready-made icons, picked from a gallery of 23 in three groups:
- Payment methods: Visa, Mastercard, American Express, Discover, Diners Club, JCB, UnionPay, PayPal, Apple Pay, Google Pay, Amazon Pay, Samsung Pay, Klarna and Skrill
- Security: Secure checkout, 256-bit encryption and Privacy protected
- Guarantees: 30, 60 and 90-day money back guarantees, Free shipping, Free returns and Satisfaction guaranteed
Available on: Plus, Pro and Agency.
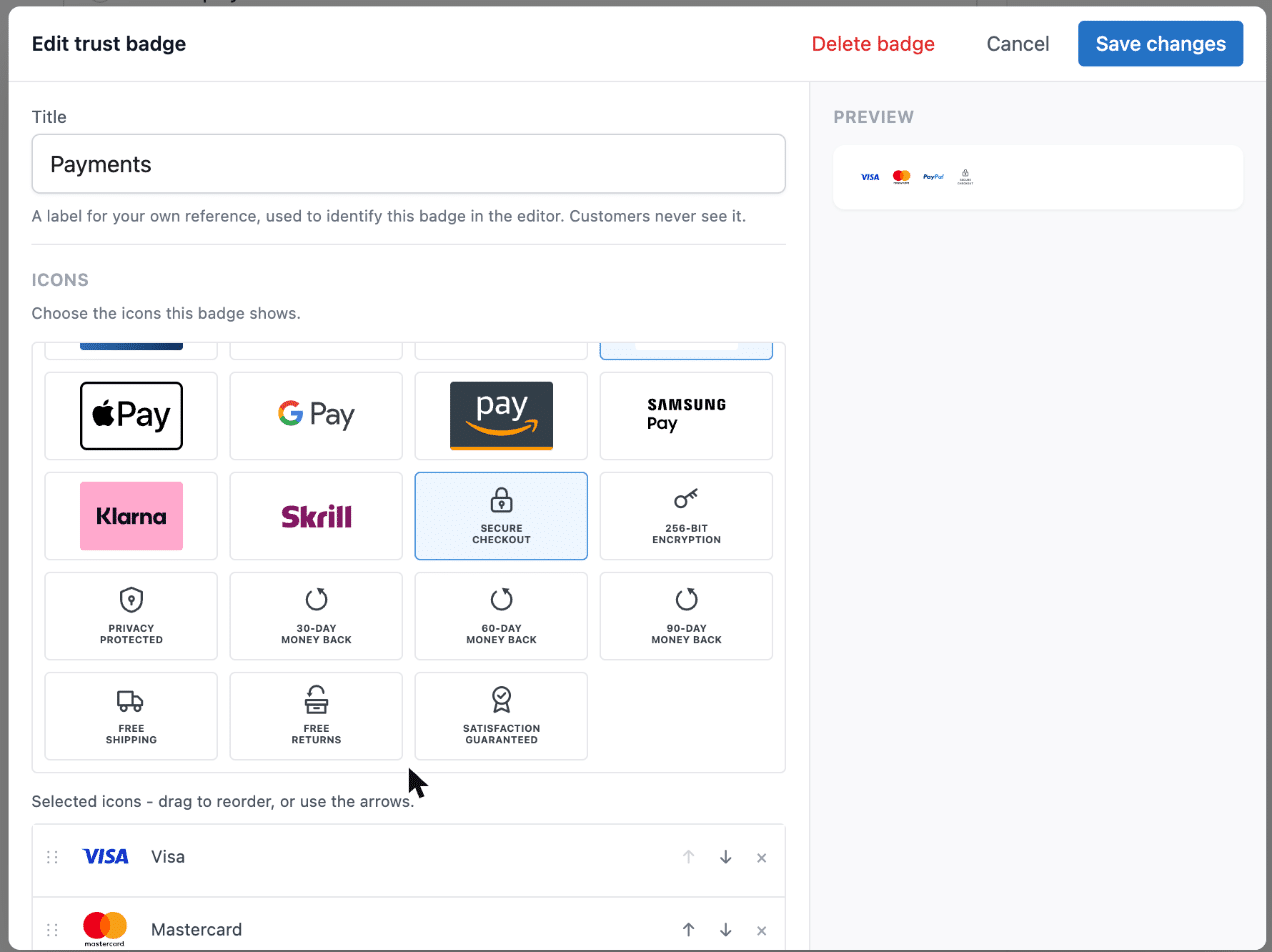
Click an icon to add it. Your selection appears as a list beneath the gallery – drag the rows to reorder them, or use the arrows, which also work from the keyboard. The preview beside the form is laid out at a real checkout width and scaled down to fit, so it shows the number of icons per row your checkout will show, not however many fit in the dialog.
The Title is for your own reference in the editor; customers never see it. Leave it blank and the slot chip reads “Badge collection (5 icons)” instead.
Size, wrap and color the icons
- Icon size sets the height the icons render at, from 16 to 128px, with 32px as the default
- Wrap icons automatically fits as many icons to a row as the space allows, wrapping onto more rows as the slot narrows. Untick it and the collection follows the column counts under Badges instead – Checkout Area Columns, Cart Summary Area Columns and Mobile Columns – with the icons shrinking to share the row, and Icon size acting as a maximum
- Icon color appears once you select a security or guarantee icon. Set a color, or leave it on Inherit so the icons match your checkout text and follow it if that color changes. Payment logos always keep their own brand colors
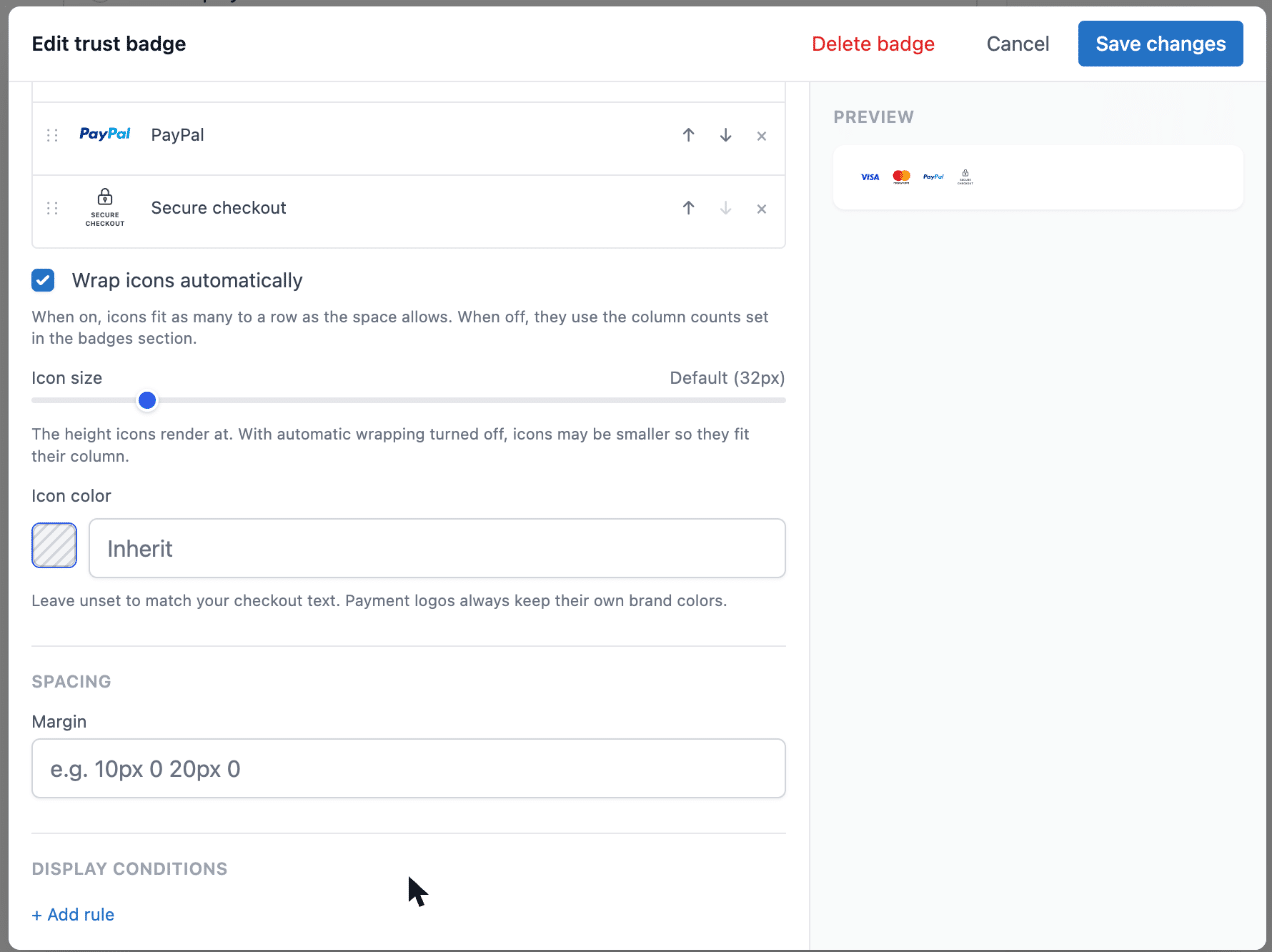
A collection lays itself out on its own. Custom badges in the same slot keep sharing their badge grid, and the collection sits in a row of its own beside them rather than joining it. Like any other badge, it takes a margin and display conditions.
Create and edit every trust badge in the editor
Available on: Basic, Plus, Pro and Agency.
Adding a trust badge no longer opens the Trust Badges settings page in a new tab. Custom badges are built in the same dialog – a form on the left, a live preview on the right – and the preview matches the area the badge sits in, so a badge in a cart summary slot previews at cart summary width. The pencil on a badge’s chip reopens it for editing. The × on the chip removes a badge from that slot and keeps it for later, while Delete badge inside the dialog removes it for good.
The Trust Badges settings page still manages your custom badges. Collections are created and edited only in the Checkout Editor, and the settings page now says so.
Find anything in the Add item menu
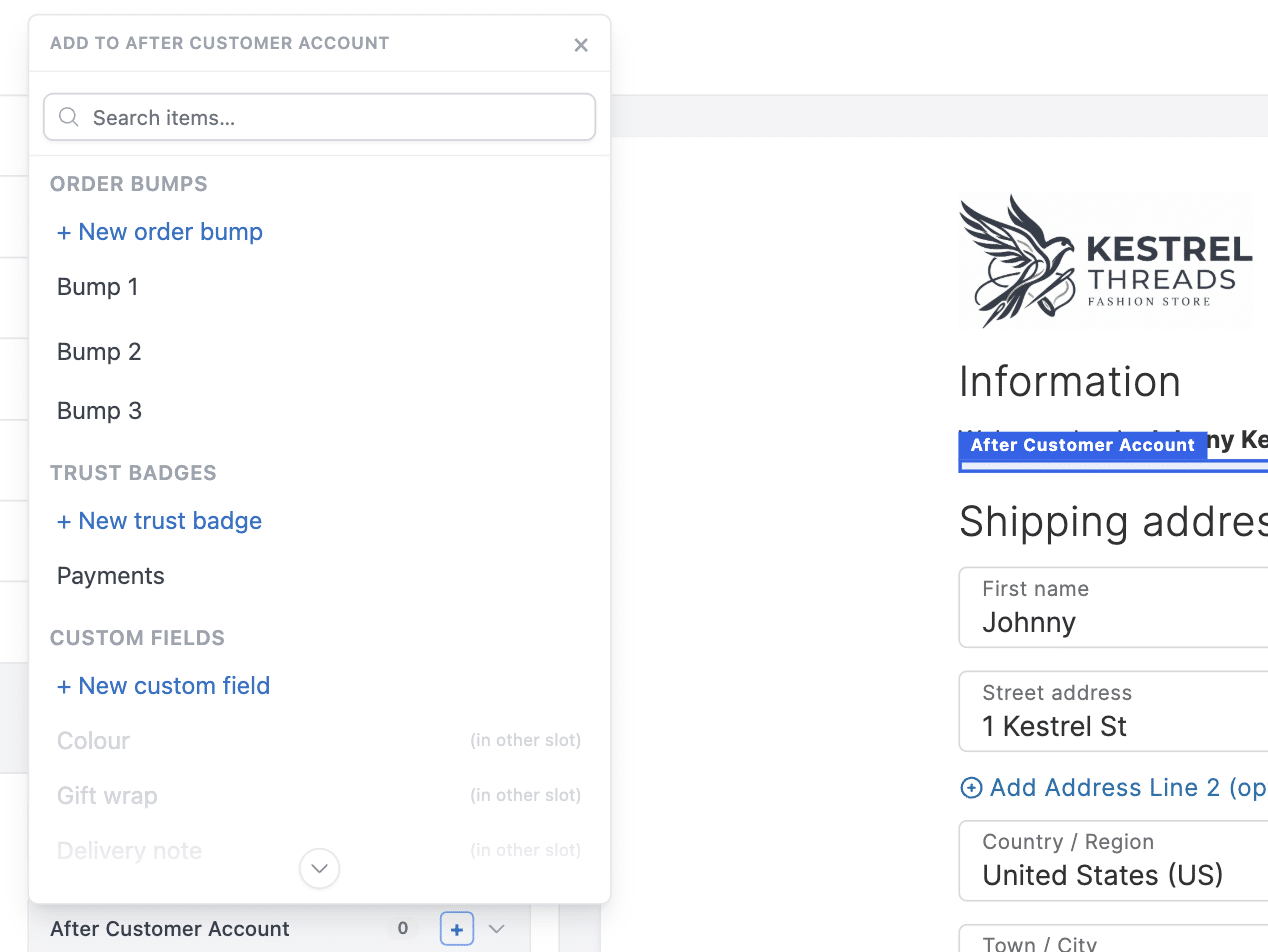
The + menu on a slot is larger and has a search box at the top, so an order bump, badge or field is a few keystrokes away rather than a scroll. Each “New” option now leads its group, and order bumps already placed in another slot are tucked into a group of their own at the end. Opening the menu on one slot closes any menu open on another.
Available on: every plan, including Lite. The items it offers follow your plan.
Size your header logo
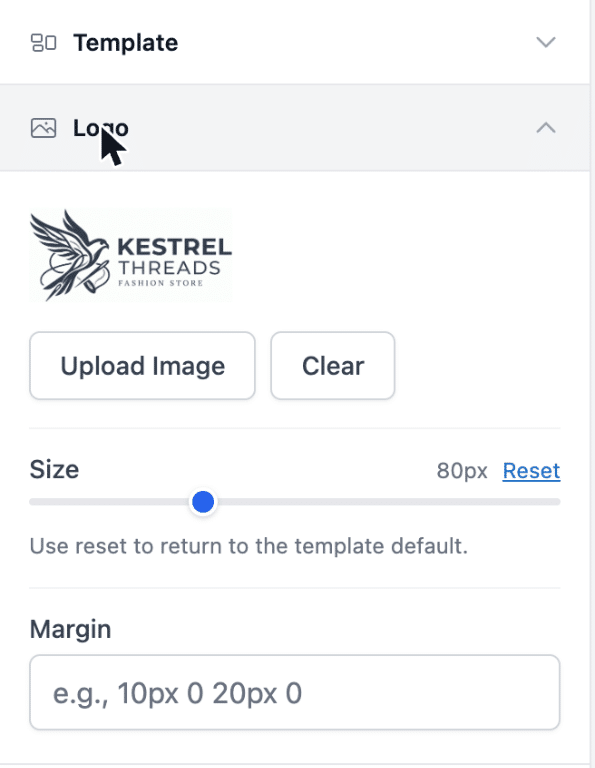
The Logo section gains a Size slider, from 24 to 200px, and a Margin field for the space around the logo, in CSS margin order. Both appear once a logo is uploaded, each template keeps its own values, and Reset returns the size to the template default. The logo thumbnail in the panel now updates as soon as you choose a new image.
Available on: every plan, including Lite.
A clearer Checkout Editor
The settings sidebar has been regrouped. The Fields, Footer and Advanced sections are gone, and their settings now sit under Typography, Addresses, Cart Summary and a new Other section, home to Order Notes and Footer Text. Along with that:
- One Page Checkout has moved to the Template section, and the Order Review step setting is hidden while it is on
- Settings use standard checkboxes; the eye toggles remain only for showing and hiding billing address fields
- Every section has an icon, an open section stands apart from the ones around it, and a warning about a setting appears directly beneath that setting
- A heading added to a slot now starts at H2
- The Live and Preview menu explains that a checkout in preview is only shown to logged-in admins
- Placing an order from the preview returns you to your checkout, and the editor points out the real order that was created, so a test order is not forgotten
Available on: every plan, including Lite. One Page Checkout itself needs Basic or higher.
Address field settings
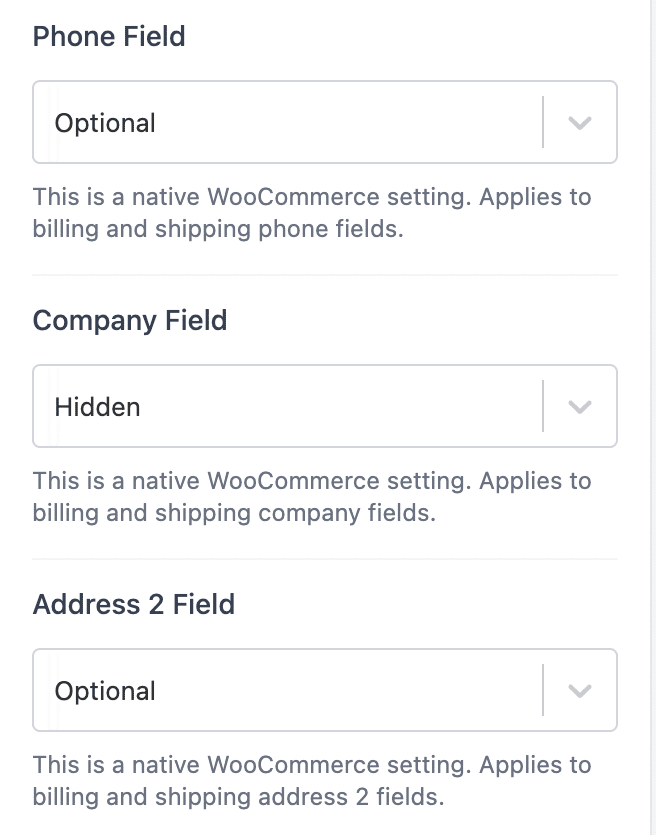
The Addresses section adds Company Field and Address 2 Field alongside the existing Phone Field. Each is set to Hidden, Optional or Required, and each is WooCommerce’s own setting, applying to both billing and shipping addresses.
Available on: every plan, including Lite.
Billing Address Fields is more careful about what it offers. A billing field WooCommerce has hidden is no longer listed there, where its toggle could not do anything. Turning off a field WooCommerce requires, or one a payment gateway checks the card against, flags the field and explains the trade-off, and a link beneath the list explains what removing a field does to the order before you turn one off. Separate House Number/Street Name now warns that it cannot be used with Google or Fetchify address autocomplete.
Fixes worth knowing about
- Order Notes: turning Order Notes off now removes only the notes field, and no longer hides checkout fields other plugins add to that section, such as a VAT ID field
- Phone field: the phone field is optional wherever WooCommerce says it is optional – it was treated as required when the WooCommerce setting had never been saved
- SiteGround Speed Optimizer: the checkout, order pay and thank you pages keep their form and styling with JavaScript or CSS optimization turned on
- Google Address Autocomplete: UK flat and unit numbers, such as “Flat 22”, are kept in Address 1 when a customer selects a suggested address
- Cart summary: the remove button, when enabled, sits in its own column after the price so every item price lines up, and it is always visible, so it can be reached by keyboard and on touch devices
Also fixed: the local pickup settings page loads again when a selected pickup method no longer exists; rewards bar labels no longer overlap when thresholds are close; items in the Before Cart Summary Items slot now sit below the rewards bar; the order bump preview is styled again on WordPress 7.1; and a round of Checkout Editor fixes. The full list follows below.
Updating
Update from Plugins in WP Admin. Then open the Checkout Editor, expand a slot and click + – custom fields and badge collections are both waiting in the Add item menu.
The simplicity of Shopify with the power of WooCommerce. Replace your WooCommerce checkout page with CheckoutWC to boost sales and reduce cart abandonment.
Full list of changes in 11.4.0
- Feature – Badge collections: add a single trust badge that shows a row of ready-made icons – payment logos, security marks and guarantees – picked from a built-in set, sized to suit and wrapped to fit whatever slot you place it in, or switched to follow your Badges column settings instead (Plus plan or higher)
- Feature – Badge collections: new Security and Guarantee icons – Secure Checkout, 256-bit Encryption, Privacy Protected, 30, 60 and 90 day Money Back, Free Shipping, Free Returns and Satisfaction Guaranteed
- Feature – Badge collections: set the color those icons are drawn in, or leave it unset so they match your checkout text – payment logos are never affected and always keep their own brand colors
- Feature – Badge collections: arrange the icons by dragging, size them, and either let them wrap to fit the slot or follow the column counts set under Badges
- Feature – Custom fields: add your own text, text area, dropdown, radio button and checkbox fields to any checkout slot from the Checkout Editor
- Feature – Custom fields: mark a field required, cap how many characters a text or text area field accepts, and show a field only for the carts and customers you choose with display conditions
- Feature – Custom fields: add a fixed or percentage fee to any field – per option on a dropdown or radio buttons, or one amount charged when a checkbox is ticked or a text or text area field is filled in – shown in the label and charged on the order
- Feature – Custom fields: what the customer entered is saved to the order, and shown on the order screen, in their order details and in order emails
- Feature – Custom fields: text fields are available on every plan, including the free version – the other field types need Plus or higher
- Tweak – Checkout Editor: the Fields, Footer and Advanced sections are gone – their settings now sit under Typography, Addresses, Cart Summary and a new Other section
- Tweak – Checkout Editor: One Page Checkout has moved to the Template section, and the Order Review step setting is now hidden while One Page Checkout is on
- Tweak – Checkout Editor: settings now use standard checkboxes rather than eye on and off toggles, which stay for showing and hiding billing address fields
- Tweak – Checkout Editor: every settings section now has an icon, and a warning about a setting appears directly beneath that setting
- Tweak – Checkout Editor: the Billing Address Fields setting now links to an explanation of what removing a field does to the order before you turn one off
- Tweak – Checkout Editor: Separate Address Fields now warns that it cannot be used with Google or Fetchify address autocomplete
- Tweak – Checkout Editor: new Company Field and Address 2 Field settings, alongside the existing Phone Field, for the three fields WooCommerce controls itself
- Tweak – Checkout Editor: a billing field WooCommerce has hidden is no longer listed under Billing Address Fields, where its toggle could not do anything
- Tweak – Checkout Editor: turning off a billing field that WooCommerce requires, or one a payment gateway checks the card against, now flags the field and explains what it costs
- Tweak – Checkout Editor: set the size of your header logo, and the space around it, in the Logo section – each template keeps its own values
- Tweak – Checkout Editor: create and edit trust badges without leaving the editor – adding one no longer opens the Trust Badges settings page in a new tab
- Tweak – Checkout Editor: the Add item menu on a slot is now larger and can be searched, so finding an order bump, badge or field no longer means scrolling
- Tweak – Checkout Editor: in the Add item menu each “New” option now leads its group, and order bumps already used in another slot are tucked out of the way
- Tweak – Checkout Editor: an open settings section now stands apart from the ones around it, and the lines between individual settings are lighter
- Tweak – Checkout Editor: a heading added to a slot now starts at H2 rather than H4
- Tweak – Checkout Editor: the Live and Preview menu now explains that a checkout in preview is only shown to logged-in administrators
- Tweak – Checkout Editor: adding a trust badge now has a Back button, so picking the wrong kind no longer means closing the dialog and starting again
- Tweak – Trust Badges: the settings page no longer lists badge collections, which are created and edited in the Checkout Editor, and explains where to find them
- Accessibility – Checkout, order pay and thank you pages no longer expose a second main landmark on the order review column
- Localization – Added Icelandic (is_IS) translations
- Fix – Cart summary: the remove button, when enabled, now sits in its own column after the price, so every item price lines up – a free gift, or any item a plugin makes non-removable, no longer sits out of line
- Fix – Cart summary: the remove button, when enabled, is always visible rather than appearing on hover, so it can be reached by keyboard and on touch devices
- Fix – Checkout: the phone field is now optional where WooCommerce says it is optional – previously it was treated as required whenever the WooCommerce setting had never been saved
- Fix – Checkout: the Free gift badge now fades with the rest of the cart summary while it refreshes, instead of staying visible
- Fix – Checkout Editor: the title and other details you have typed into the trust badge dialog are no longer cleared when you open the media library to choose an image
- Fix – Checkout Editor: the first item you add to a slot in a session now stays where you put it – previously it could be silently dropped if the editor refreshed its slots at the same moment
- Fix – Checkout Editor: the trust badge image now appears above the button that chooses it, with a button to clear it, matching the header logo controls
- Fix – Checkout Editor: the preview now scrolls to the slot you changed after saving an item in its modal, instead of reloading back at the top
- Fix – Checkout Editor: the logo thumbnail in the settings panel now updates as soon as you choose a new logo, and no longer reverts to the previous one after saving
- Fix – Checkout Editor: opening the Add item menu on one slot now closes the menu already open on another, instead of leaving the two overlapping
- Fix – Checkout Editor: placing an order from the preview now returns you to your checkout, and the editor points out the real order that was created
- Fix – Checkout slots: an order bump or field in the After Delivery Method slot no longer loses keyboard focus every time the checkout totals refresh
- Fix – Checkout slots: anything in the Before Cart Summary Items slot now sits below the free shipping & rewards bar, directly above the first cart item
- Fix – Free shipping & rewards bar: the labels beneath the bar no longer overlap when reward thresholds are close in value, in the side cart and at checkout
- Fix – Google Address Autocomplete: UK flat and unit numbers (e.g. “Flat 22”) are no longer dropped from Address 1 when selecting a suggested address
- Fix – Local pickup: the settings page loads again when one of the shipping methods you had selected for pickup no longer exists, instead of showing a blank page
- Fix – Order bumps: the bump preview is styled again when you edit an order bump on WordPress 7.1
- Fix – Order summary: what a customer types into the promo code field, or into a field placed in an order summary slot, no longer overlaps the field’s label
- Fix – SiteGround Speed Optimizer: the checkout, order pay and thank you pages no longer lose their form or styling when JavaScript or CSS optimization is on – Speed Optimizer names its optimized copies after the asset handle, so another page on your store could leave the wrong file cached under ours
- Fix – Trust badges: a review badge shown one per row now reads as a single block, instead of leaving large gaps above its description and stars
- Fix – Turning off Order Notes now removes only the notes field, instead of also hiding checkout fields other plugins add to that section, such as a VAT ID field