How to Price Custom Products in WooCommerce: Engraving, Dimensions and Artwork
Table of Contents
- How custom products work in WooCommerce
- Charging per character for engraving and custom text
- How to set up per-character pricing
- Charging a flat fee for gift wrap and other extras
- How to set up a quantity-based flat fee
- Charging a percentage for premium materials
- How to set up percentage pricing
- Calculating a price from the customer's measurements
- How to set up measurement formula pricing
- Charging for artwork uploads
- How to set up an artwork upload fee
- How to add other extra fees to WooCommerce products
- Optional service fees
- Automatic surcharges with a price formula
- Display product customizations and pricing at checkout
- What to check before you take custom orders
- Frequently asked questions
- Can I charge per character for engraving in WooCommerce?
- Can customers enter their measurements and get a calculated price?
- Can customers upload artwork and pay a fee for it?
- Do the customer's options show on the order and confirmation email?
- Can I make a personalization option required?
- Do product options show at checkout with CheckoutWC?
- Set clear, simple pricing for custom products
Shoppers love buying something that feels made for them. You find it in a necklace engraved with a name, or a blind cut to fit a window. The same idea applies to a photo printed on canvas, or even a present that arrives gift wrapped. They’re happy to pay extra for a custom product.
However, WooCommerce gives each product one price, or one price per variation. It has no built-in way to charge for choices on custom products, like engraving, measurements, artwork, or gift wrap. Charging fairly also takes thought, because engraving one initial is a smaller job than engraving a full message.
I’ll walk you through six ways to price customer choices, with a worked example for each:
- Per-character pricing for engraving and custom text
- Flat fees for gift wrap and simple extras
- Percentage uplifts for premium materials
- Formula pricing from the customer’s measurements
- Fees for artwork uploads
- Other extra fees, such as installation charges and automatic surcharges
You can also display those choices and their prices at checkout.
How custom products work in WooCommerce
A custom product lets the customer personalize the item before they buy, for example with text, measurements, an image, or gift wrap. It does this by displaying one or more product add-ons on the product page so that customers can select and pay for the extras they want. This lets you charge for the real work, materials and handling behind each order.
WooCommerce doesn’t do this on its own, so you need a plugin. We recommend WooCommerce Product Options by Barn2. It adds a wide range of extra field types, for example text inputs, checkboxes, radio buttons, number fields and file uploads. Unlike most product options plugins, it also lets you set a price for each option and build completely bespoke price formulas, so you control pricing.
Barn2 analyzed 693 stores using the plugin and found custom and personalized products were the most common use, at 38% of stores. I used it for every example because it covers every pricing method in this list. The chosen options and their prices appear at checkout on both the standard WooCommerce checkout and CheckoutWC.
Now let’s look at the different ways you can charge custom pricing for the options that the customer selects.
Charging per character for engraving and custom text
Per-character pricing charges for each typed character and works best for engraving, printing, and other custom text that varies in length.
- A single engraving fee: The customer pays one price whatever the length. This simple option suits engraving with a fixed size, such as a monogram of up to three initials.
- Per-character pricing: The price rises with each character. This suits names and messages that vary in length, because a long message takes longer to engrave than one initial.
To charge for engraving and custom text in WooCommerce Product Options, create a text field and price it by character.
How to set up per-character pricing
- Install and activate the WooCommerce Product Options plugin.
- Go to Products → Product Options, click Add Group, name it, and use Visibility to choose the products or categories it applies to. Then click Add option.
- Choose Text input as the option type for the engraving field.
- On the choice, set Price Type to Character count and enter 0.50.
- Set Maximum to 25 characters.
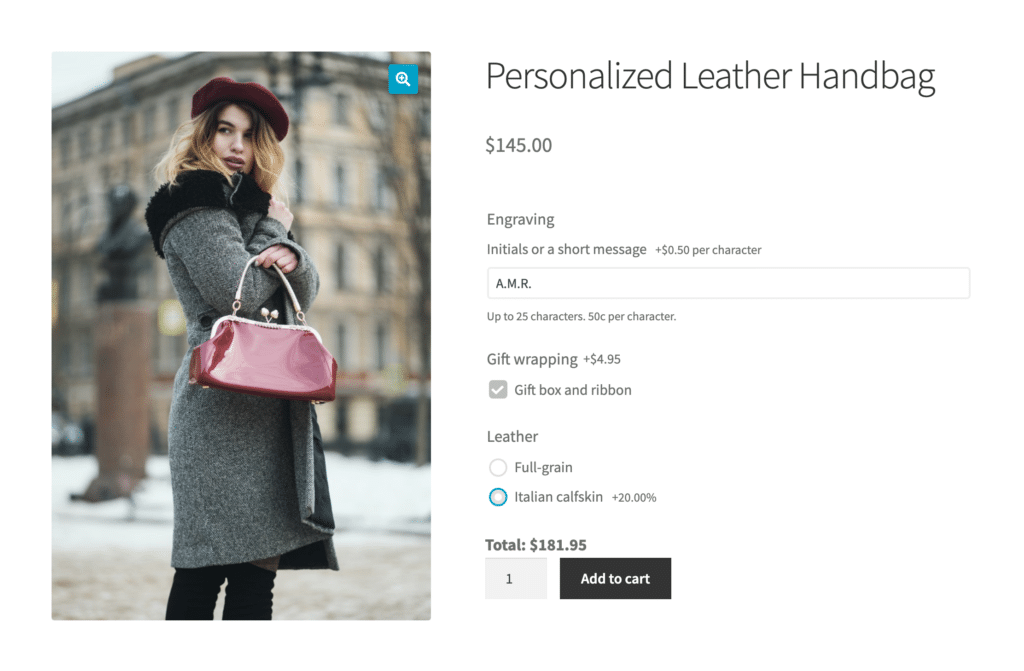
Take a $145 leather handbag with engraving priced at $0.50 per character, up to 25 characters. If the customer types A.M.R., that counts as six characters because the periods are included. The engraving adds $3.00, and the handbag comes to $148.00.
Use the option’s Description to let customers know that spaces and punctuation count toward the character price.
Charging a flat fee for gift wrap and other extras
Use a flat fee when a simple extra costs you the same on every order.
Gift wrap is a good example because the shopper makes one yes-or-no choice. One fixed price is fair because the extra costs you the same every time. The same pricing works for a presentation box or a printed gift note.
To charge a flat fee in WooCommerce Product Options, add a checkbox and choose how the fee should apply to the order quantity.
How to set up a quantity-based flat fee
- Create or edit a group and click Add option.
- Choose Checkboxes as the option type.
- Add a choice with the label “Gift box and ribbon”.
- Set Price Type to Quantity-based fee and enter 4.95, so each item ordered gets its own wrapping charge.
Choose One-time fee instead to charge once, whatever the quantity.
On the same handbag, the engraved version is already at $148.00. A Gift box and ribbon checkbox at $4.95 takes the price to $152.95. The customer can see that extra before adding the product to the cart.
Keep each checkbox to one yes-or-no decision. If you put gift wrap and a note in the same checkbox, the customer can’t choose one without the other.
Charging a percentage for premium materials
Store owners can use a percentage uplift when an upgrade should rise with the product price.
Premium materials often work better this way than with a flat fee. A fixed charge can be too low on an expensive product and too high on a cheaper one. Percentage pricing keeps the upgrade tied to the value of the item.
To charge a percentage for premium materials in WooCommerce Product Options, use radio buttons with one base choice and one priced upgrade.
How to set up percentage pricing
- Create or edit a group and click Add option.
- Choose Radio buttons as the option type.
- Add “Full-grain” with Price Type set to No cost.
- Add “Italian calfskin” with Percentage increase set to 20.
On the $145 handbag, the Italian calfskin upgrade adds $29.00. With the $3.00 engraving and $4.95 gift wrap, the handbag comes to $181.95. Shoppers can see how each choice changes the total.
The percentage is worked out from the product’s own price. As a result, the leather upgrade scales with the handbag rather than with the engraving or gift wrap.
Calculating a price from the customer’s measurements
A measurement price calculator uses the customer’s own dimensions to calculate the product price on the product page.
Made-to-measure products need this because the amount of material changes with the size. Blinds, flooring, fabric and signage all fit this model. The shopper enters the size they need, and the store owner charges for the material being supplied.
To calculate a price from measurements in WooCommerce Product Options, collect the dimensions first and then use them in a formula.
How to set up measurement formula pricing
- Create or edit a group and click Add option.
- Add two Number options called Width and Drop, each with Minimum 30 and Maximum 300.
- Tick Required for both Number options.
- Add a Price formula option with the formula ([Width] * [Drop]) / 10000 * 45.
- Add a Radio buttons option called “Fabric grade”, with “Standard” set to No cost and “Blackout lining” set to a Quantity-based fee of 25.
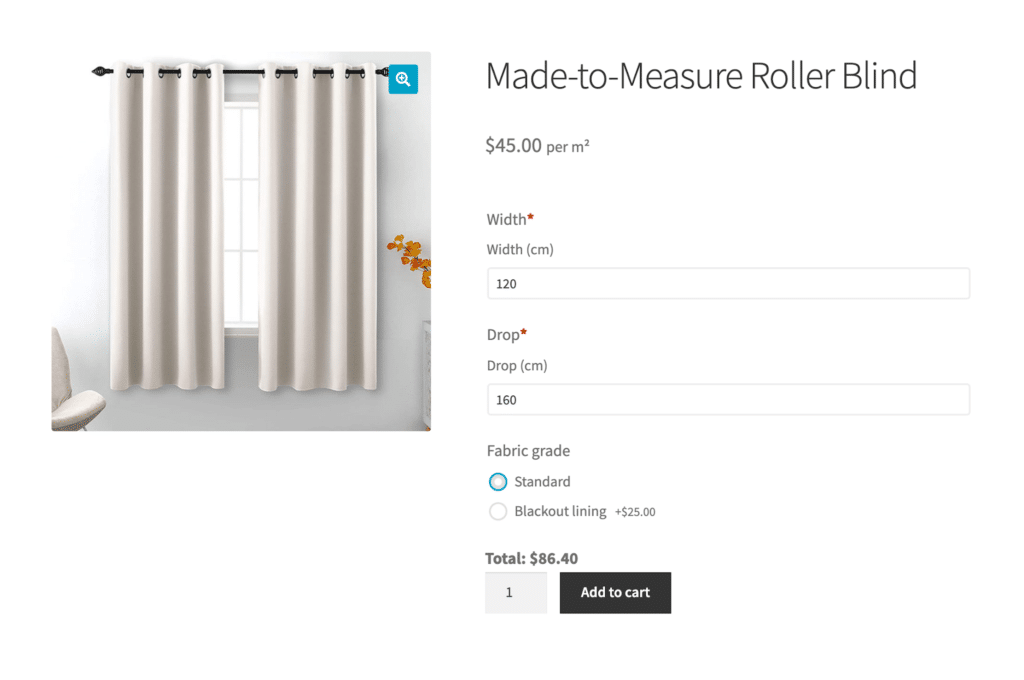
For example, a blind measuring 120cm wide by 160cm drop is 1.92 square meters. At $45 per square meter, the blind comes to $86.40. Adding blackout lining as a $25 fee takes the total to $111.40.
A made-to-measure product gets its price from the formula, so add upgrades to it as fees. Percentages suit products that have a price of their own, like the handbag. The minimum and maximum values mean customers can only order sizes you can make.
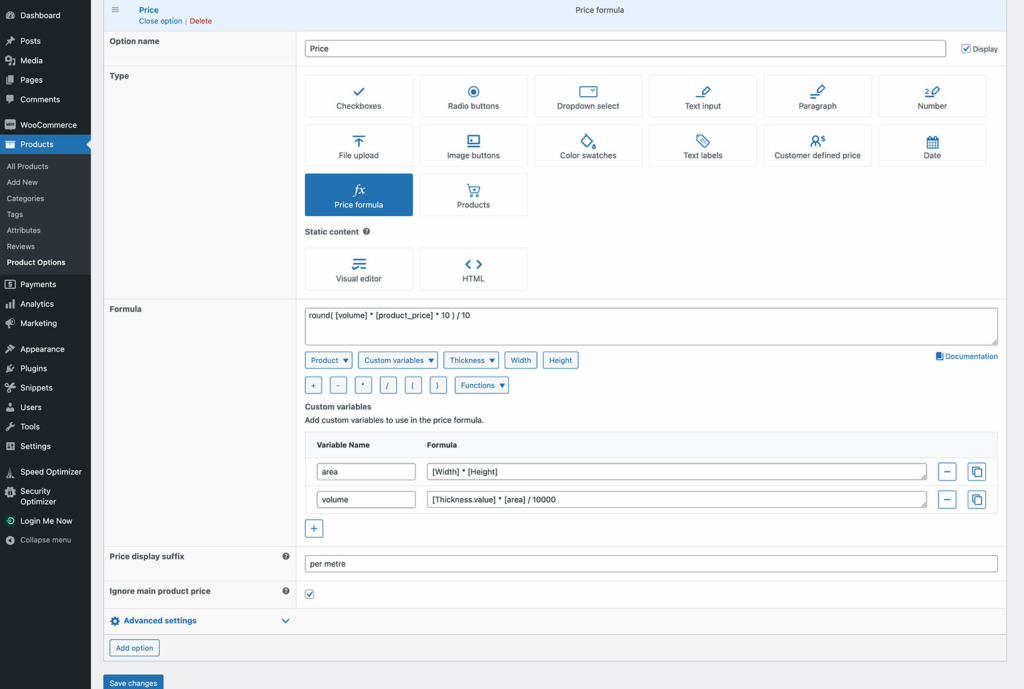
Price formula option using area and volume variables, with a suffix field and ignore main product price setting. (02b-price-formula-admin.png)
Charging for artwork uploads
Your team can charge an artwork upload fee for checking and preparing a customer’s file.
This pricing suits products where the customer supplies an image. Canvas prints, signs and printed merchandise all need the file before production can start. The note tells shoppers that someone will handle the artwork before printing.
To charge for artwork uploads in WooCommerce Product Options, add a required upload field and charge once for checking the file.
How to set up an artwork upload fee
- Create or edit a group and click Add option.
- Choose File upload as the option type.
- Set Price Type to One-time fee and enter 7.50, because one file needs checking once.
- Tick Required.
- Set the Allowed file types, and set a maximum file size.
For example, a custom canvas print costs $38. The artwork upload fee adds $7.50, so the canvas print comes to $45.50.
Tell customers that you’ll check the file before printing. That small note helps them understand why the fee exists.
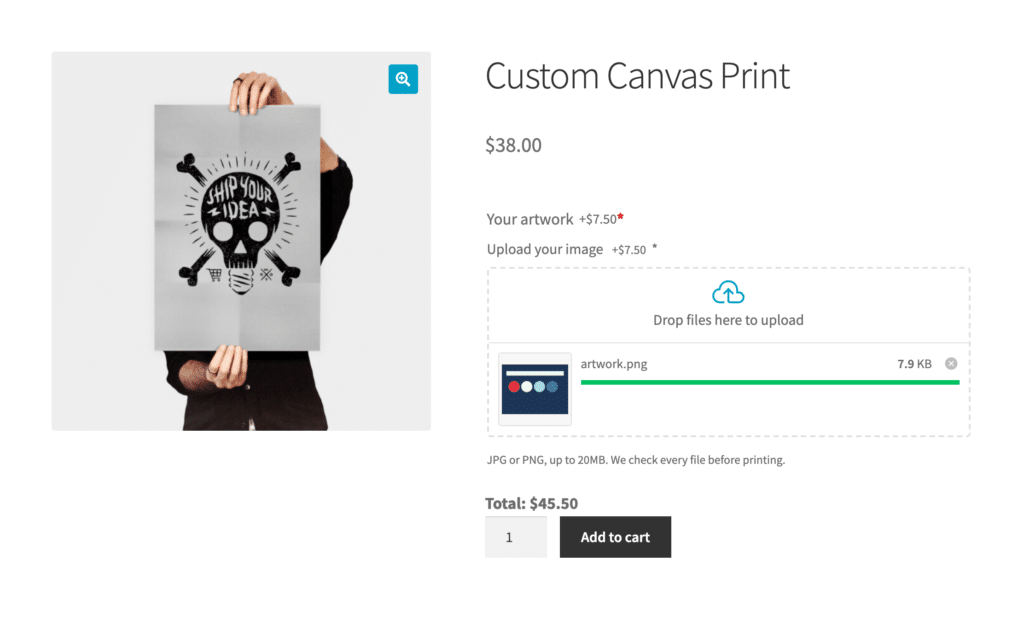
A file upload field with a $7.50 artwork fee. (03-artwork-upload.png)
How to add other extra fees to WooCommerce products
Besides the five methods, you can use WooCommerce Product Options to charge for optional services and add automatic surcharges.
Optional service fees
Optional service fees work well for installation, assembly and express production. The customer chooses whether they want the service.
To set them up, add a Checkboxes option with one choice per service. Use One-time fee for a service that happens once per order line, such as installation. Choose Quantity-based fee when each item needs the service. This works like the gift wrap setup above.
Automatic surcharges with a price formula
When a fee should be added without the customer choosing it, or needs calculating, use a Price formula option. It works like a price calculator for the fee.
This works for a handling surcharge added to every product, a packaging charge that rises with the product’s weight, or a minimum charge for small made-to-measure orders.
Price formulas can be complex to set up, so Barn2 provides a price formula AI bot for customers with an active WooCommerce Product Options license. You describe how you want the price to work in plain English, then paste its formula into the Price formula option. Check the formula before you go live.
- Store-wide surcharges: Set the group’s Visibility to All products, or pick specific categories.
- Formulas: Build the formula from fixed amounts, the customer’s measurements or the product’s own properties, such as its weight.
- Minimum charges: Wrap the formula in max() so the price never drops below your minimum, for example max(your formula, 20).
- Rounding: Use round() to keep calculated prices tidy.
- Testing: Add a test product to the cart and check the surcharge before you go live.
Display product customizations and pricing at checkout
After a customer has chosen their custom options, seen the updated pricing and added the item to the cart, they need to be reassured that their choices are being correctly attached to their order. As a result, it’s essential to display details of these choices on the WooCommerce checkout. This works smoothly whether you use the default WooCommerce checkout or CheckoutWC.
At checkout, every option the customer picked is listed against the line item. Each add-on is priced separately. The shopper can check they’re ordering the right thing before they pay.
Store owners benefit because clear order details reduce mistakes and questions after purchase. The same option details carry through to the order details and the order confirmation email. Order details give both sides a record of what was ordered.
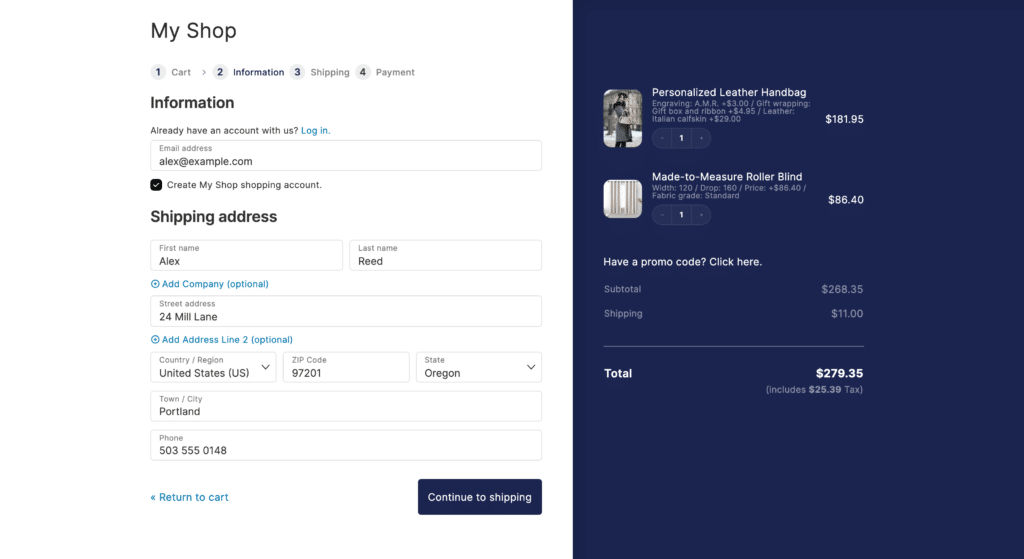
Every choice listed against the line item on CheckoutWC, with each add-on priced. (04-checkoutwc-summary.png)
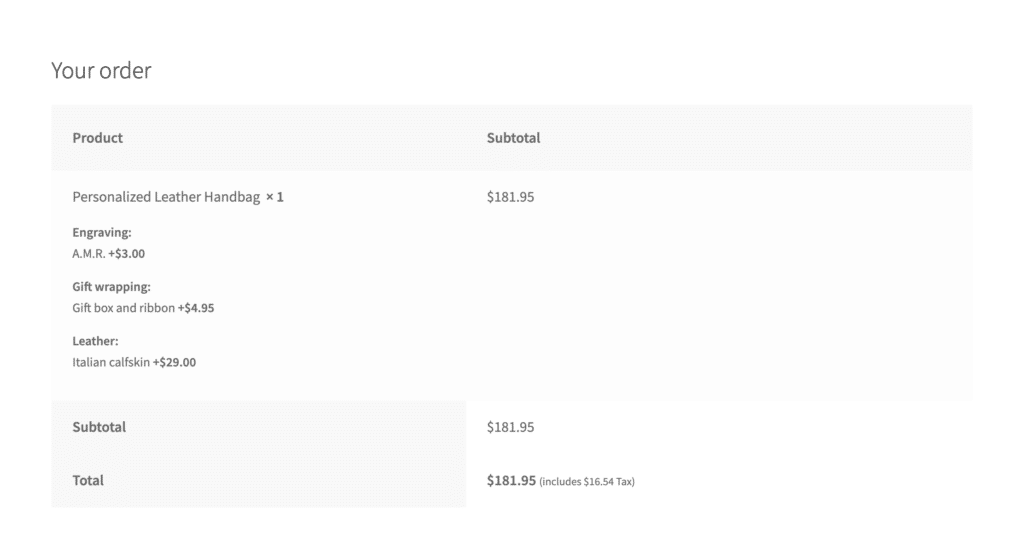
The same details on the standard WooCommerce checkout. (05-default-checkout-order.png)
What to check before you take custom orders
Before you sell custom products in WooCommerce, test the full buying flow yourself.
- Required fields: Customers can’t add the product to the cart until they fill them in, and the error message names the missing field.
- Running totals: Change each option and watch the total update.
- Tax: Check that tax on the add-on prices follows your store’s tax settings.
- Order details: Place a test order and confirm the choices appear on the order and in the confirmation email.
- Phones: Try every field on a phone, because shoppers often type initials or upload photos there.
- Variations: WooCommerce Product Options lets you create options in its own interface, or select existing variations from your store and display them as options in the plugin’s display styles. You can use variations in price formulas. However, the other custom pricing options aren’t available for variations, because variations set their own prices.
Frequently asked questions
Can I charge per character for engraving in WooCommerce?
Yes, WooCommerce Product Options can price each character the shopper types. You add a Text input field, choose Character count pricing, and set a maximum length. A.M.R. adds $3.00 at $0.50 per character because punctuation counts.
Can customers enter their measurements and get a calculated price?
Customers can type width and drop on the product page and see the formula price. In the blind example, 120cm by 160cm comes to $86.40 before blackout lining.
Can customers upload artwork and pay a fee for it?
Yes, WooCommerce Product Options can add a required File upload field with a One-time fee. You can limit file types and set a maximum file size. The canvas print example uses a $7.50 artwork fee.
Do the customer’s options show on the order and confirmation email?
Selected options carry through to the order details and confirmation email. Each choice is listed against the line item, so both sides can check the order.
Can I make a personalization option required?
You can make important personalization fields required. For example, the artwork upload field can block orders until the customer supplies a file.
Do product options show at checkout with CheckoutWC?
CheckoutWC can show the same option details at checkout. Every selected option is listed against the line item, with each add-on priced separately.
Set clear, simple pricing for custom products
Adding extra price options for custom WooCommerce products gives customers extra flexibility while also increasing your store’s average order value. This applies equally whether you’re selling engraved products, a larger blind, a premium leather upgrade or an artwork file.
Start with the product where the customer’s choice changes your cost the most. Set up that one pricing method, place a test order, and check how the custom options appear at checkout.