How to Add a Delivery/Pickup Date and Time Picker to WooCommerce Checkout

Table of Contents
- Why Use Order Delivery Instead of Custom Fields?
- How It Appears in Checkout
- Step 1: Download and Install Order Delivery
- Step 2: Access Delivery & Pickup Settings
- Step 3: Configure General Settings
- Step 4: Configure Picking (Order Preparation Logic)
- Step 5: Configure Delivery & Pickup Scheduling
- Delivery / Pickup Days
- Time Frames (Your Time Slots)
- What You Can Control Per Time Frame
- Advanced Delivery Ranges (Optional)
- Disable Specific Dates
- Step 6: Tips
- What Happens After Checkout
- Final Thoughts
If you want to let customers choose a delivery or pickup time at checkout, the good news is: you don’t need to build it from scratch.
Order Delivery for WooCommerce gives you everything from delivery date selection to time slots and cutoff rules during checkout.
However, while it works with the default checkout, it really shines when used together with CheckoutWC.
CheckoutWC replaces the standard WooCommerce checkout with a streamlined, conversion-focused design that’s optimized for speed, clarity, and mobile usability. And importantly, it integrates seamlessly with Order Delivery for WooCommerce – so your delivery and pickup scheduling looks like a natural part of the checkout, not an add-on.
In this guide, I’ll show you how to set up delivery and pickup date/time selection using Order Delivery, and how it works within a CheckoutWC-powered checkout for the best possible customer experience.
Why Use Order Delivery Instead of Custom Fields?
It might be tempting to just add a simple date picker field to your checkout – but that approach breaks down quickly in real-world scenarios.
Order Delivery for WooCommerce is built specifically for stores that need structured delivery or pickup scheduling. Instead of collecting a date, it lets you control:
- Available delivery/pickup days
- Time slots with defined ranges
- Order limits per slot or per day
- Cutoff times for same-day or next-day delivery
- Separate rules for delivery vs pickup
In other words, it’s not just a field – it’s your logistics layer at checkout.
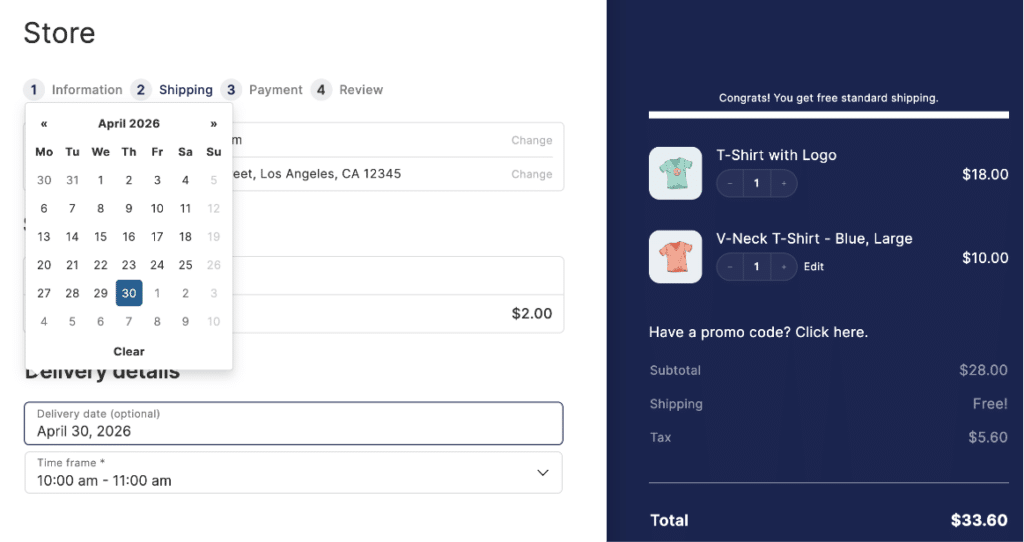
How It Appears in Checkout
Once configured, Order Delivery adds a delivery/pickup scheduling section to your checkout flow.
On a standard WooCommerce checkout, this typically appears as an extra section among your billing and shipping fields.
On CheckoutWC, however, the experience is much cleaner:
- The calendar and time slots are clearly separated
- The layout feels more structured and less cluttered
- It’s easier for customers to understand what they need to do
- You can choose the location of the delivery/pickup scheduling section
This is where CheckoutWC really makes a difference – it turns a functional feature into a polished experience.
Step 1: Download and Install Order Delivery
Before you get started, you’ll need to install Order Delivery for WooCommerce.
If you’re on a CheckoutWC Pro plan or higher, you already have access to Order Delivery as part of your plan – no need to purchase it separately. Not seeing it? Just reach out to our team, and we’ll send it over to you.
If you’re not using CheckoutWC, or you’d prefer to use it with the standard WooCommerce checkout, you can purchase Order Delivery as a standalone extension.
Once you’ve downloaded the plugin:
- Go to Plugins → Add New → Upload Plugin
- Upload the ZIP file
- Click Install Now, then Activate
After activation, you’ll be ready to configure your delivery and pickup settings.
Step 2: Access Delivery & Pickup Settings
After installing Order Delivery for WooCommerce, go to:
WooCommerce → Settings → Delivery & Pickup Dates
This is where everything is configured.
Note: CheckoutWC shows a shortcut to Order Delivery in its menu when Order Delivery is activated!
Step 3: Configure General Settings
Start in the Settings tab to define how customers interact with delivery and pickup options.
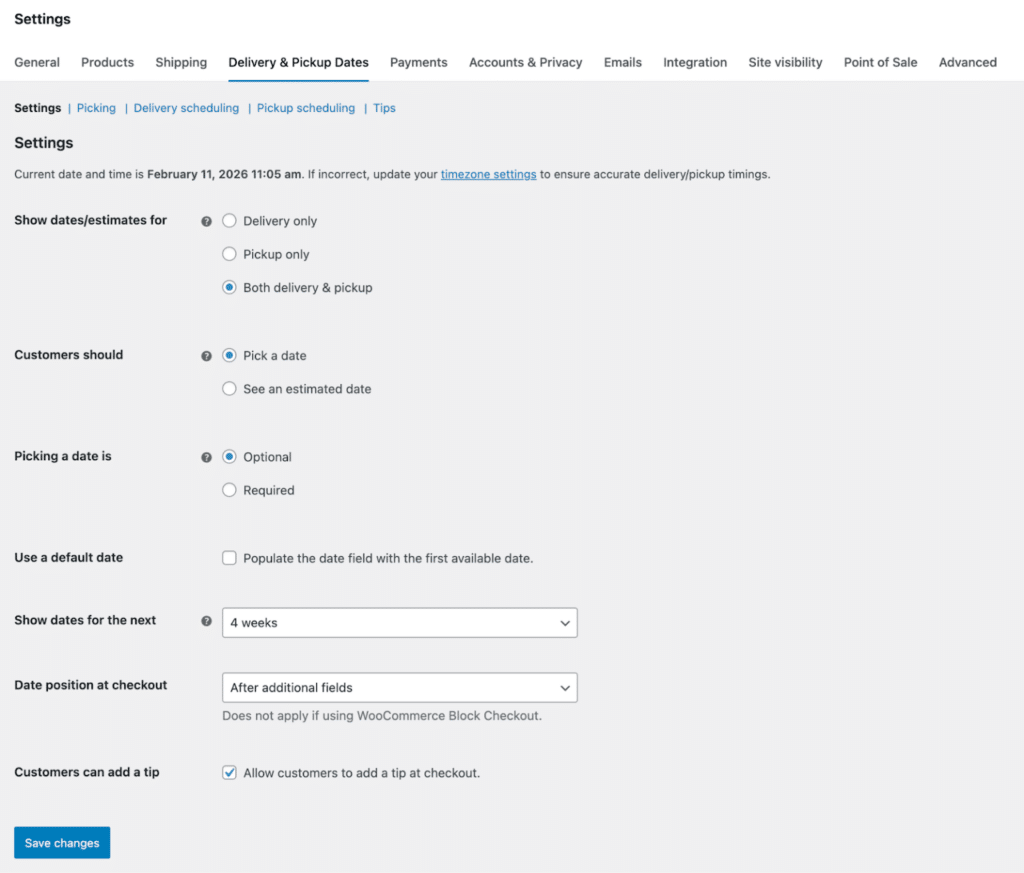
Here are the most important options:
Show delivery/estimates for
Choose whether you offer:
- Delivery only
- Pickup only
- Both delivery and pickup
Customers should
Decide whether customers:
- Select an exact date at checkout
- Or are shown an estimated date instead
Picking a date is required or optional
If enabled, customers must choose a date before placing an order.
Use a default date
Automatically selects the first available date (reduces friction at checkout).
Show dates for the next X weeks
Controls how far into the future customers can book.
Date position at checkout
Defines where the delivery/pickup selector appears in checkout. When CheckoutWC is activated, these options are CheckoutWC specific.
Once these are set, you’ve defined the customer-facing behaviour.
Step 4: Configure Picking (Order Preparation Logic)
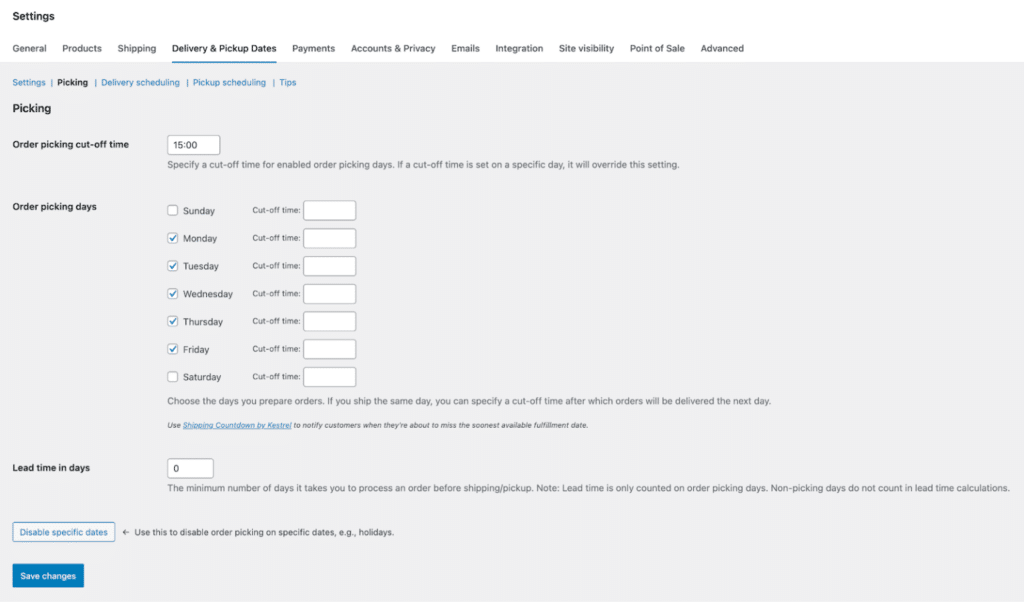
The Picking section controls how long it takes you to prepare orders – and this directly affects which dates customers can select.
Key settings here are:
Order picking cut-off time
Set a daily cutoff (e.g. 15:00). Orders placed after this are treated as if they were placed the next day.
Order picking days
Select the days your team processes orders.
Lead time (in days)
The minimum number of working days required before an order is ready.
Example:
- Lead time = 1 day
- Order placed Friday
- If you don’t pick on weekends → earliest availability = Monday
Disable specific dates
Block out holidays or closures from your picking schedule.
👉 This section ensures you never promise a delivery date you can’t fulfill.
Step 5: Configure Delivery & Pickup Scheduling
Next, define when customers can actually receive or collect orders.
You’ll see:
- Delivery Scheduling
- Pickup Scheduling
These are shown depending on whether you selected delivery/pickup/both, in general settings.
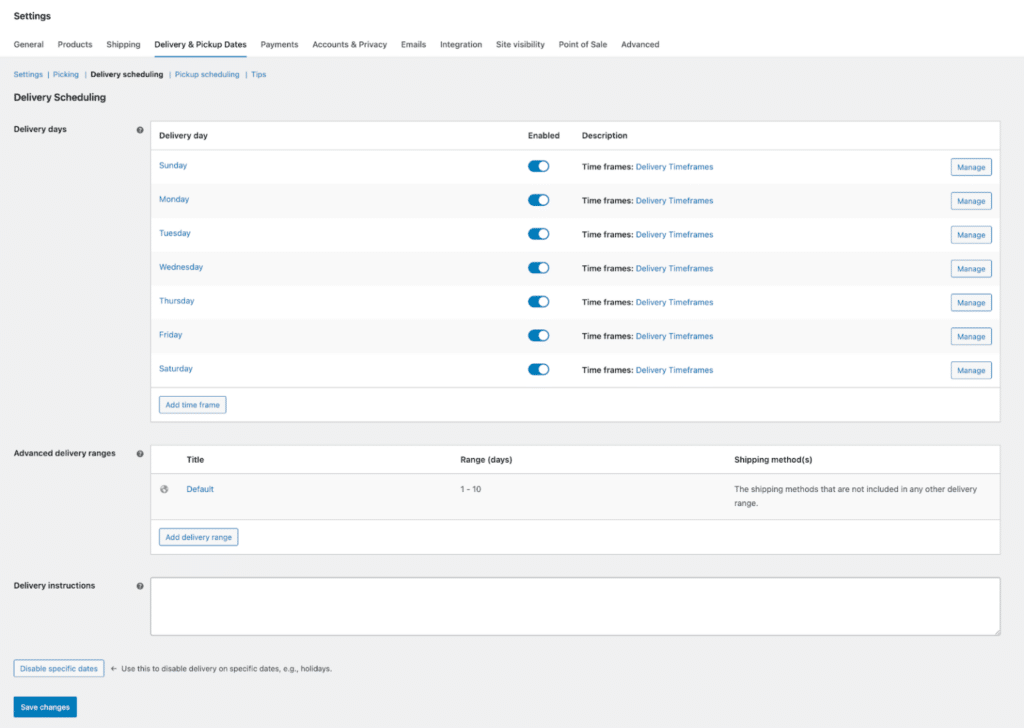
Delivery / Pickup Days
Select which days you:
- Deliver orders
- Allow customer pickups
These don’t have to match your picking days.
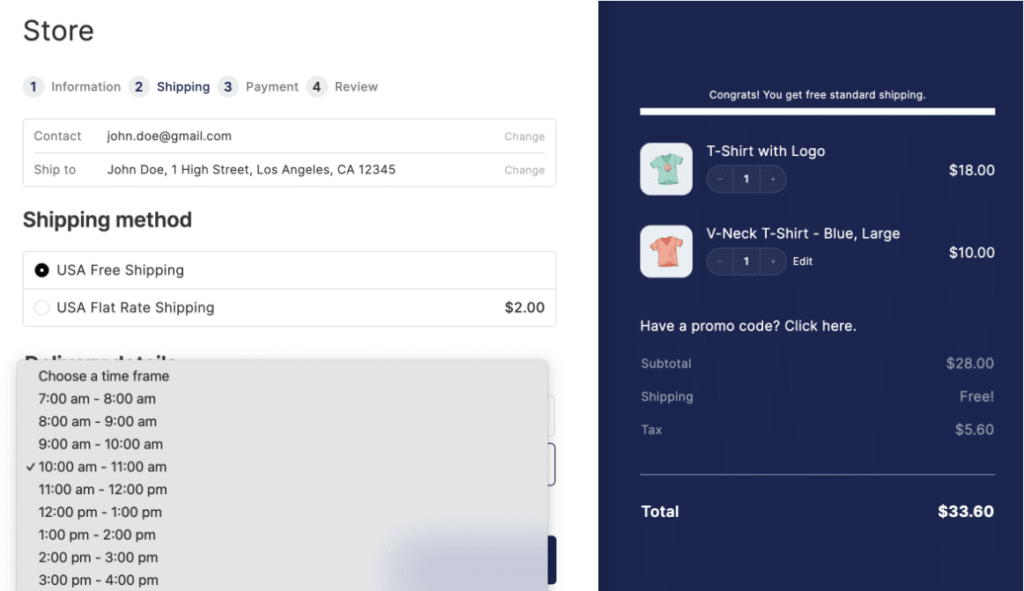
Time Frames (Your Time Slots)
This is where you create the selectable time slots at checkout.
Instead of manually creating each slot, you can use frequency-based time frames:
Example:
- Start: 09:00
- End: 17:00
- Frequency: 60 minutes
This automatically creates:
- 09:00-10:00
- 10:00-11:00
- etc.
What You Can Control Per Time Frame
Each time frame can include:
- Order limits: cap how many orders per slot
- Shipping method restrictions: e.g. time frame is only for specific shipping methods
- Extra fees: charge for premium slots
- Assigned days: choose which days the slot applies to
This gives you precise control over capacity and pricing.
Advanced Delivery Ranges (Optional)
If you offer multiple shipping speeds (e.g. standard vs express), you can define different delivery windows:
- Express: 1-2 days
- Standard: 3-5 days
These ranges:
- Control which dates are available
- Ensure accurate delivery estimates per shipping method
Disable Specific Dates
Just like in Picking, you can block out delivery/pickup dates:
- Holidays
- Fully booked days
- One-off closures
These dates are automatically removed from the calendar.
Step 6: Tips
The Tips section lets you offer optional tipping at checkout.
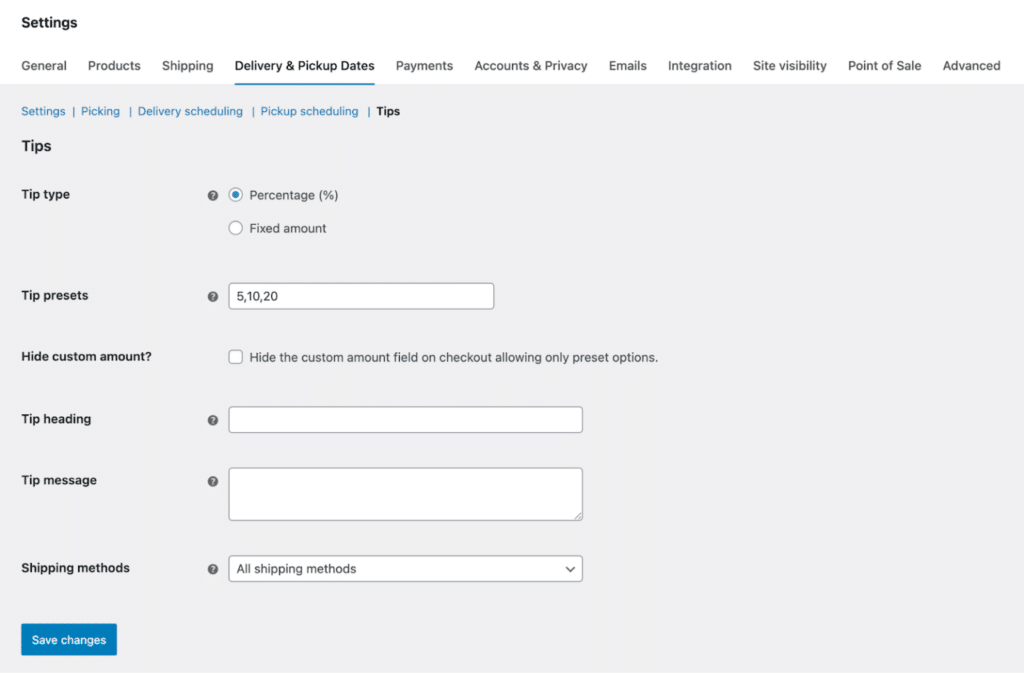
You can configure:
- Fixed or percentage-based tips
- Preset amounts (e.g. 5, 10, 20)
- Whether custom tips are allowed
- Which shipping methods tips apply to
This is especially useful for:
- Food delivery
- Local services
- Courier-style businesses
What Happens After Checkout
Once a customer selects a delivery or pickup date:
- The details appear in order confirmation emails
- Customers can view them in their account
- You’ll see them in the WooCommerce admin
You also get:
- Delivery/pickup columns in the orders list
- Filtering by delivery/pickup or shipping date
- Editable delivery/pickup details on each order
This makes managing scheduled orders much easier at scale.
Final Thoughts
Adding delivery and pickup date/time selection to your checkout isn’t just a UX improvement – it’s a fundamental upgrade to how your store operates.
With Order Delivery for WooCommerce, you get a powerful, flexible system for managing availability, time slots, and order flow without relying on fragile custom fields or workarounds.
And while it works perfectly well with the default WooCommerce checkout, pairing it with CheckoutWC takes things a step further.
You get:
- A cleaner, more intuitive checkout layout
- Better visibility for delivery/pickup selection
- A smoother mobile experience
- And ultimately, higher conversion rates
If you’re already using the CheckoutWC Pro plan, you already have access to Order Delivery – making this one of the highest-impact features you can enable in just a few minutes.
If not, you can purchase Order Delivery for WooCommerce as a standalone extension and use it with any WooCommerce checkout.
Either way, once it’s set up properly, you’ll spend less time managing delivery issues – and more time fulfilling orders efficiently.