Google address autocomplete suggests complete addresses as customers start typing on your WooCommerce checkout, so they fill it in faster and with fewer mistakes. To set it up, add a Google API key under CheckoutWC » Integrations, then turn on Enable Google Address Autocomplete under CheckoutWC » Pages.
CheckoutWC can use Google or Fetchify for suggestions; both need an account with that service. Without either, CheckoutWC can still fill in the city and state from a postcode.
Until Google autocomplete is set up, a Faster address entry card on CheckoutWC » Dashboard takes you to the next step: Set up Google autocomplete opens the Google API key setting, and once a key is saved, Turn on Google autocomplete opens the switch under CheckoutWC » Pages.
When you’d use this
- Customers mistype addresses and orders arrive with wrong or incomplete ones.
- Most of your customers check out on their phones, where typing a full address is slow.
- You want to check addresses as well as suggest them; for that, see Smarty address validation, which works alongside either service.
Set up Google address autocomplete
Before you start
You need a Google Cloud project with billing turned on, and these APIs enabled on it:
- Maps JavaScript API
- The Places API you plan to use, Places API (New) or the legacy Places API (see Use Places API (New) unless your project is older)
The same API key also powers the map on the thank you page, so if you use that map, enable the Geocoding API too.
1. Add your Google API key
Go to CheckoutWC » Integrations and, under Google API, enter your key in Google API Key. Under Google Places API Version, keep Places API (New) – recommended unless your Google Cloud project only has the legacy API. Click Check Key to test it, then Save Changes.
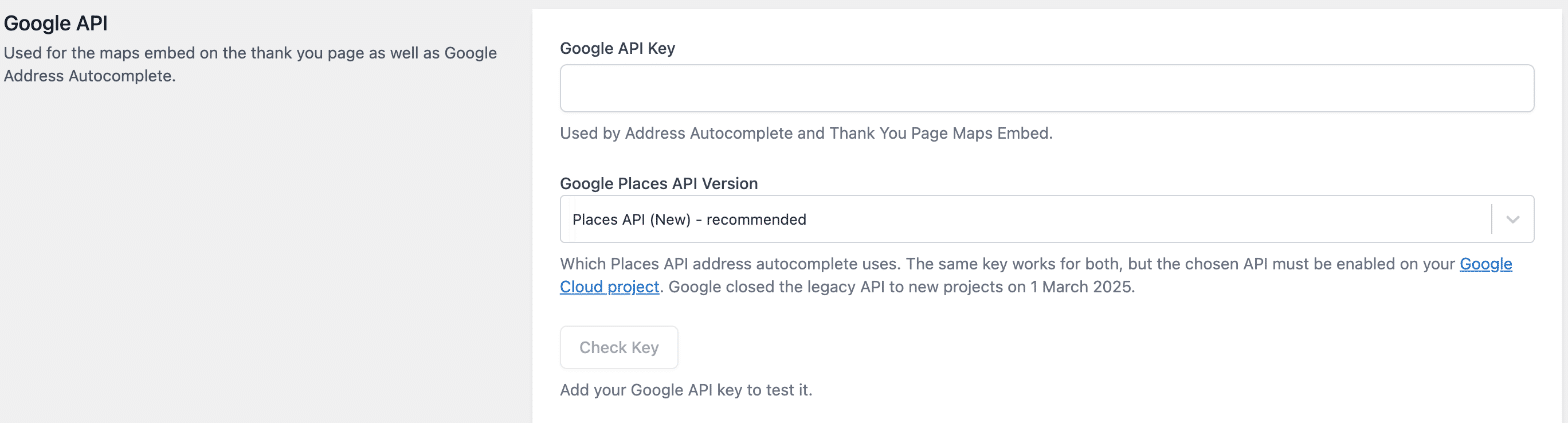
If you don’t have a key yet, see Get and configure your Google API key.
2. Turn on autocomplete
Go to CheckoutWC » Pages, open the Checkout tab and, under Address Completion and Validation, turn on Enable Google Address Autocomplete. Click Save Changes.
3. Test it
Go to your checkout and start typing an address. Suggestions appear after the first few characters. Picking one fills in the address fields.
What it fills in
Picking a suggestion fills in the street address, city, state or province, postcode and country. Address 2 (apartment, suite and so on) is cleared when a suggestion is picked, so an old unit number isn’t left next to a new street. For the United Kingdom, New Zealand and Taiwan, CheckoutWC may fill Address 2 from the suggestion, and it then opens the Address 2 field so the customer can see it. In every other country, customers type their unit number after picking a suggestion.
Autocomplete works on the billing address, and on the shipping address when the order needs shipping.
Set up Fetchify address autocomplete
Fetchify is an address lookup service, and you need a Fetchify account to use it. To use it instead of Google:
- Get an access token from your Fetchify account.
- Go to CheckoutWC » Pages, open the Checkout tab and, under Address Completion and Validation, turn on Enable Fetchify Address Autocomplete.
- Paste the token into Fetchify Access Token and click Save Changes.
At checkout, Fetchify adds an address search box headed “Search for your address”. The address fields stay collapsed until the customer picks a result or clicks “Or enter address manually.”
Only one autocomplete service can run at a time. If both are on, the settings screen shows “You can only use one address autocomplete service at a time. Please disable one of the services.”
Postcode lookup
When a customer enters a postcode, CheckoutWC fills in the state, and also the city when the postcode belongs to one place. It works without any setup, using the free Zippopotam.us service, which receives the postcode and country. It isn’t used for the United Kingdom, Canada, the Netherlands or Belgium, and it turns off when Google or Fetchify autocomplete is on.
To turn it off, developers can add this snippet in the PHP Snippets box (CheckoutWC » Advanced, Scripts tab) or a code snippets plugin:
add_filter( 'cfw_enable_zip_autocomplete', '__return_false' );
Limit suggestions to certain countries
There’s no setting for this, but developers can limit Google’s suggestions with two filters, one for each address. Each takes a list of country codes. Use the two-letter codes from the ISO 3166-1 alpha-2 standard; upper or lower case both work. The United Kingdom is GB, not UK.
add_filter( 'cfw_address_autocomplete_shipping_countries', function () {
    return array( 'US', 'CA' );
} );

add_filter( 'cfw_address_autocomplete_billing_countries', function () {
    return array( 'US', 'CA' );
} );
Google limits how many countries you can list: up to 15 with Places API (New), and 5 with the legacy API. These filters apply to Google only, and they change only which addresses are suggested. Customers can still type any address and choose any country your store sells to.
Add the snippet in the PHP Snippets box (CheckoutWC » Advanced, Scripts tab), a child theme’s functions.php or a code snippets plugin.
Common issues
No suggestions appear
- Go to CheckoutWC » Integrations and click Check Key. It tests your key the way the checkout uses it and tells you what’s wrong, for example “Places API (New) is not enabled on this project, so address autocomplete is not working.”
- Check that Enable Google Address Autocomplete is on and saved.
- Check that Google Places API Version matches the API enabled on your Google Cloud project. Google closed the legacy API to projects created after 1 March 2025, so newer projects need Places API (New) – recommended.
- Check that Fetchify autocomplete is off. Only one service can run at a time, and Check Key tells you if both are on.
- Open your browser’s developer tools on the checkout and look in the console for a message that starts “CheckoutWC:” or comes from Google. The next sections explain the common ones.
- With Places API (New), the address field looks normal when something is wrong. It just shows no suggestions.
Google’s error names in the console
When Google rejects your key, the console shows an error with one of these names:
| Error | What it means | Fix |
|---|---|---|
RefererNotAllowedMapError |
Your store’s address isn’t in the key’s allowed websites. The error shows the address that needs adding. | Add your store’s domain to the key’s website restrictions in the Google Cloud console. |
ApiNotActivatedMapError |
The Maps JavaScript API isn’t enabled on your Google Cloud project. | Enable it on the project. |
BillingNotEnabledMapError |
Billing isn’t turned on for your Google Cloud project. | Turn on billing for the project. |
InvalidKeyMapError |
Google can’t find the key, usually because it was copied incompletely. | Copy the whole key again into Google API Key and save. |
ApiTargetBlockedMapError |
The key’s API restrictions leave out an API CheckoutWC needs. | Add the missing APIs to the key’s API restrictions. |
“Google Places API (New) request failed”
With Places API (New), CheckoutWC writes this to the console when Google refuses a suggestion request. It usually means Places API (New) isn’t enabled on your Google Cloud project, or isn’t in the key’s allowed APIs. Enable it in both places, or switch Google Places API Version to Places API (Legacy) if your project can use it.
The key needs the right APIs, on the project and on the key
If you restricted the key to certain APIs, allow the Maps JavaScript API, the Places API your store uses and, for the thank you page map, the Geocoding API. Then check the same APIs are enabled on the Google Cloud project itself. Billing must be on for the project as well.
Check Key passes but the checkout shows no suggestions
Check Key runs in your admin, not on your checkout. If a performance plugin such as Perfmatters is set to block Google Maps, the check can pass while the checkout page still blocks it. Allow Google Maps on the checkout page in that plugin’s settings.
If you change the key and run Check Key again, refresh the page first. Google Maps can only load one key per page.
“Google refused this key for this site.”
Check Key shows this when Google rejects the key, usually because its website restrictions don’t include your store’s address. In the Google Cloud console, add your site to the key’s allowed websites.
Autocomplete doesn’t work with separate house number and street fields
Google autocomplete can’t be used together with Enable Separate House Number and Street Name Address Fields. The settings screen warns “Google Address Autocomplete cannot be used with Separate Address Fields.” While separate fields are on, Google autocomplete stays off. Choose the one that matters more to your customers.
Suggestions are in the wrong language
Google returns suggestions in your site’s language. Change it under Settings » General » Site Language.
Cost, API version and mobile
Google bills the requests, not CheckoutWC
CheckoutWC doesn’t charge extra for address autocomplete. Google bills the Google Cloud project that owns your key for the requests, and it asks you to turn on billing for the project. What you pay depends on how many searches your customers run and on Google’s current rates, so check Google’s pricing page. With Places API (New), CheckoutWC waits until the customer has typed three characters and paused, and groups each search into one Google session, which keeps the number of billable requests down. Restricting the key to your site’s address also stops other sites from using it.
Use Places API (New) unless your project is older
Places API (New) is the recommended choice, and new CheckoutWC installs start on it. Google closed the legacy API to Google Cloud projects created after 1 March 2025, so a newer project can only use Places API (New). Stores that were already using autocomplete before the setting existed stay on Places API (Legacy) until you change Google Places API Version under CheckoutWC » Integrations. The two look slightly different at checkout: Legacy shows Google’s own suggestion list, while with Places API (New) CheckoutWC draws the list and supports the arrow keys, Enter and Escape. Whichever you choose must be enabled on your Google Cloud project and, if you restricted the key’s APIs, allowed on the key.
Autocomplete works the same on mobile
There’s no separate mobile setting. Autocomplete runs on any device that loads the checkout, with the same key, settings and suggestions.
Separate house number and street fields turn it off
Google autocomplete and Enable Separate House Number and Street Name Address Fields can’t be used together; see Autocomplete doesn’t work with separate house number and street fields.