CheckoutWC is a WordPress plugin that runs on your store, not a hosted checkout. It replaces WooCommerce’s checkout, order pay and thank you pages with its own, on your own site.
Most WooCommerce plugins work with CheckoutWC without any setup. CheckoutWC uses WooCommerce’s own checkout underneath, so plugins that add fees, change prices, add fields through WooCommerce, or process orders keep working. For about 120 popular plugins, CheckoutWC also includes adjustments that run automatically when the plugin is active, such as moving the plugin’s checkbox or picker to the right step.
For themes, see CheckoutWC theme compatibility. For payment gateways, see Payment gateway compatibility. For caching and optimization plugins, see Fix caching and hosting conflicts.
How CheckoutWC works with other plugins
CheckoutWC splits the checkout into steps: Information, Shipping and Payment. It runs WooCommerce’s checkout hooks in those steps, so most plugin output appears in a sensible place. Two WooCommerce hooks are the exception:
- Output on
woocommerce_checkout_before_customer_detailsis not shown. - Output on
woocommerce_checkout_after_customer_detailsis hidden.
If a plugin’s checkbox, form or message is missing on the CheckoutWC checkout, it’s usually on one of these. If the plugin lets you choose where its output goes, pick another location or a CheckoutWC hook. See Place a plugin’s output with a CheckoutWC hook.
If a plugin isn’t working, compare with WooCommerce’s own checkout by adding ?bypass-cfw=true to your checkout URL. That bypasses CheckoutWC for that page load only, just for you. If it works there and not on CheckoutWC’s checkout, contact support with the plugin’s name and version.
Kestrel’s own WooCommerce extensions are built to work with CheckoutWC. If one doesn’t, contact support.
Block checkout
CheckoutWC replaces your WooCommerce checkout whether the checkout page is built with the classic checkout shortcode or WooCommerce’s Checkout block. If the page uses the block, CheckoutWC shows its own checkout in its place and ignores the block, so you don’t need to edit the page or switch it back to the shortcode. Plugins see the page as the classic checkout.
The block is replaced, not extended, so a payment method that only works in the block won’t appear. To compare with WooCommerce’s own checkout, add ?bypass-cfw=true to your checkout URL.
Payment gateways
Most gateways work without setup; see Payment gateway compatibility. Two that people ask about:
- WooPayments: supported. CheckoutWC moves WooPayments’ express checkout buttons, such as Apple Pay and Google Pay, to the top of the checkout. Turn the buttons on in WooPayments’ settings under Express checkouts.
- WooCommerce Stripe Gateway: supported with version 4.0.0 or later. The express buttons need the checkout page among the gateway’s express checkout locations.
For the full list of express buttons, see Set up express checkout.
Order bumps and product plugins
An order bump adds its product to the cart with a quantity and, for a variable product, a variation. It can’t collect anything else from the customer. A product that needs extra input before it can be bought, such as a Product Add-ons field or a Name Your Price amount, can’t be offered as an order bump; use a product without them.
Email, SMS and marketing opt-ins
Klaviyo
CheckoutWC shows Klaviyo’s newsletter checkbox, and its SMS consent checkbox if you use one, just above the button at the bottom of the Payment step. It needs Klaviyo for WooCommerce 2.4.1 or later. Checkboxes keep the default you set in Klaviyo.
To move them, return a different hook from the cfw_klaviyo_output_hook filter. For example, to show them under the account details on the Information step, add this under CheckoutWC » Advanced » Scripts » PHP Snippets:
add_filter( 'cfw_klaviyo_output_hook', function() {
    return 'cfw_after_customer_info_account_details';
} );
MailerLite
CheckoutWC follows the position you choose in MailerLite’s checkout settings and places the checkbox on the matching step:
- Below the email field or after the customer details: on the Information step, under the account details.
- In the shipping section: on the Information step, after the address.
- In the billing section (MailerLite’s default): on the Payment step, after the billing address.
MailerLite’s option names may differ slightly. You can also hide the checkbox in MailerLite’s settings.
Mailchimp for WooCommerce
Mailchimp’s default checkbox location doesn’t show on the CheckoutWC checkout. In Mailchimp’s settings, under Audience Defaults, set the checkbox’s action hook to cfw_checkout_before_payment_method_tab_nav. That puts it just above the button at the bottom of the Payment step. To put it under the account details on the Information step instead, use cfw_after_customer_info_account_details.

Once someone subscribes, Mailchimp stops showing them the checkbox, so test in a private window.
ActiveCampaign and ConvertKit
CheckoutWC moves ActiveCampaign for WooCommerce’s opt-in to just above the button at the bottom of the Payment step, and shows ConvertKit’s opt-in after the billing fields. Nothing to set.
SMS for WooCommerce
In SMS for WooCommerce’s settings, set the opt-in checkbox location to After shipping address. See Zorem’s CheckoutWC guide. That location only shows on orders that need shipping.
Delivery dates, pickup points and carriers
Iconic Delivery Slots
With WooCommerce Delivery Slots by Iconic active, its Checkout Fields Position setting has an extra choice: CheckoutWC: After shipping methods. Choose it and save, and the delivery slots appear below the shipping methods on the Shipping step.

The slots don’t show when the Shipping step is skipped:
- If Disable Shipping Step is on under CheckoutWC » Pages, turn it off.
- With local pickup, choosing pickup skips the Shipping step. To let pickup customers choose a slot, turn on Enable Pickup Step in the local pickup settings.
Other delivery date plugins
CheckoutWC moves the date picker of these plugins to the Shipping step, after the shipping methods: Coderockz Woo Delivery, Order Delivery Date (Pro and Lite), WooCommerce Order Delivery (before version 4.0) and YITH Delivery Date. The same Shipping step and pickup step notes apply.
Pickup points and carriers
CheckoutWC adjusts for these shipping and carrier plugins, for example by moving pickup point pickers to the Shipping step or splitting street and house number fields: MyParcel, PostNL, Sendcloud, Shipmondo (formerly Pakkelabels), Mondial Relay, Webshipper, Pakettikauppa, Carrier Agents, DPD Portugal pickup, VASP Kios, WC Pont, BigBlue, Route, Chronopost, Kangu, Use My Shipper, WooCommerce Shipping & Tax and WooCommerce Shipment Tracking.
Gift cards, coupons and loyalty
PW WooCommerce Gift Cards (Pimwick)
CheckoutWC places the gift card box at the top of the checkout, whatever location you choose in the plugin. Nothing to set. Older articles recommended a particular location setting; that’s no longer needed.
IgniteWoo Gift Certificates
The recipient details form doesn’t show on the CheckoutWC checkout by default. To show it with the billing address, add this under PHP Snippets:
add_action( 'wp', function() {
    global $ignite_gift_certs;
    if ( ! $ignite_gift_certs ) {
        return;
    }
    remove_action( 'woocommerce_checkout_after_customer_details', array( $ignite_gift_certs, 'recipient_detail_form' ), 999 );
    add_action( 'cfw_checkout_after_billing_address', array( $ignite_gift_certs, 'recipient_detail_form' ) );
} );
The form then appears after the billing address on the Payment step, or on the Information step for orders that don’t need shipping.
Other gift card, coupon and loyalty plugins
CheckoutWC also adjusts for WooCommerce Gift Cards and Advanced Coupons (in the coupon area), Smart Coupons, Extended Coupon Features Pro, Free Gifts for WooCommerce, WooCommerce Points and Rewards, YITH Points and Rewards and WPLoyalty.
Tax and VAT numbers
CheckoutWC supports three EU VAT plugins and places the VAT number field automatically:
- EU VAT Number (WooCommerce): on the Payment step, under “Same as shipping address”. CheckoutWC shows or hides it as the customer changes country.
- Aelia EU VAT Assistant: on the Payment step, after the billing address, for orders that need shipping.
- EU/UK VAT Compliance Premium: on the Information step.
For orders that don’t need shipping, the billing address and its VAT field are on the Information step.
On the Payment step, the field follows the billing address. When the billing address is the same as the shipping address, the VAT field shows or hides based on the shipping country. Whether a customer needs to give a VAT number is a question for your tax adviser.
CheckoutWC also adjusts for NIF Portugal, Fatture in Cloud, Woo Finvoicer, Extra Checkout Fields for Brazil, Germanized and German Market.
Subscriptions and deposits
WooCommerce Subscriptions
CheckoutWC adjusts for WooCommerce Subscriptions automatically:
- Customers must create an account when the cart has a subscription.
- The Shipping step is skipped for carts with only a free trial.
- The change payment method page uses WooCommerce’s own template, not CheckoutWC’s.
- Customers can change a subscription’s variation in the cart summary when Allow Variation Changes is on under CheckoutWC » Pages.
Changing a variation at checkout used to empty the cart unless the Subscriptions “mixed checkout” setting was on. CheckoutWC 11.1.3 fixed that, so you don’t need to change it. If you’re on an older version, update CheckoutWC.
CheckoutWC also adjusts for Subscription Gifting, All Products for Subscriptions, SUMO Subscriptions and WooCommerce Memberships.
WooCommerce Deposits
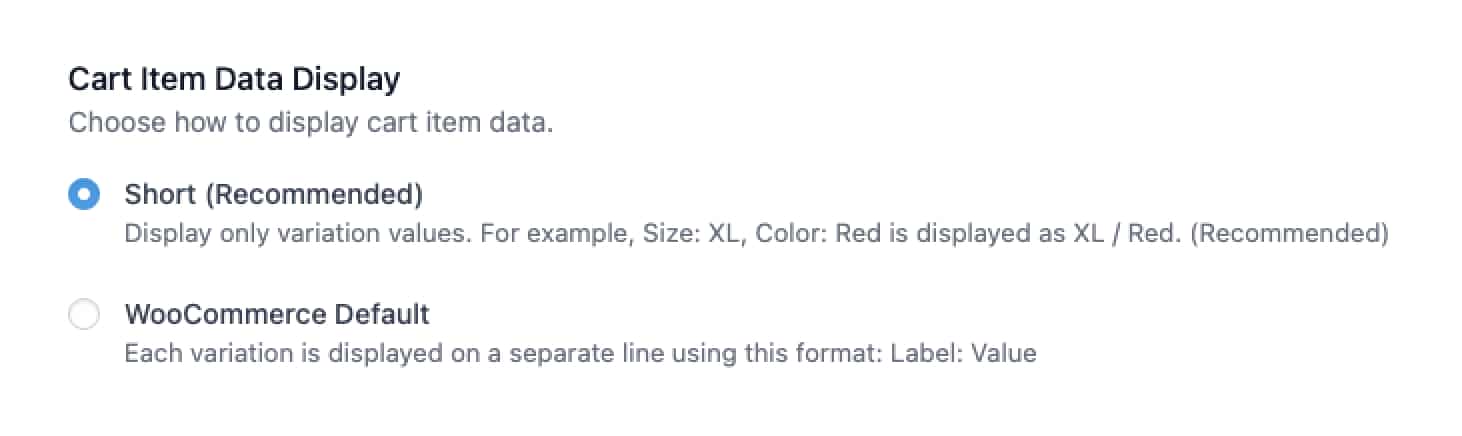
By default, CheckoutWC shows cart item details, such as variations and deposit details, in a short format. With a deposits plugin, that can make the deposit details hard to read. To show each detail on its own line, set Cart Item Data Display to WooCommerce Default. It’s under CheckoutWC » Pages, on the Global Options tab, in the Cart Summary section, and also in the Checkout Editor’s Cart Summary section.
Place a plugin’s output with a CheckoutWC hook
Many plugins let you choose an action hook for their output. These CheckoutWC hooks are good choices:
| Where it appears | Hook |
|---|---|
| Information step, under the email field | cfw_checkout_after_email |
| Information step, under the account details and “Create account” checkbox | cfw_after_customer_info_account_details |
| Information step, after the shipping address (orders that need shipping) | cfw_checkout_after_shipping_address |
| Shipping step, after the shipping methods | cfw_checkout_after_shipping_methods |
| Payment step, after the billing address | cfw_checkout_after_billing_address |
| Payment step, before the payment methods | cfw_checkout_before_payment_methods |
| Payment step, just above the button at the bottom | cfw_checkout_before_payment_method_tab_nav |
The hook cfw_checkout_after_login, used in older articles, was removed in CheckoutWC 7.0. Use cfw_after_customer_info_account_details instead.
For every hook, see the hooks reference.
Social login buttons
CheckoutWC’s login window, opened from the “Log in.” link on the Information step, runs WooCommerce’s own login form hooks. Many social login plugins add their buttons to WooCommerce’s login form, so they appear there without any setup. The login prompt only shows when Enable log-in during checkout is on under WooCommerce » Settings » Accounts & Privacy.
If your social login plugin lets you choose a custom hook, such as WooCommerce Social Login’s custom hooks setting, cfw_after_customer_info_account_details puts the buttons under the account details on the Information step.
Plugins CheckoutWC adjusts automatically
When one of these plugins is active, CheckoutWC adjusts for it. There’s nothing to turn on, except where a setting is named. A plugin that isn’t listed should still work.
- Email and marketing: Klaviyo, MailerLite, ActiveCampaign, ConvertKit, Pixel Caffeine, WooCommerce Mixpanel, Google Analytics Pro (before version 2.0), Ultimate Affiliate Pro, Reviewbird (review badges), Facebook for WooCommerce (its Initiate Checkout event fires on the CheckoutWC checkout), Enhanced Ecommerce Google Analytics (its checkout step tracking fires on the three steps).
- Delivery and shipping: listed under Delivery dates, pickup points and carriers.
- Gift cards, coupons and loyalty: listed under Gift cards, coupons and loyalty. Ultimate Rewards Points (Points and Rewards by MakeWebBetter) also has its apply points box shown at the top of the checkout.
- Tax and VAT: listed under Tax and VAT numbers.
- Subscriptions and payments: WooCommerce Subscriptions, Subscription Gifting, All Products for Subscriptions, SUMO Subscriptions, SUMO Payment Plans, myCred Partial Payments, WooCommerce Memberships.
- Checkout fields: WooCommerce Checkout Field Editor, ThemeHigh Checkout Field Editor (free and Pro), Checkout Manager, WC Fields Factory, WooCommerce Checkout Add-Ons, Cashier, WooCommerce Advanced Messages. The field editors have optional address field settings under CheckoutWC » Integrations; see Add custom checkout fields.
- Passwordless login: OwnID, with its widget set up for CheckoutWC’s login.
- Funnels and upsells: CartFlows (a “Use CheckoutWC template?” option on each CartFlows checkout), WooCommerce One Page Checkout, WooFunnels Order Bumps, Upsell Order Bump Offer, One Click Upsells for WooCommerce (its Apple Pay and PayPal buttons show at the top of the checkout), phone order plugins.
- Addresses: NL Postcode Checker, WooCommerce Address Validation (with the Smarty provider), Saved Addresses for WooCommerce, Checkout Address Autocomplete, Crafty Clicks Postcode Lookup (its lookup loads on the Information step).
- Products and cart: Product Bundles, WPC Product Bundles, YITH Composite Products, Product Recommendations (side cart location), Quantity Discounts & Pricing, Donation for WooCommerce, WooCommerce Tipping, Tickera, Apply Online, NextGEN Gallery, CO2OK.
- Currency and translation: Aelia Currency Switcher, CURCY, WOOMC Multi Currency and Price Based on Country (order bump prices), WPML, Polylang, TranslatePress, Weglot.
- Builders, caching and hosting: see theme compatibility and caching and hosting conflicts.