Custom Free Shipping Rules in WooCommerce

Table of Contents
- When and how to offer free shipping without losing money
- How to set up free shipping with a minimum spend threshold in WooCommerce
- Coupon-based free shipping method
- Product-specific free shipping setup
- Enhance customer experience with CheckoutWC's free shipping progress bar
- How it works
- Seamless integration with WooCommerce
- Setting it up is simple
- Solving the top 5 WooCommerce free shipping problems
- 1. Conflicting shipping calculations
- 2. Cart abandonment before reaching thresholds
- 3. Products that shouldn't ship free
- 4. International shipping cost challenges
- 5. Too many shipping options causing decision paralysis
- Combine free shipping with checkout optimization for better results
Setting up free shipping in WooCommerce might seem like navigating a maze without a map. One wrong turn with your shipping rules can confuse customers or eat into your profits.
Take a deep breath – this guide breaks down everything you need to know with step-by-step instructions that won’t leave you scratching your head.
You’ll learn how to set up three powerful free shipping methods:
- Free shipping based on minimum cart totals (the classic “spend $50, get free shipping”).
- Coupon-activated free shipping that rewards specific customer actions.
- Product-specific free shipping for your high-margin items.
Plus, you’ll discover how to pair these methods with checkout optimization tools like progress bars to boost your average order value.
By the time you finish reading, you’ll have practical, ready-to-implement strategies for free shipping that increase sales without sacrificing your bottom line. Let’s get started!
When and how to offer free shipping without losing money
Free shipping is universally loved, but it can take a bite out of your profits if not done strategically. Here’s how to make free shipping work for your store’s bottom line:
- Set minimum purchase thresholds slightly above your average order value – this nudges customers to add one more item to their cart. If your customers typically spend $45, try setting your free shipping at $59.
- Pair free shipping with smart product recommendations. When a customer adds a $40 item to their cart, suggest complementary products that would push them over your free shipping threshold.
- Offer free shipping as a limited-time promotion during sales events or holidays. The fear of missing out drives quick purchasing decisions and creates urgency.
- Reserve free shipping for your VIP customers or first-time buyers to build loyalty or make a strong first impression.
- Make it a membership perk with solutions like Constellation, turning shipping costs into a subscription benefit.
- Limit free shipping to locations close to your warehouse or to high-margin products that can absorb the shipping cost.
- Use free shipping strategically on clearance items – it helps move stagnant inventory while delighting customers with a double discount.
How to set up free shipping with a minimum spend threshold in WooCommerce
If you’re looking to boost your average order values without complicated setup, free shipping with a minimum spend is your ticket. WooCommerce makes this easy through its shipping zone system – let’s walk through it step by step.
- Navigate to WooCommerce > Settings > Shipping.
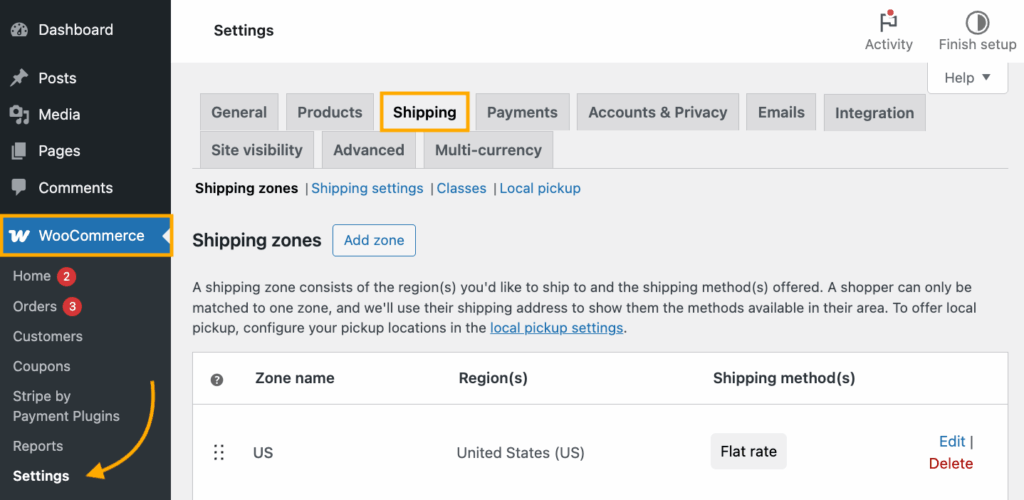
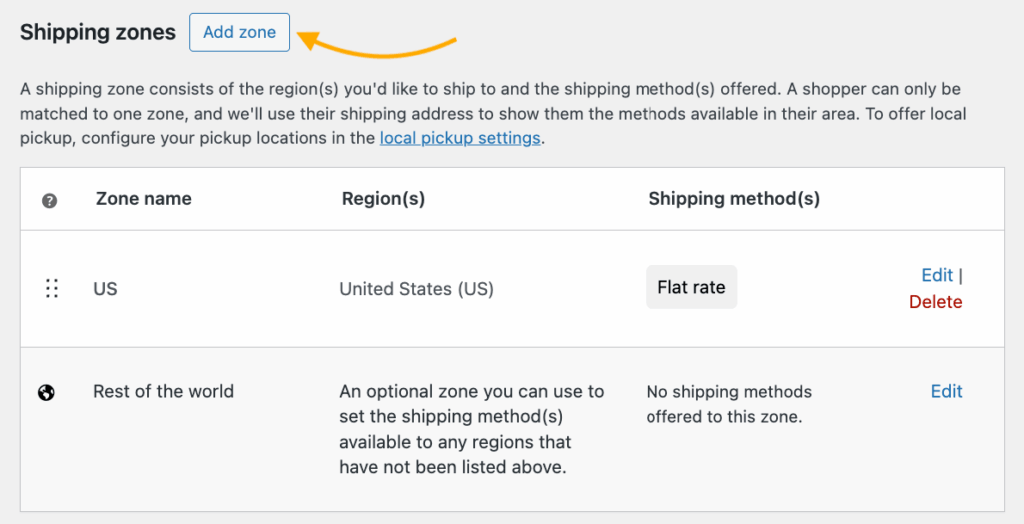
- Select an existing shipping zone or click Add zone to create a new one.
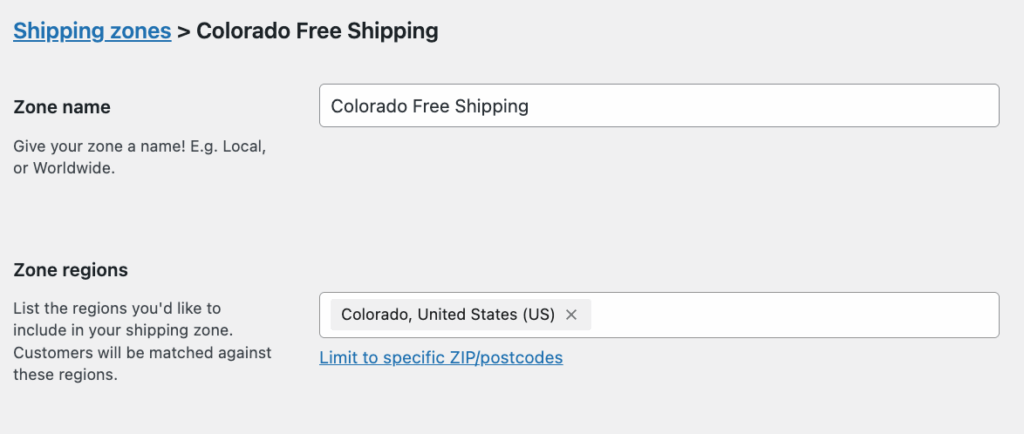
- Give your zone a descriptive name (like “Colorado Free Shipping”) and select the regions where this shipping rule applies. You can choose entire countries, states, or even specific zip codes.
- Click Add shipping method and select Free shipping.
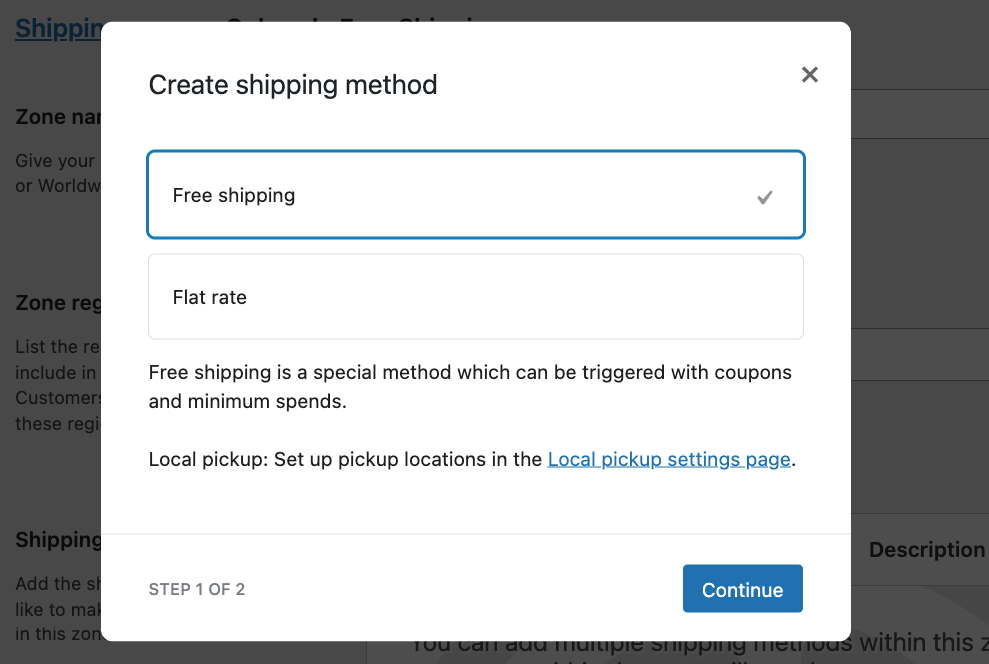
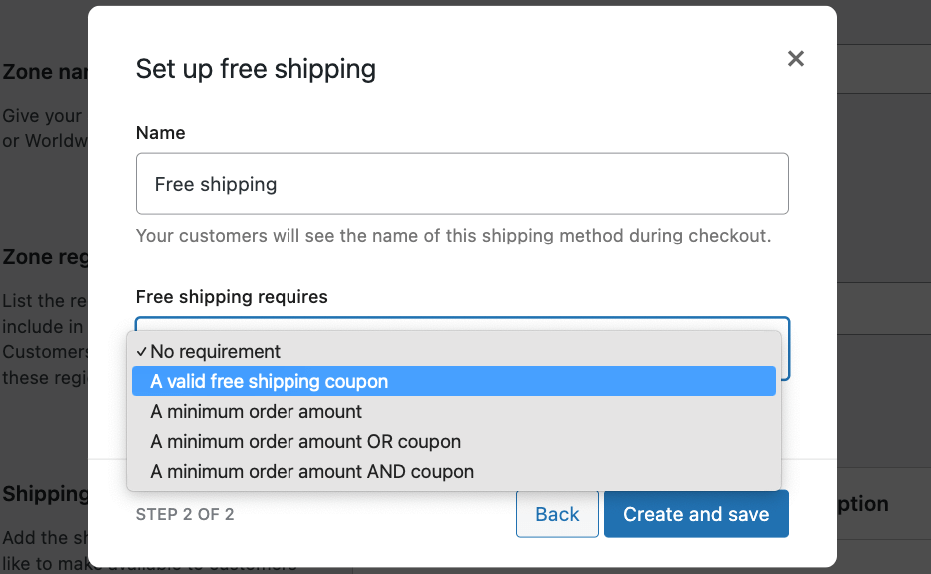
- Now for the magic part – select your free shipping requirement:
- No requirement (free shipping for everyone)
- Valid free shipping coupon (customer needs a coupon)
- Minimum order amount (they need to spend a certain amount)
- Minimum order amount OR valid coupon (either will work)
- Minimum order amount AND valid coupon (need both)
- If you choose any option with a minimum amount, enter your threshold and decide whether this amount applies before or after coupon discounts are applied.

- Click Create and save.
| 🤓Pro tip: Set your threshold about 10-15% above your current average order value. If your customers typically spend $45, try a $59 threshold – this encourages them to add “just one more item” to qualify. |
For different geographic areas, create additional shipping zones with tailored thresholds. Many stores use higher minimums for international shipping or exclude free shipping entirely for distant regions where costs are prohibitive.
Don’t set it and forget it! Monitor your data after implementation and adjust thresholds based on customer behavior and profit margins.
Coupon-based free shipping method
Want to reward specific customer actions or run a targeted promotion? Coupon-based free shipping gives you this flexibility without permanent discounts. Here’s how to set it up in just a few clicks:
First, you’ll need to prepare WooCommerce to accept free shipping coupons:
- Go to WooCommerce > Settings > Shipping and select the shipping zone where you want the coupon to work.
- Click Add shipping method and select Free shipping.
- When configuring this method, select “A valid free shipping coupon” from the dropdown menu.
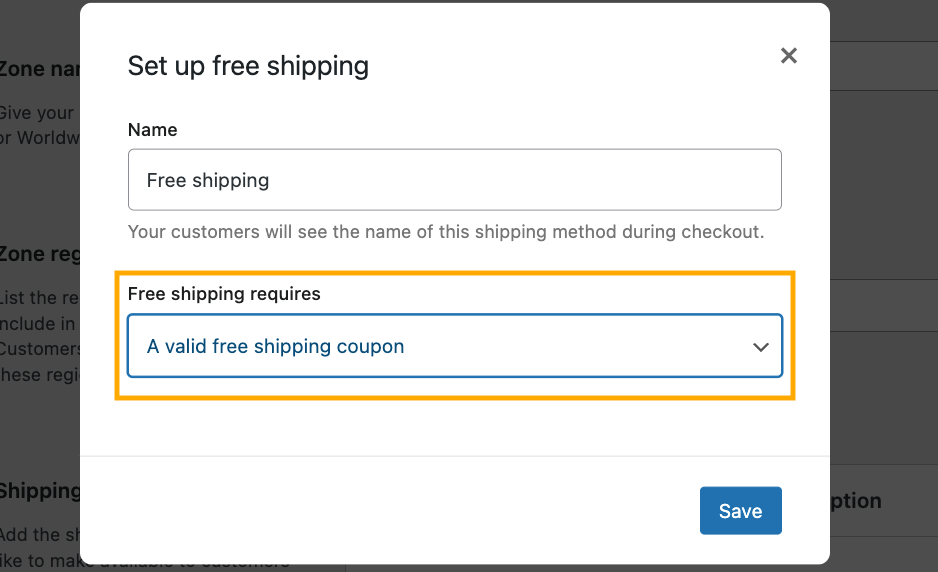
- Click Save changes.
Now, create the coupon your customers will use:
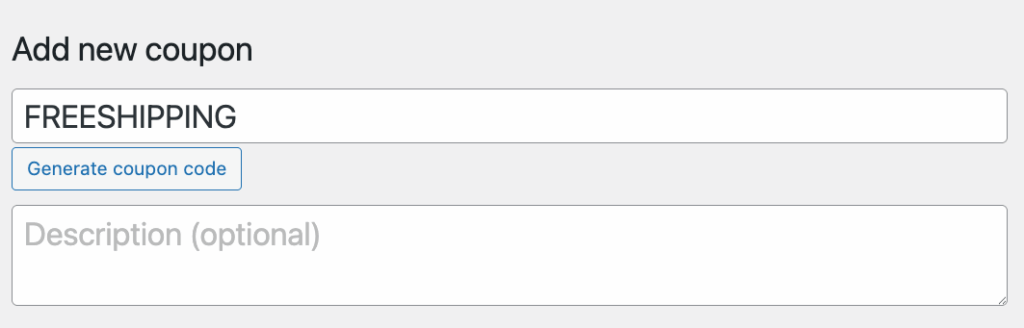
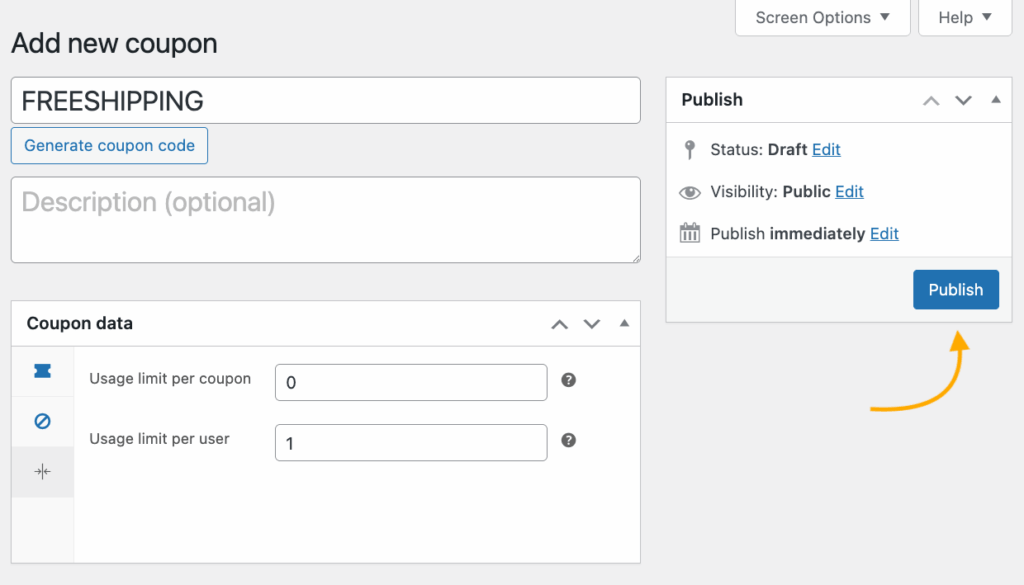
- Navigate to Marketing > Coupons > Add new coupon.
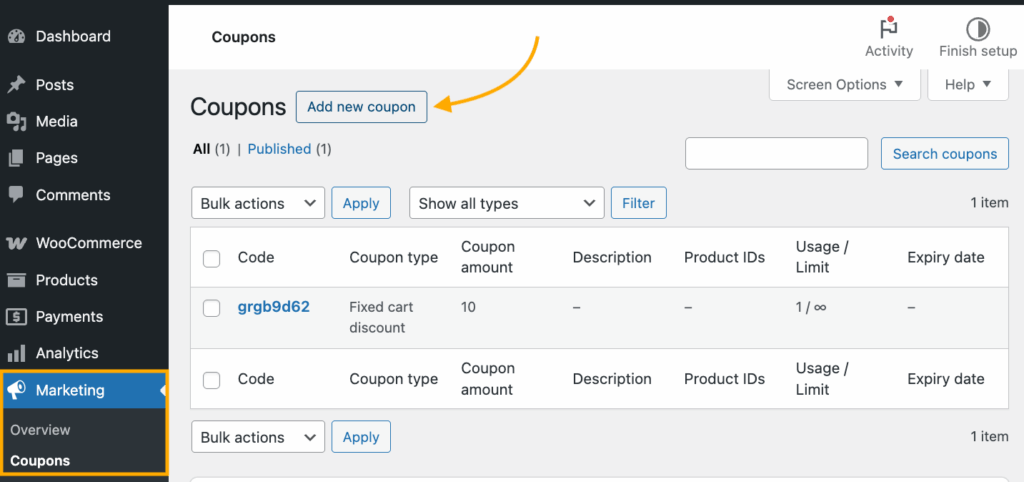
- Enter a memorable code like FREESHIPPING (all caps makes it more noticeable).
- Under the Coupon data section, find and check the “Allow free shipping” option. This is what links your coupon to the shipping method you just created.
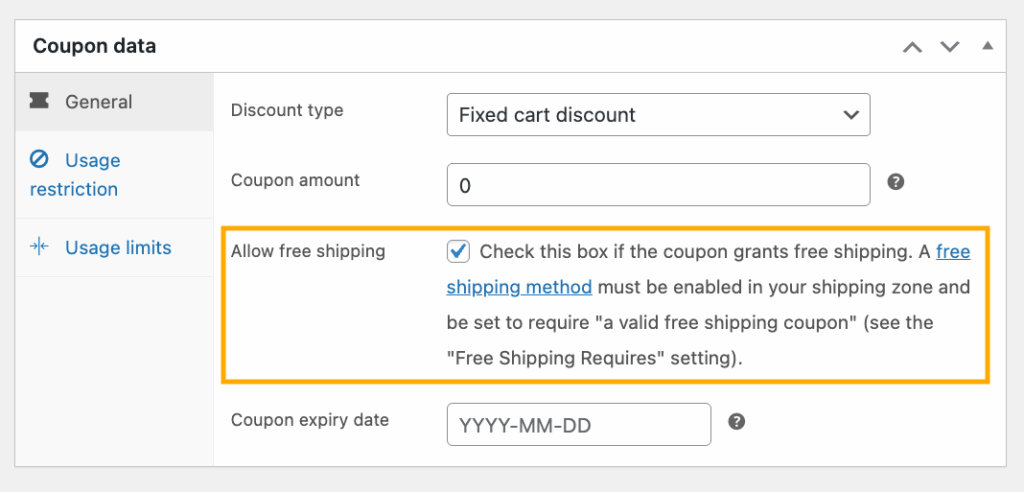
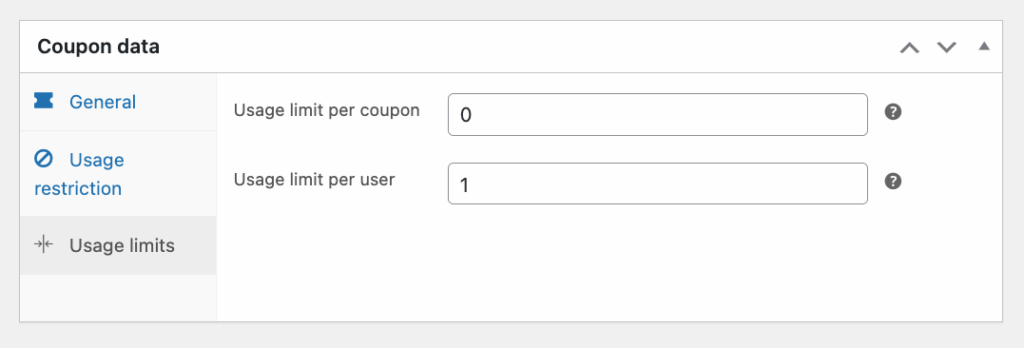
- Add any other restrictions if needed – maybe you want the coupon to expire after a certain date or limit usage to once per customer.
- Click Publish to activate your coupon.
That’s it! When customers enter this code at checkout, shipping fees magically disappear – but only for those who have the special code.
This method works brilliantly for email campaigns, social media promotions, or rewarding returning customers with a little something extra.
Product-specific free shipping setup
Want to offer free shipping on just your high-margin items or bestsellers? Product-specific free shipping lets you strategically waive shipping costs without applying blanket rules to your entire store.
Setting this up requires shipping classes – WooCommerce’s way of grouping products with similar shipping needs. Here’s how to make it happen:
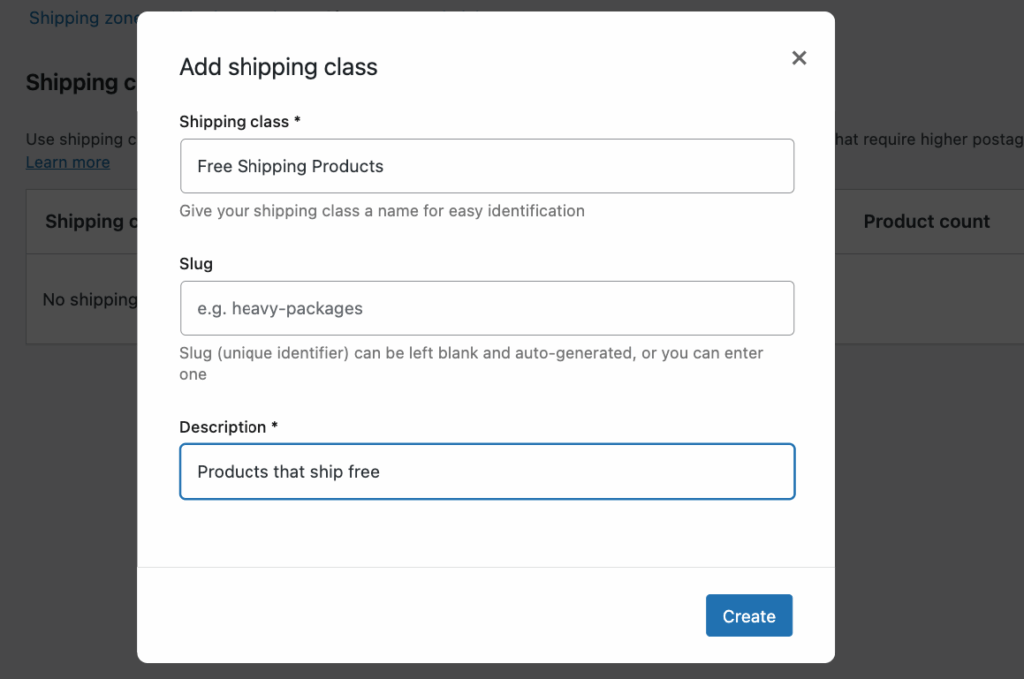
- First, create a dedicated shipping class by going to WooCommerce > Settings > Shipping > Shipping Classes, then click Add shipping class.
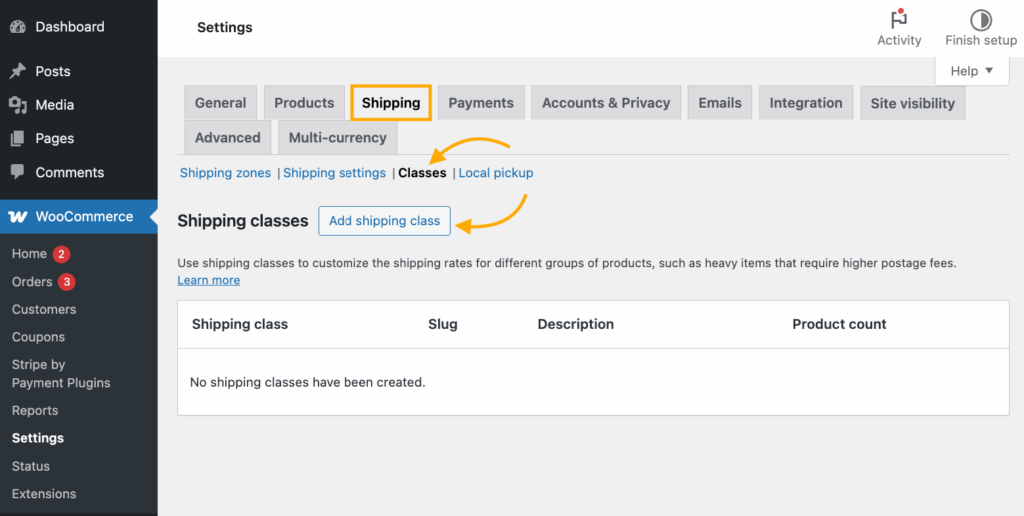
- Name it something clear like “Free Shipping Products” (you’ll be the only one seeing this name), add an optional description like “Products that ship free,” and click Create.
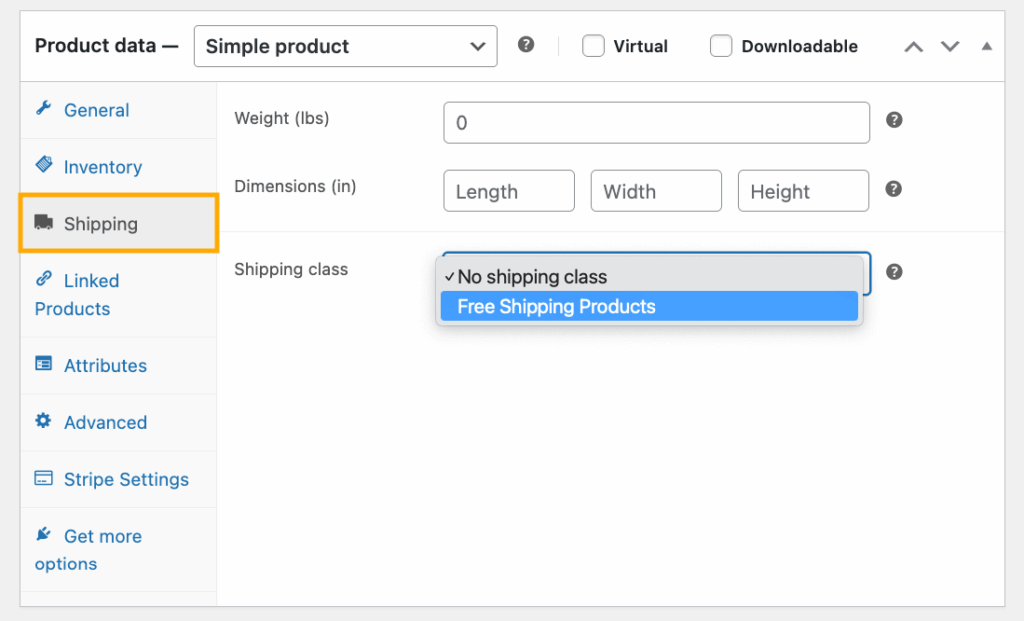
- Now, assign products to this class. Go to Products > All Products, select a product to edit, and scroll to the Shipping tab. From the dropdown menu, select your newly created “Free Shipping Products” class and update the product.
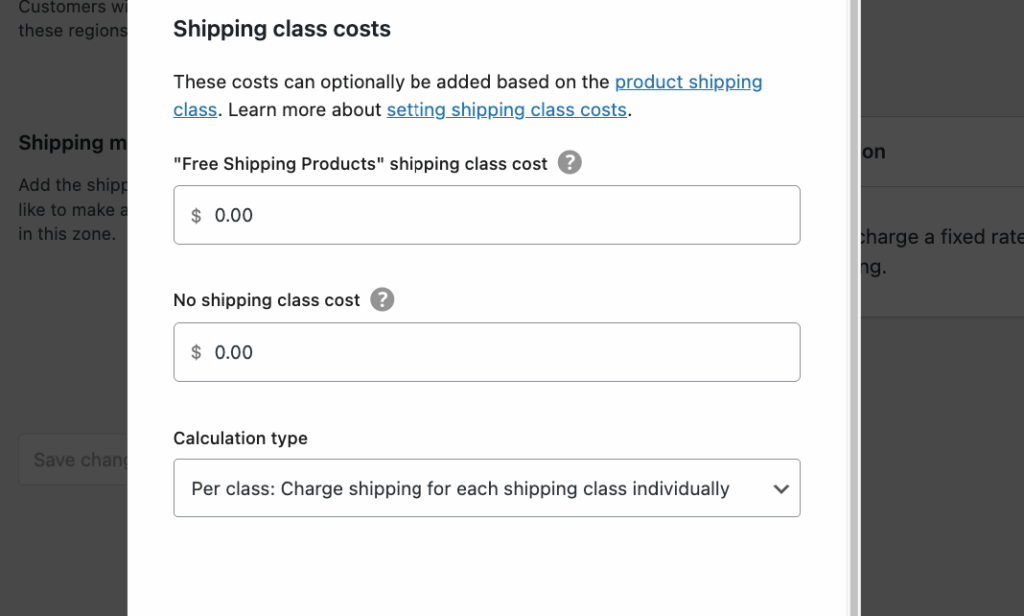
- The final step is configuring your shipping zones to recognize this class. Go to WooCommerce > Settings > Shipping, select each shipping zone, and add or edit your flat rate shipping method.
- When configuring flat rate costs, set the cost for your “Free Shipping Products” shipping class to $0.00 while maintaining normal rates for other products.
For digital goods, there’s an even simpler approach – just check the “Virtual” box (and “Downloadable” if applicable) when editing the product.
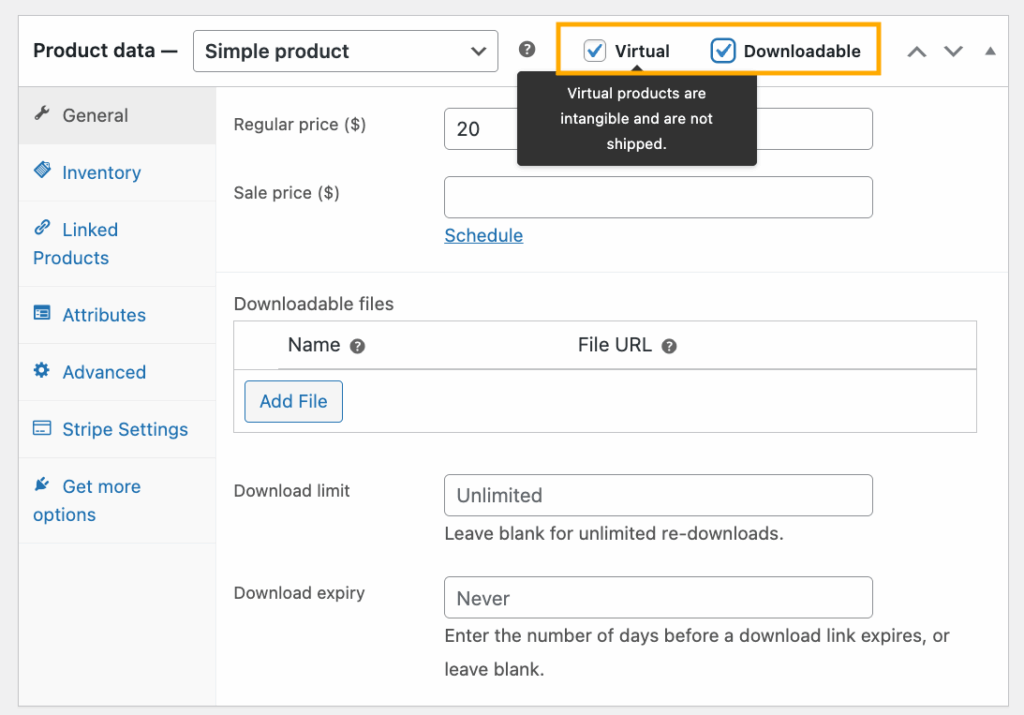
This bypasses the shipping system entirely since these products don’t require physical delivery.
Need more advanced options? Our ecommerce shipping solutions guide covers specialized plugins that can handle complex shipping rules.
Enhance customer experience with CheckoutWC’s free shipping progress bar
You’ve set up free shipping with a minimum spend threshold – great first step! But here’s the problem: many customers abandon their carts when they don’t realize how close they are to qualifying for free shipping. This is where CheckoutWC‘s free shipping progress bar comes to the rescue.
CheckoutWC is a premium checkout optimization plugin that transforms the standard WooCommerce checkout into a conversion powerhouse. Among its many features, the free shipping progress bar stands out as a simple yet incredibly effective tool for boosting your average order value.
How it works
The progress bar creates a visual indicator that appears in both the side cart and during checkout, showing customers exactly how much more they need to spend to unlock free shipping. As customers add products to their cart, the bar fills in real-time, creating an irresistible gamification element – “I’m just $12 away from free shipping!”

This dynamic feedback loop taps into fundamental customer psychology. Studies show that customers are more likely to add additional items when they can visually see how close they are to a reward. It transforms shipping costs from a negative surprise into an achievable goal.
Seamless integration with WooCommerce
What makes CheckoutWC’s progress bar particularly powerful is how effortlessly it works with your existing setup:
- It automatically detects the minimum spend thresholds you’ve already configured in your WooCommerce shipping zones.
- No need to duplicate settings or maintain configurations in multiple places.
- Works with all your conditional free shipping rules based on locations and zones.
- Appears in the side cart, making the incentive visible throughout the entire shopping experience.
Setting it up is simple
- Go to CheckoutWC > Cart in your WordPress admin panel.
- Ensure the Side Cart feature is enabled (it’s where the progress bar will appear).
- Find the “Free Shipping Progress Bar” toggle and switch it on.

- Set a free shipping threshold if you don’t have established shipping configurations; otherwise, leave blank. You can also customize the messaging on the progress bar.
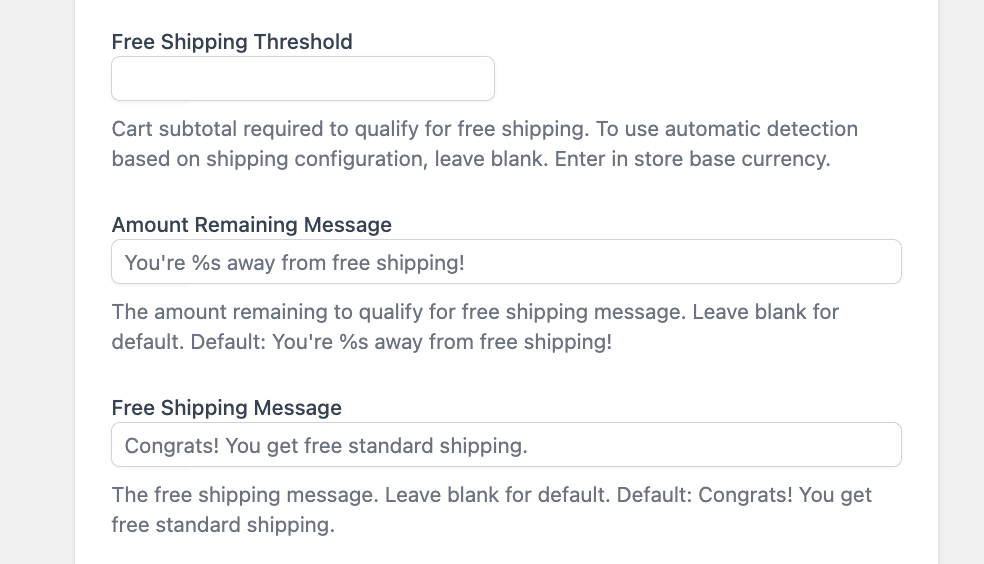
- Next, you can click on the checkbox to show the progress bar at checkout and customize the colors and text to match your brand if desired.

- Save your settings and you’re done!.
The progress bar instantly starts working with your existing free shipping thresholds, encouraging customers to add those extra items that push them over the threshold.
By implementing this visual motivator, stores typically see reduced cart abandonment rates, increased average order values, and improved customer satisfaction – all from a feature that takes less than five minutes to activate.
Solving the top 5 WooCommerce free shipping problems
Even with the best intentions, free shipping can sometimes cause headaches for store owners. Here are solutions to the five most common free shipping frustrations:
1. Conflicting shipping calculations
Problem: Your customers see multiple shipping options and get confused about which to choose, especially when both free and paid options appear simultaneously.
Solution: Check the order of your shipping methods within each zone. Remember that WooCommerce displays methods in the order they’re added. Place free shipping at the top to make it the default selection when available. Also, ensure your shipping zone hierarchy makes sense – more specific zones (like zip codes) should appear before broader ones (like countries).
2. Cart abandonment before reaching thresholds
Problem: Customers abandon carts when they don’t realize how close they are to qualifying for free shipping.
Solution: Implement CheckoutWC’s free shipping progress bar to visually show customers how close they are to free shipping. Set your threshold strategically – about 10-15% above your current average order value works well.
3. Products that shouldn’t ship free
Problem: Some bulky or heavy products eat into profits when shipped free.
Solution: Create a “Heavy/Oversized Items” shipping class and assign problematic products to it. Then, in your shipping zones, set this class to maintain its shipping fee even when other products qualify for free shipping. This approach lets you offer free shipping on most items while protecting your margins on costly-to-ship products.
4. International shipping cost challenges
Problem: Offering worldwide free shipping quickly becomes unprofitable.
Solution: Create separate shipping zones for domestic and international destinations with different free shipping thresholds. For example, set a $50 threshold domestically but $150 internationally. For distant regions where shipping costs are extremely high, consider excluding free shipping entirely or using Table Rate Shipping plugins for more granular control.
5. Too many shipping options causing decision paralysis
Problem: Multiple shipping methods confuse customers and slow down checkout.
Solution: Streamline options to show only what’s relevant. Use CheckoutWC to automatically hide the shipping method tab when free shipping is the only available option, creating a frictionless checkout experience when customers qualify.
Combine free shipping with checkout optimization for better results
Setting up free shipping in WooCommerce doesn’t have to be complicated – as we’ve seen, you’ve got multiple options to implement the perfect strategy for your store. Whether you choose threshold-based, coupon-activated, product-specific, or quantity-based free shipping, the right approach can dramatically boost your conversion rates.
But here’s the truth: Free shipping alone isn’t enough. The real magic happens when you pair free shipping incentives with a streamlined checkout experience.
This is where CheckoutWC truly shines. Beyond the free shipping progress bar we’ve discussed, CheckoutWC transforms your entire checkout process with:
- One-page checkout that eliminates unnecessary steps and friction.
- Side cart functionality that lets customers manage their order without leaving their shopping journey.
- Strategic upsells and cross-sells that appear at the perfect moment to increase cart value.
- In-cart quantity editing that makes adjusting orders effortless.
When customers see that progress bar getting closer to 100% and know they’ll experience a smooth, hassle-free checkout afterward, they’re significantly more likely to complete their purchase – and spend more while doing it.
Ready to supercharge your free shipping strategy with a checkout experience that converts? Get started with CheckoutWC today and watch your average order values climb while cart abandonment rates drop.

The simplicity of Shopify with the power of WooCommerce. Replace your WooCommerce checkout page with CheckoutWC to boost sales and reduce cart abandonment.