CheckoutWC has the following structure for its template files:
- /templates/
- /template-name/
- assets/
- build/
- src/
- content.php
- footer.php
- header.php
- screenshot.png
- style.css (only used for name and capability info – do not add styles to this file)
- /template-name/
Templates
checkout-for-woocommerce/templates/template-name/content.php
This template has the bulk of the checkout page template. It’s everything between the header area (essentially the title area) and the footer (copyrights).
checkout-for-woocommerce/templates/template-name/header.php
The header template renders the site name / logo.
checkout-for-woocommerce/templates/template-name/footer.php
The footer template renders the copyright information, as well as any custom text provided in settings.
Folders
There are two folders in the templates that ship with Checkout for WooCommerce:
assets/
Static assets such as images are places in this folder.
src/
This folder contains the TypeScript and Sass files needed to build the template assets.
build/
This is where the compiled assets (CSS/JS/etc) are placed.
Editing Templates
Template files should never directly modified because they are replaced with each plugin update.
Instead you can over ride them in your theme. To do so, create a directory named ‘checkout-wc’ in your theme or child theme and copy any of the relevant templates into this directory.
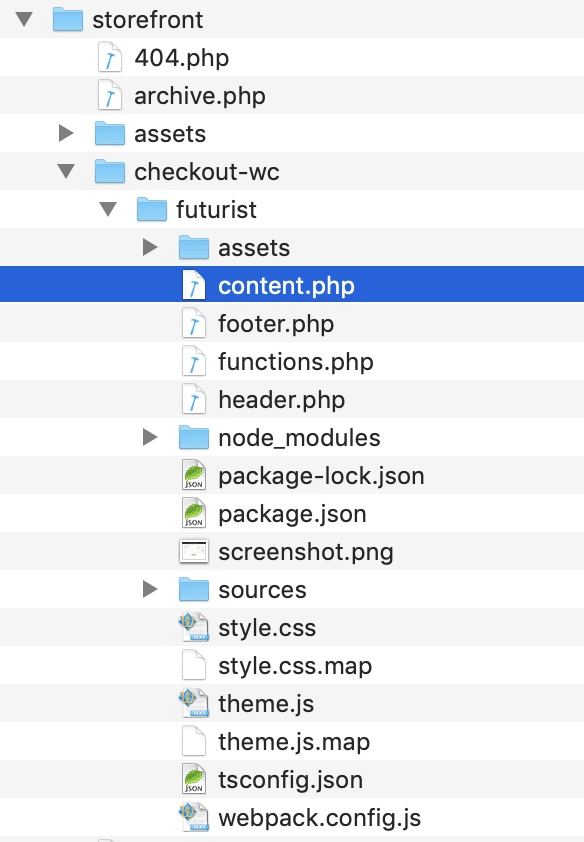
For example, if you’re using the Storefront theme with the Futurist template and you want to override the main content template file, you would copy:
plugins/checkout-for-woocommerce/templates/futurist into themes/storefront/checkout-wc/
And modify content.php. This is what the file structure would look like:
Building The Template
If you want to make changes to the TypeScript or Sass files in src/, you will need to run a few commands in terminal. We are assuming you have some basic knowledge of npm and webpack.
- Open terminal and cd into the template directory.
- If this is your first time making a modification, run npm install
- You can then execute webpack with these commands:
- npm run start (Watches the source folder and builds the development versions of the TypeScript and Sass assets)
- npm run build (Builds the production versions of the TypeScript and Sass assets)