How to Edit WooCommerce Cart Page for Better Conversions
Table of Contents
- How a customized cart page and checkout boost conversions
- High-impact customizations that reduce abandonment
- How to customize your cart and checkout pages using the Block Editor
- Enhancing cart page design with page builders
- Advanced customization possibilities
- Important considerations before using page builders
- CheckoutWC as the ultimate cart and checkout optimization solution
- How to customize your cart page with CheckoutWC
- Best practices for implementing and testing your customized cart page
- Implementation checklist
- Testing tools and techniques
- Upgrade to CheckoutWC: The smarter choice over traditional cart edits
Is your WooCommerce store losing sales at the cart stage? You’re not alone. Many store owners feel frustrated watching potential customers vanish at this critical point in the buying process.
While the default WooCommerce cart page technically works, it’s decidedly basic – a generic template that doesn’t reflect your brand personality or optimize for conversions. Still, most businesses overlook this crucial page, missing opportunities to turn browsers into buyers with strategic customizations.
The good news? You don’t need to hire an expensive developer or learn complex code to transform your cart page into a conversion machine. This guide will walk you through practical, no-code solutions that can dramatically reduce cart abandonment and boost your bottom line.
Let’s get into it!
How a customized cart page and checkout boost conversions
The numbers don’t lie – cart abandonment is a huge problem for online stores. Research shows that 55% of users abandon their carts before reaching checkout, with an additional 17% dropping off during the checkout process itself. That’s a potential 72% of sales flying out the window!
Why does this happen with WooCommerce stores? The default WooCommerce cart and checkout experience has several critical limitations that create friction:
- Disruptive navigation flow – The standard cart page forces customers to leave their shopping journey completely, breaking their browsing momentum.
- Cluttered interface – Default WooCommerce carts display unnecessary fields and information that overwhelm customers.
- Limited upsell capabilities – The basic cart offers few opportunities for strategic product recommendations.
- One-size-fits-all approach – The same lengthy checkout process is used for both simple and complex purchases.
- Slow load times – Standard cart pages often reload completely with each update, creating frustrating delays.
- Poor mobile experience – Default carts aren’t optimized for the smaller screens where most shopping happens today (Did you know that 63% of e-commerce revenue comes from shopping on mobile?).
These limitations directly contribute to abandoned carts and lost revenue. By customizing your cart experience, you can eliminate these friction points and create a smoother path to purchase.
High-impact customizations that reduce abandonment
Small tweaks to your cart and checkout pages can make a big difference:
- Strategic shipping information placement: Showing shipping costs at checkout rather than early in the funnel prevents sticker shock abandonment.
- Cleaner transaction flow: Removing post-purchase marketing distractions that confuse customers about whether their order is complete.
- Trust signals at hesitation points: Adding security badges and guarantees exactly where customers pause in the buying process.
- Visual continuity: Creating a clear, obvious path from “Add to Cart” to “Complete Purchase” buttons.
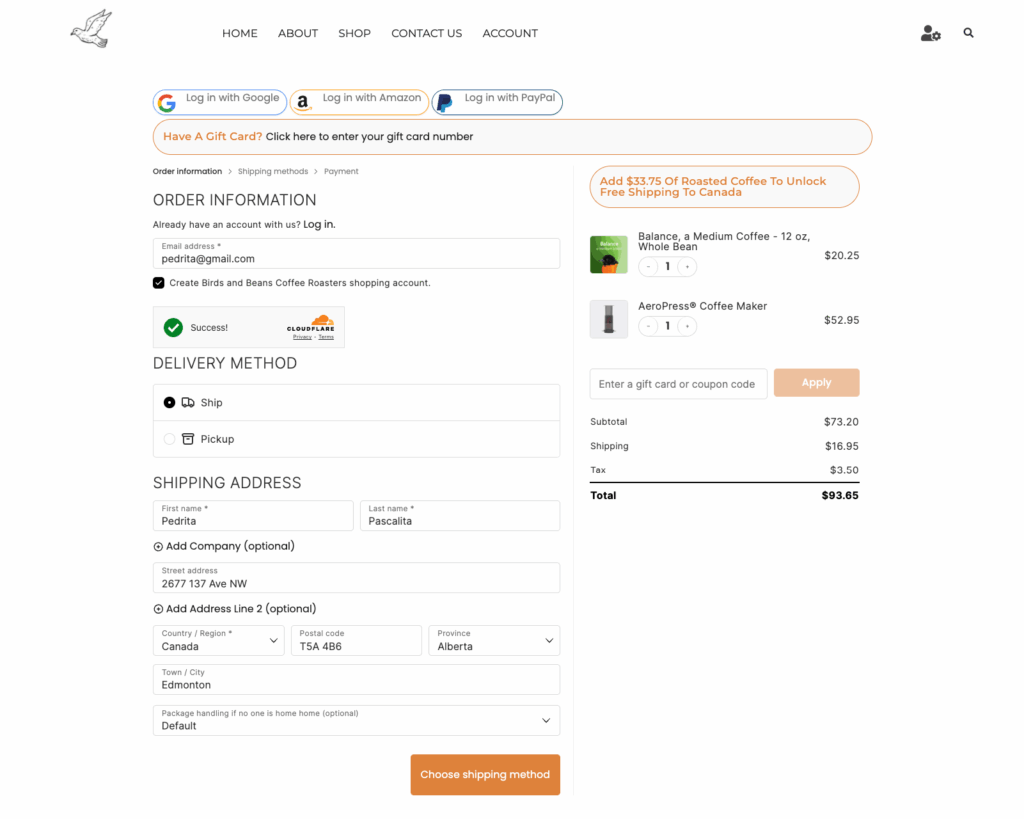
If you’re looking for some inspiration, here’s a great example of an effective checkout page by Birds and Beans Coffee Roasters – one of CheckoutWC’s many happy customers:
So, what do you do when you want to go beyond what WooCommerce has to offer? Well, there are four ways to customize the cart and checkout process:
- Block Editor – Simple, code-free customization to match your brand styling.
- Plugins – Pre-built functionality enhancements like coupon fields and order bumps.
- Page builders – Drag-and-drop visual editors for complete cart redesigns without coding.
- Custom code – Advanced modifications (typically unnecessary for most stores).
While custom coding might seem appealing, it comes with significant drawbacks: Ongoing maintenance requirements, limited flexibility for non-developers, and substantial time investment. Most store owners find that plugins and page builders offer expert-optimized solutions with built-in updates, all without requiring technical expertise.
That’s why, in this guide, we’ll focus on block editor customization for simple changes, page builders, and CheckoutWC for comprehensive cart and checkout optimization that dramatically boosts conversions.

The simplicity of Shopify with the power of WooCommerce. Replace your WooCommerce checkout page with CheckoutWC to boost sales and reduce cart abandonment.
How to customize your cart and checkout pages using the Block Editor
The Block Editor is a very straightforward way to customize your WooCommerce cart page and create a more user-friendly shopping experience.
WooCommerce includes a default cart template that serves as your starting point. While the Block Editor doesn’t allow complete page redesigns, it offers enough flexibility to transform the basic cart experience.
Here’s what you need to do:
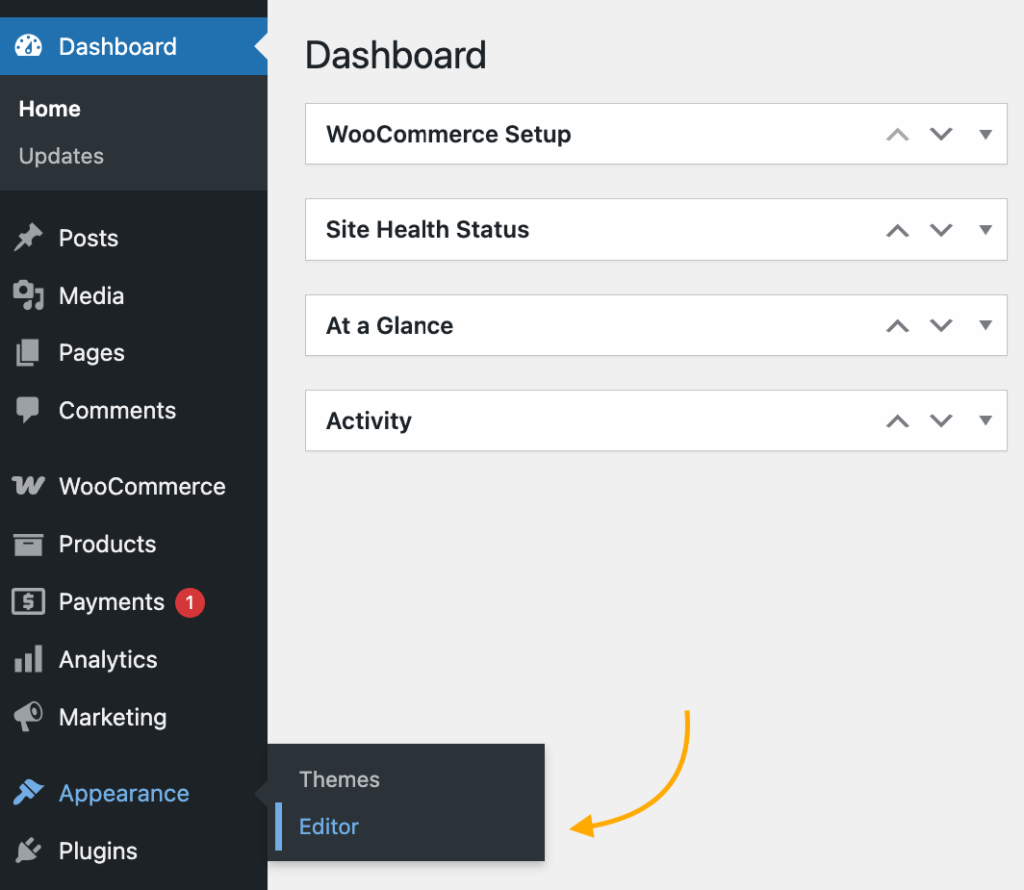
- Access the cart template
- Navigate to Appearance > Editor in your WordPress dashboard.
- Click on “Templates” and select the “Page: Cart” template.

- Change the overall design to fit your brand
- You can change things like the background color (or add a custom image), text color, typography size, padding dimensions, block spacing, and border style.
- The color and typography of the headings and links.
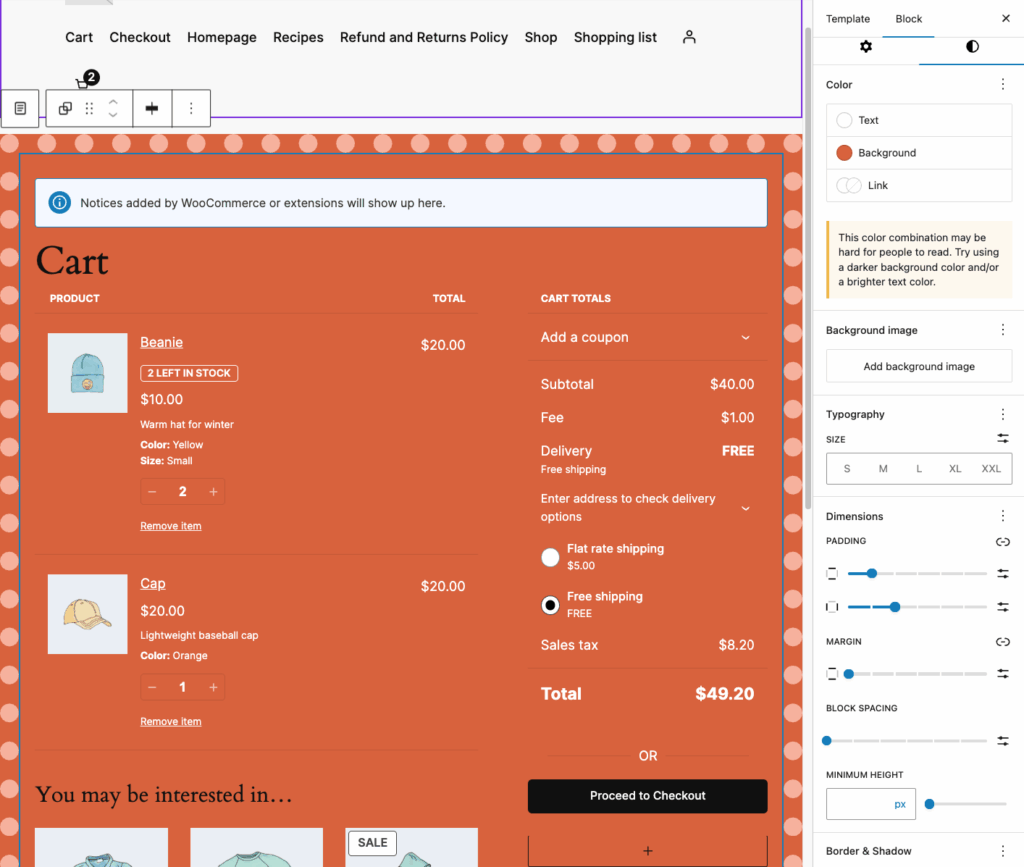
- You can’t edit individual elements, for example, just the “Proceed to Checkout” button or the “Add to cart” buttons in the cross-sell section.
- Increase sales with cross-sells
- The Cart Cross-Sells section is one of the few unlocked elements you can move around
- Adjust how many cross-sell products appear by using the slider in Block settings (1-6 products)
- Position cross-sells strategically – either before the checkout button (to catch attention) or after (to avoid distraction)
- Modify the empty cart experience
- Click the “Empty Cart” state option in the block toolbar
- Customize the default “Your cart is currently empty” message
- Add product recommendations using the Newest Products block to encourage shopping
- Add trust elements
- Insert guarantees, security badges, or shipping info between cart sections
- These can be added using regular paragraph or image blocks
Did you know? You can technically add the Cart block to any page, but for full functionality, you must designate your chosen page as the cart page in WooCommerce > Settings > Advanced.
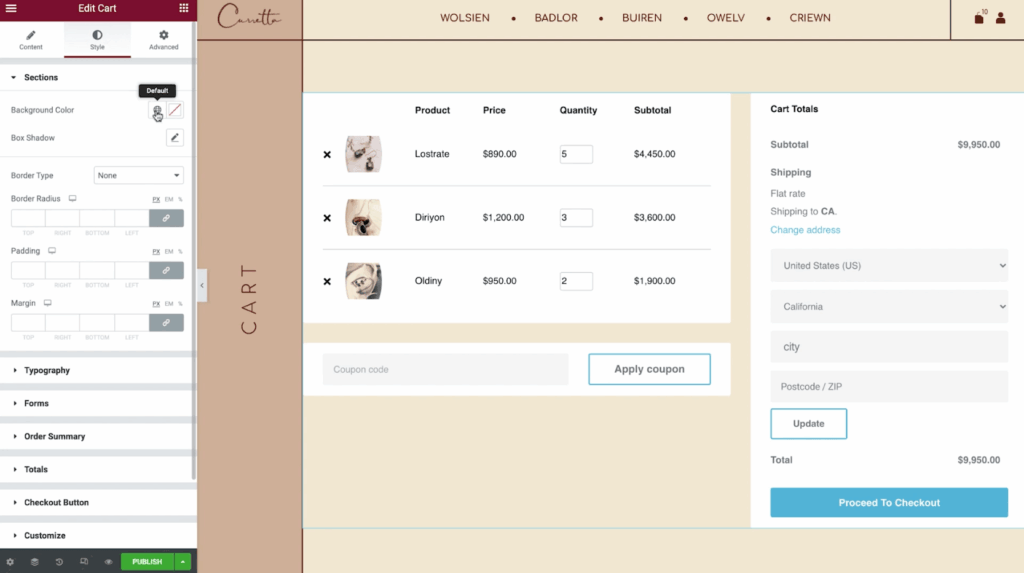
Enhancing cart page design with page builders
While the Block Editor offers basic customization, page builders are what you need if you want advanced design capabilities. Page builders like Elementor and Divi are visual drag-and-drop tools that let you create custom layouts without coding knowledge.
These tools include specialized WooCommerce elements that integrate directly with your store, allowing you to completely redesign your cart experience or build a custom cart template from scratch.
Advanced customization possibilities
- Dynamic conditional layouts: Create different cart experiences based on customer behavior – show special offers for first-time buyers or display loyalty rewards for returning customers.
- Visual styling controls: Adjust colors, spacing, typography, and borders through intuitive interfaces instead of writing custom CSS.
- Attention-grabbing animations: Add subtle motion effects to draw attention to important elements like free shipping thresholds or available coupon fields.
- Optimized mobile experiences: Design dedicated mobile cart layouts that maintain full functionality while adapting perfectly to smaller screens.
Important considerations before using page builders
Page builders offer impressive capabilities but come with tradeoffs. For minor cart tweaks, they may introduce unnecessary code bloat and complexity. A lightweight plugin might be more efficient for simple modifications.
If you’re already using a page builder for your entire site, extending it to your cart creates design consistency. However, if you’re only using it for the cart page, you might see slower loading times – a critical factor in checkout optimization.
Remember: A beautiful but slow cart page can actually decrease conversions. Studies show that each second of load time can reduce conversion rates by 7-10%. Balance design improvements against performance impacts when making your decision.
CheckoutWC as the ultimate cart and checkout optimization solution
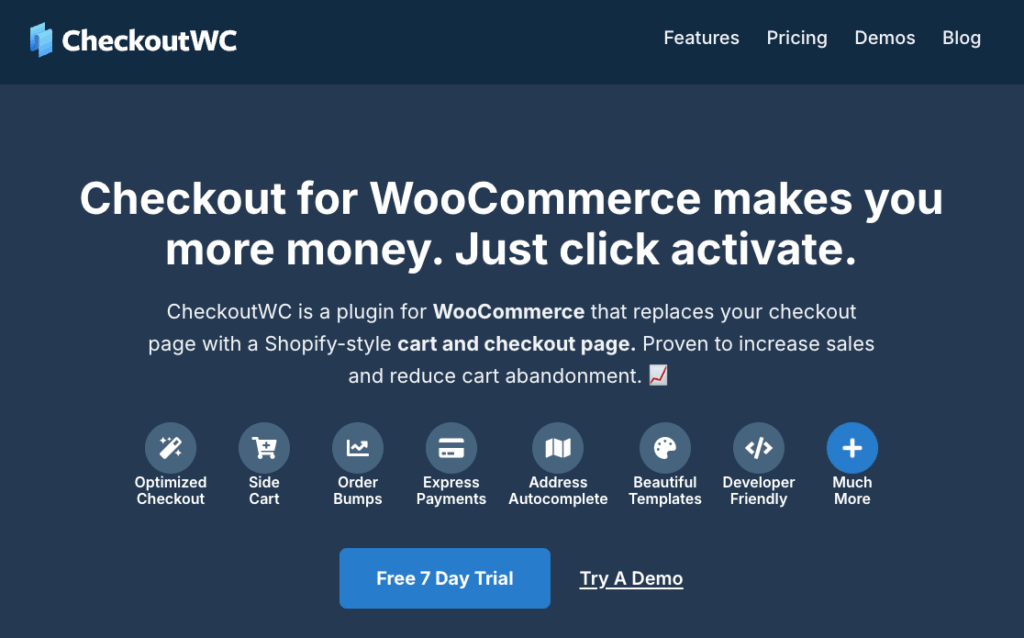
While tweaking your WooCommerce cart page with blocks and page builders can yield improvements, sometimes a purpose-built solution is what your store truly needs. CheckoutWC takes cart and checkout optimization to the next level by offering a complete replacement system rather than piecemeal modifications.
The fundamental challenge with the default WooCommerce cart is creating a frictionless path to purchase. CheckoutWC addresses this by completely reimagining the checkout experience from the ground up, focusing on conversion optimization at every step.
For store owners who’ve made basic cart edits but still see high abandonment rates, CheckoutWC offers a compelling alternative with features specifically designed to keep customers moving toward purchase:
- Side cart functionality: Unlike the standard cart page that interrupts the shopping flow, CheckoutWC’s side cart appears without taking customers away from product browsing. When a customer adds an item, the cart slides in from the side, allowing them to:
- Review their selections without leaving the page they’re on.
- See a dynamic free shipping progress bar that encourages additional purchases.
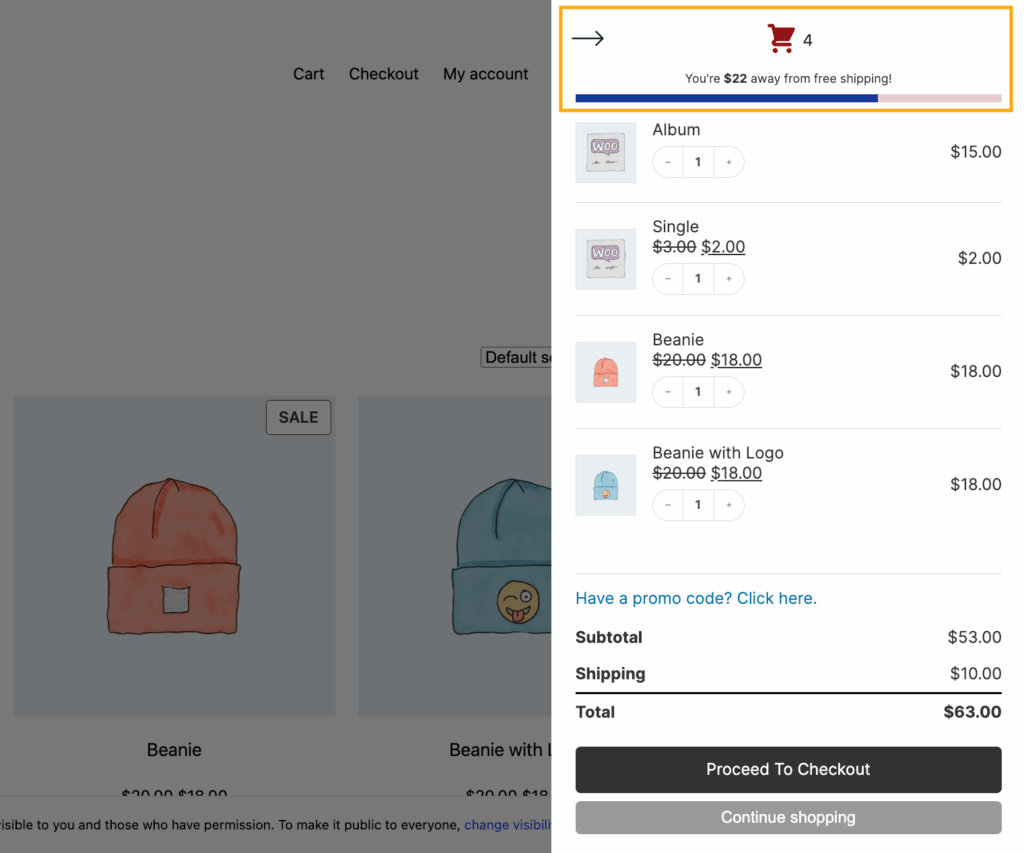
- Make quantity adjustments instantly without page reloads.
- Strategic upsell opportunities: The side cart creates natural moments for relevant product suggestions. Order bumps can be strategically placed to increase average order value – something nearly impossible to implement with standard cart customizations.
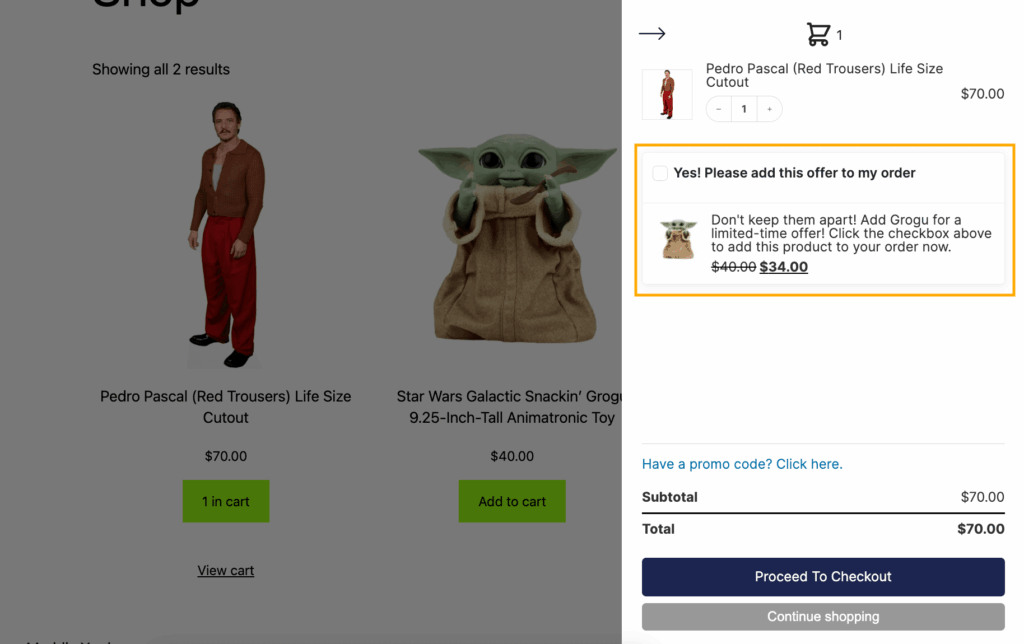
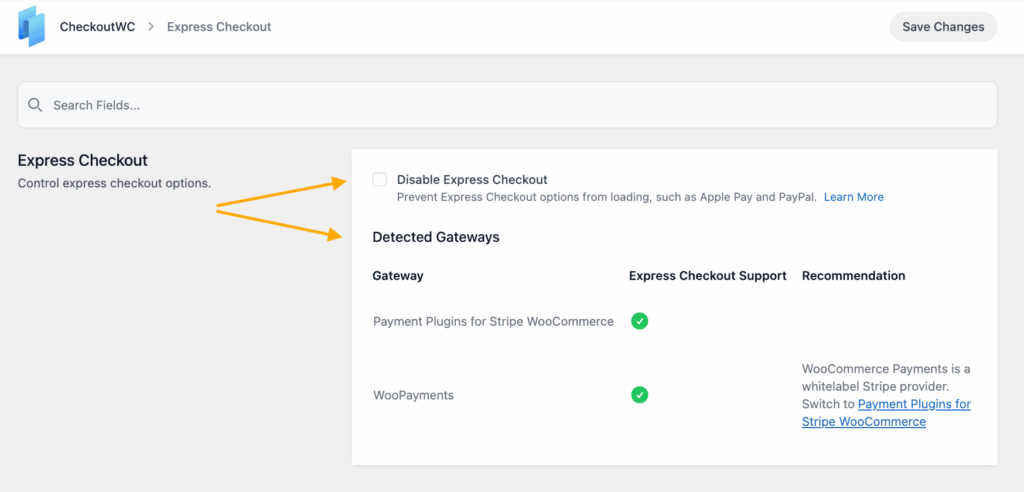
- Express checkout options: CheckoutWC integrates popular payment methods like Apple Pay and PayPal directly in the side cart, letting customers complete their purchase in seconds rather than navigating multiple pages.
Most importantly, CheckoutWC maintains WooCommerce compatibility while eliminating the ongoing maintenance burden of custom cart modifications—no more worrying about updates breaking your carefully crafted customizations.
How to customize your cart page with CheckoutWC
Setting up CheckoutWC to transform your cart experience is straightforward. Here’s how to implement its key features:
- Enable the side cart:
- Navigate to WP Admin > CheckoutWC > Side Cart and toggle the “Enable Side Cart” switch to ON.
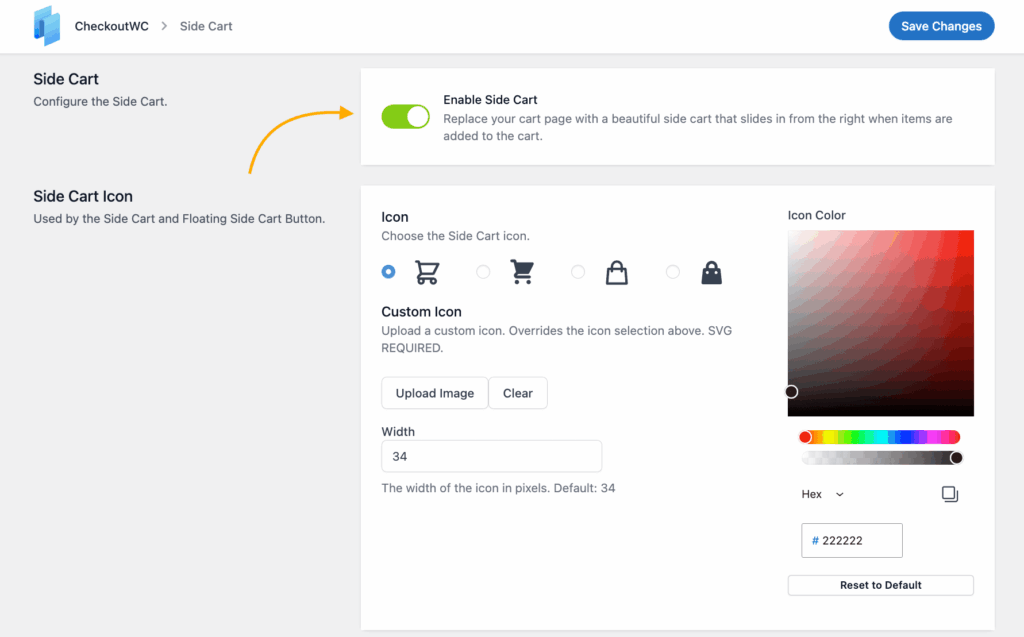
- Customize appearance options including cart button position, colors, and animation styles.
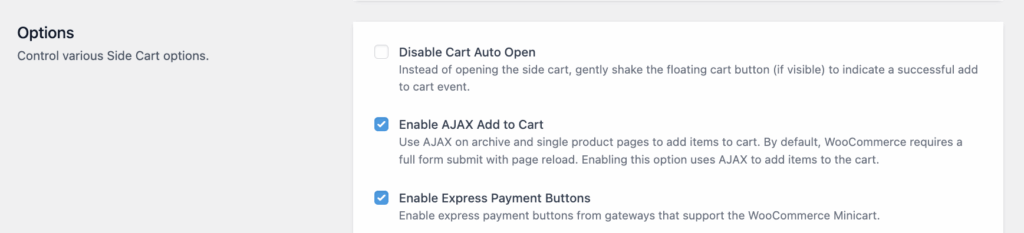
- Enable AJAX add-to-cart functionality to ensure products appear in the side cart without page refreshes.
- Create a one-page checkout experience:
- Go to WP Admin > CheckoutWC > Appearance and select your preferred template style (Groove, Air, Glass, etc.).
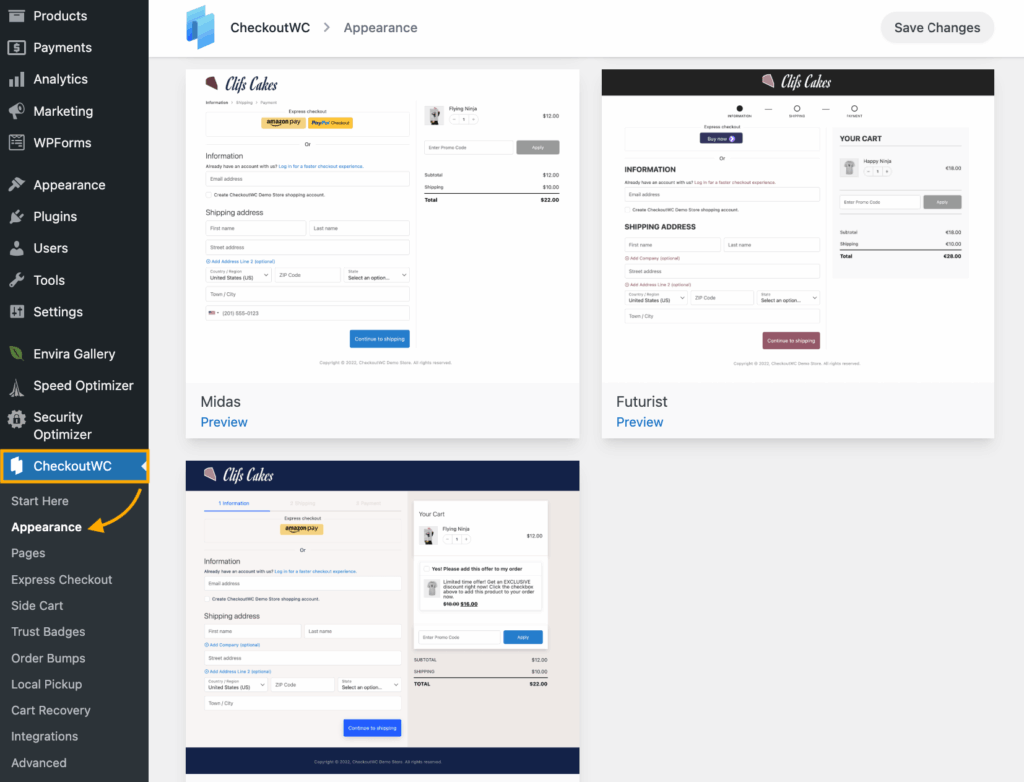
- Under Checkout Design, choose “One Page Checkout” to eliminate multi-step navigation.
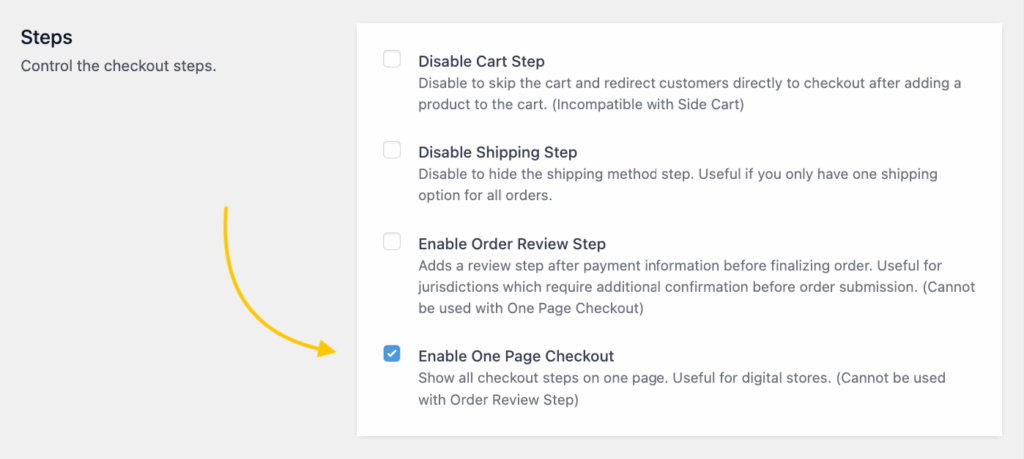
- This effectively bypasses the traditional cart page, moving customers directly to checkout.
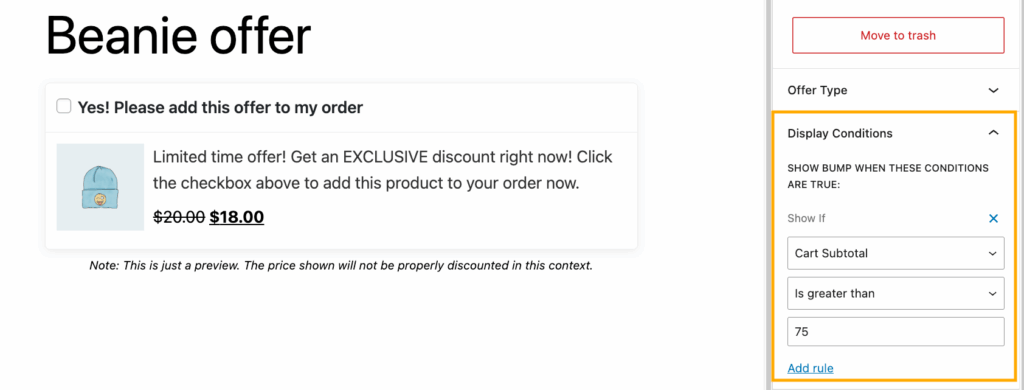
- Add order bumps to increase sales:
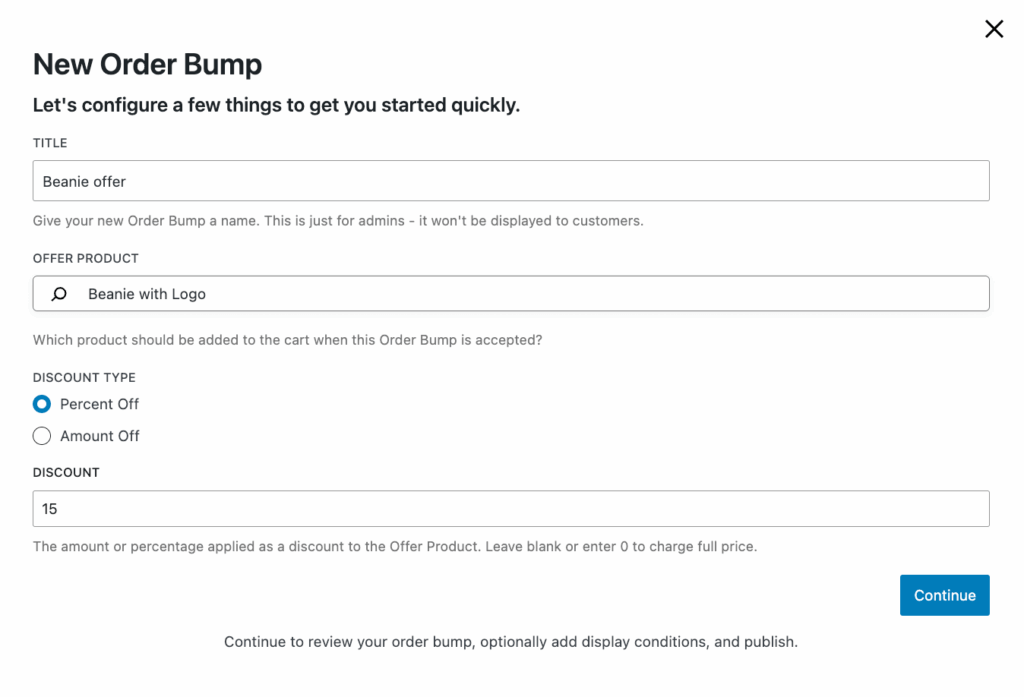
- Access WP Admin > CheckoutWC > Order Bumps and click “Add New” to create your first bump offer.
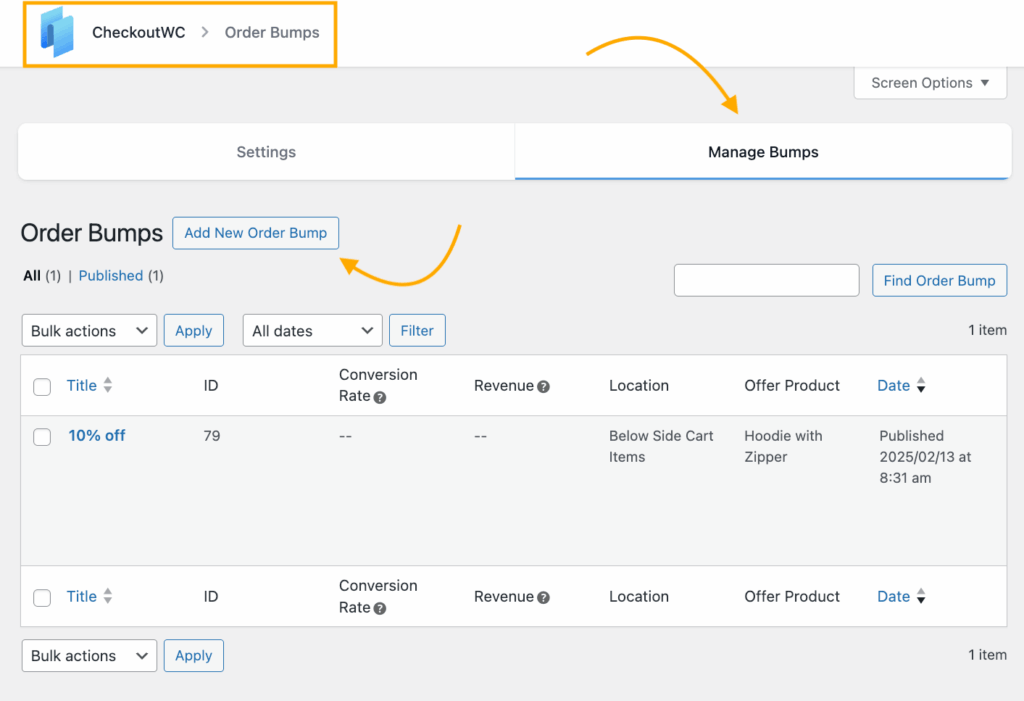
- Select which products trigger the bump and which product to offer.
- Choose the display location (side cart, checkout page, or both).
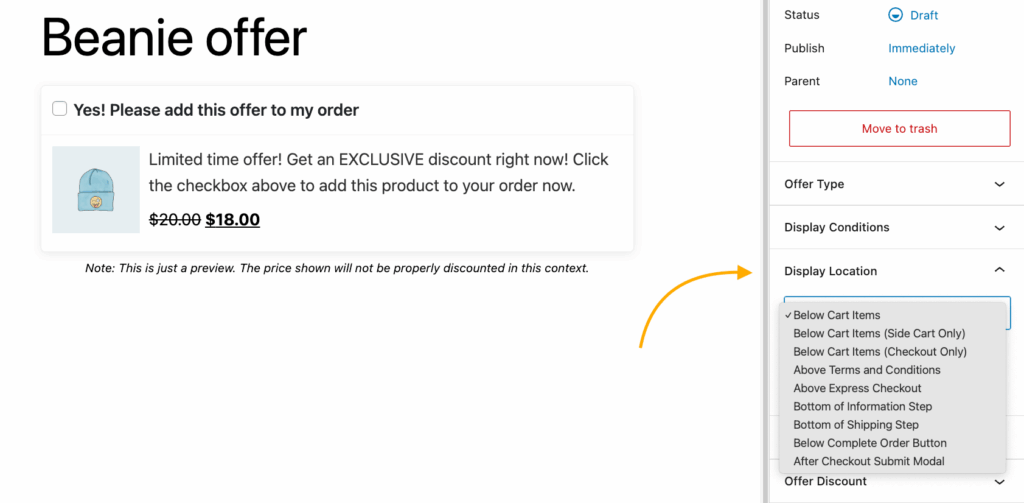
- Write a compelling offer description.
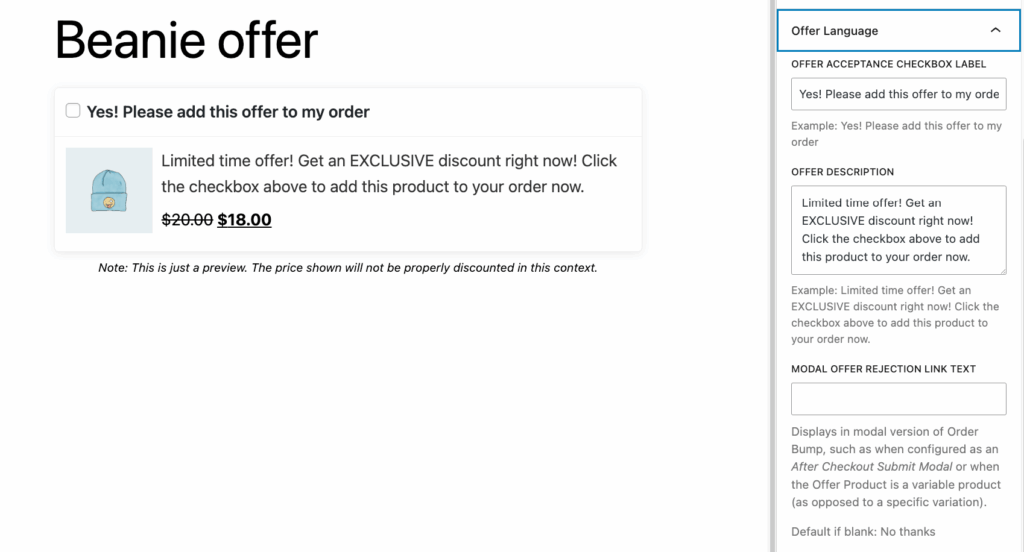
- Set any extra conditions.
The beauty of CheckoutWC is how it eliminates friction throughout the purchasing journey. The cart editing feature directly on the checkout page lets customers adjust quantities or remove items without navigating backward, keeping them moving forward in the purchase process. Combined with address validation and express payment options, these features create a seamless experience that significantly reduces cart abandonment.
Best practices for implementing and testing your customized cart page
Making changes to your cart page is a high-stakes operation – it directly affects your bottom line. Follow these best practices to ensure a smooth implementation that actually increases conversions:
Implementation checklist
- Create a backup first – Before making any cart modifications, take a complete site backup. This provides a safety net if something goes wrong and lets you quickly revert changes that negatively impact sales.
- Establish a baseline – Set up proper tracking through Google Analytics 4, WooCommerce’s built-in analytics, or Semrush. Document key metrics like:
- Cart abandonment rate.
- Average time spent on the cart page.
- Cart-to-checkout progression percentage.
- Device-specific conversion rates.
- Test thoroughly before launch – Verify your cart works flawlessly with:
- Variable products with multiple options.
- Products with different tax classes.
- Applied discount codes and coupons.
- All shipping methods and zones.
- Every payment gateway you offer.
- Maintain compatibility – Test custom cart modifications with your entire plugin ecosystem, particularly:
- Payment processors.
- Shipping calculators.
- Inventory management tools.
- Marketing automation plugins.
- Schedule strategically – Implement cart changes during low-traffic periods, ideally during normal maintenance windows when customers expect possible disruptions.
Testing tools and techniques
For a thorough evaluation, utilize these specialized tools:
- Behavioral analysis: Hotjar and Crazy Egg offer heatmaps and session recordings to visualize exactly where customers hesitate or abandon the cart.
- Split testing: Use AB Tasty to test different cart layouts with actual customers.
- Cross-device testing: BrowserStack allows testing across multiple devices and browsers simultaneously.
Research from the Baymard Institute shows professionally optimized carts can reduce abandonment by up to 35%. Similarly, MECLABS research demonstrates that maintaining “cognitive momentum” – where customers feel they’re making steady progress without interruption – directly correlates to higher conversion rates.
While custom cart modifications require ongoing compatibility testing with each WooCommerce update, CheckoutWC eliminates this maintenance burden by handling compatibility updates automatically, ensuring your optimized experience remains consistent across WooCommerce versions.
Upgrade to CheckoutWC: The smarter choice over traditional cart edits
While DIY cart editing gives you control, it comes with significant technical challenges. Template modifications often break with WooCommerce updates, CSS customizations demand constant maintenance as browser standards evolve, and plugin conflicts frequently arise when multiple tools try to modify the same cart functionality.
CheckoutWC eliminates these headaches by providing a purpose-built solution that works alongside WooCommerce rather than fighting against it. The side cart functionality gives customers a faster path to purchase without interrupting their shopping journey, while maintaining your existing cart page as a fallback option.
Rather than cobbling together multiple plugins, CheckoutWC delivers everything in one cohesive package:
- Order bumps strategically placed to increase average order value
- Express payment options for one-click purchasing
- Address validation to prevent shipping errors
- Fully responsive design that works flawlessly on mobile devices
What truly sets CheckoutWC apart is its foundation in conversion research. Each template is built on extensive usability studies, eliminating the guesswork of what makes an effective cart. When WooCommerce releases updates, CheckoutWC maintains compatibility automatically – no more scrambling to fix broken customizations after every core update.
Instead of spending countless hours tweaking cart elements that may not actually improve your conversion rate, consider CheckoutWC as your complete solution. It’s specifically engineered to optimize the entire cart-to-checkout process, solving the exact problem you came here to fix: Turning more browsers into buyers.
The simplicity of Shopify with the power of WooCommerce. Replace your WooCommerce checkout page with CheckoutWC to boost sales and reduce cart abandonment.