WooCommerce order bumps let you offer complementary products or upgrades right at checkout, when customers are already committed to buying. This guide walks you through creating your first bump, from the Quick Start wizard to a live offer on your checkout page. You’ll have a working order bump in about five minutes.

Prerequisites
Order Bumps require a Plus, Pro, or Agency plan. If you’re on the Basic plan, you can upgrade in your account or view pricing options.
Plan limits:
- Plus: Up to 2 Order Bumps
- Pro and Agency: Unlimited Order Bumps
Step 1: Open the Order Bump editor
Go to WP Admin > CheckoutWC > Order Bumps and click Add New at the top of the screen. The Quick Start wizard will appear to help you configure the essentials.
Step 2: Complete the Quick Start wizard
The wizard collects four pieces of information to get you started:
Title
Give your Order Bump an internal name. This is for your reference only and won’t be displayed to customers. Use something descriptive like “Phone Case Upsell” or “Extended Warranty Offer” so you can identify it later.
Offer Product
Search for and select the product you want to offer. This is what gets added to the customer’s cart when they accept the bump.
Discount Type
Choose between Percent Off or Amount Off. Percent discounts work well for higher-priced items, while fixed amounts are clearer for lower-priced add-ons.
Discount
Enter the discount value. For a 15% discount, select “Percent Off” and enter 15. For a $5 discount, select “Amount Off” and enter 5. Leave blank or enter 0 to offer the product at full price.
Click Continue to move to the full editor.
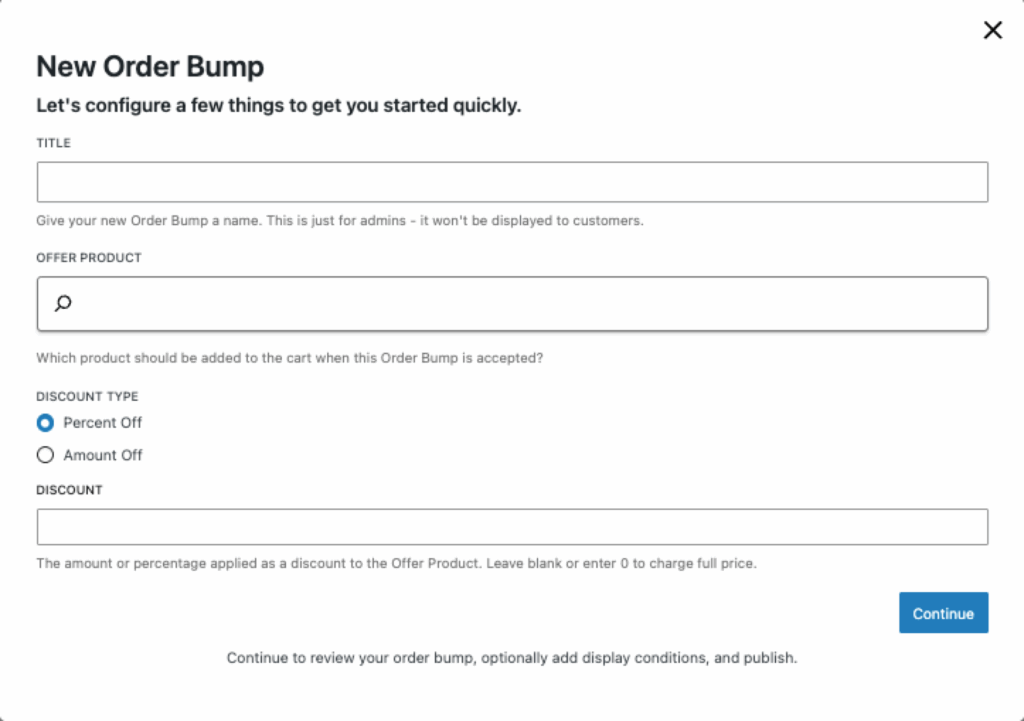
New order bump quick start configuration modal
Step 3: Configure display settings
After the wizard, you’ll see the Order Bump editor with a live preview on the left and all settings in the sidebar on the right. A few settings are worth reviewing before you publish:
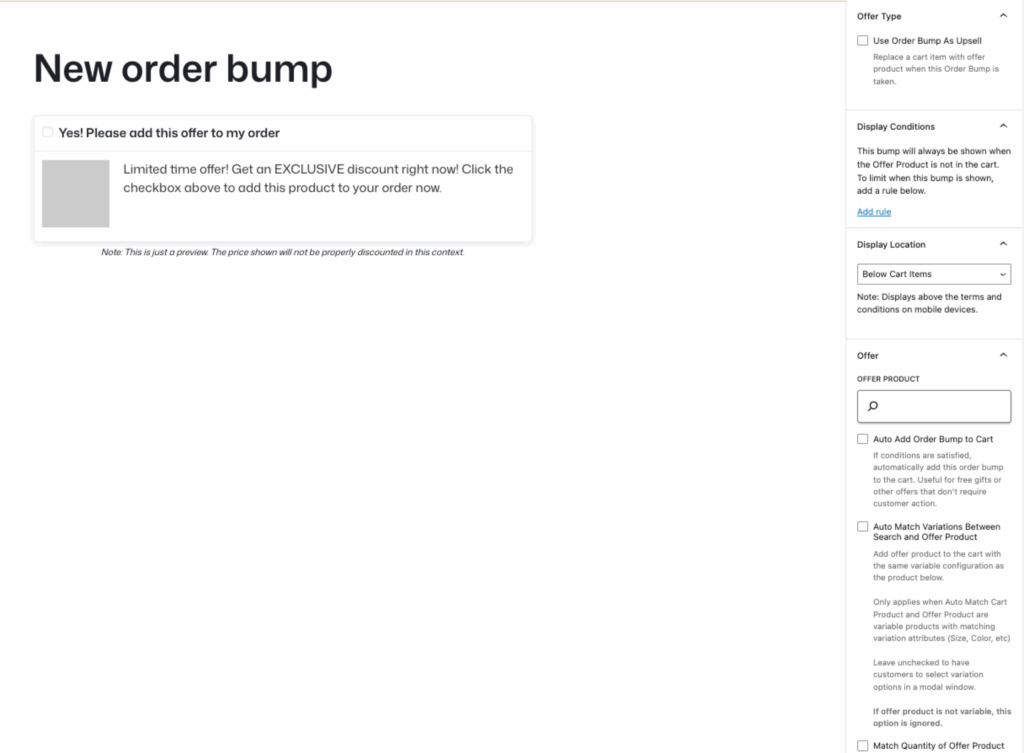
Order bump editor interface with preview and sidebar settings
Display Location
Choose where the bump appears. The default, Below Cart Items, works well for most stores. See Order Bump placement locations for a full breakdown of each option.
Display Conditions
Control when the bump appears based on cart contents, customer details, or other criteria. By default, bumps show to all customers. To target specific scenarios, click Add rule in the Display Conditions section.
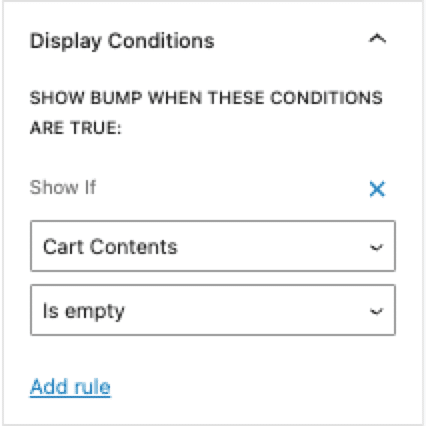
Configuring conditional logic for order bumps
Offer Language
Scroll down in the sidebar to find the copy settings:
Offer Acceptance Checkbox Label
The text next to the checkbox customers click to accept the offer. The default is “Yes! Please add this offer to my order” but you can customize it to match your product. For example: “Yes! Add the protection plan” or “Add matching earrings for 20% off”.
Offer Description
A short pitch that appears below the checkbox. This is your chance to explain the value. Keep it to one or two sentences. Example: “Most customers add this to protect their purchase. Cancel anytime if you change your mind.”
Step 4: Publish and test
Click Publish in the sidebar to make your Order Bump live. Then add a product to your cart and go through checkout to see the bump in action.
If your bump doesn’t appear, check these common issues:
- The offer product is out of stock or not purchasable
- The offer product is already in the cart (bumps hide automatically in this case)
- You have display rules that aren’t being met (check the Display Conditions section)
Example WooCommerce order bump configurations
Here are three common Order Bump setups to give you ideas for your store:
Example 1: Complementary accessory
Scenario: You sell phones and want to offer a matching case.
| Setting | Value |
| Title | Phone Case Upsell |
| Offer Product | Premium Silicone Case |
| Discount Type | Percent Off |
| Discount | 15 |
| Display Location | Below Cart Items |
| Checkbox Label | Add a case and save 15% |
| Description | Protect your new phone from day one. This case fits perfectly and ships with your order. |
Optional: Add a display rule so this only shows when a phone is in the cart. Go to Display Conditions > Add rule and create a “Cart contains product” rule targeting your phone products.
Example 2: Warranty or protection plan
Scenario: You sell electronics and want to offer extended protection.
| Setting | Value |
| Title | 2-Year Protection Plan |
| Offer Product | Extended Warranty (2 Years) |
| Discount Type | Percent Off |
| Discount | 0 (full price) |
| Display Location | Above Terms and Conditions |
| Checkbox Label | Protect my purchase for 2 years |
| Description | Covers accidental damage, defects, and normal wear. File claims online anytime. |
Why it works: Protection plans are high-margin products that customers expect to see at checkout. Placing the bump above the terms puts it right before the final purchase decision.
Example 3: Free gift at cart threshold
Scenario: You want to reward customers who spend $75 or more with a free sample.
| Setting | Value |
| Title | Free Sample Over $75 |
| Offer Product | Deluxe Sample Pack |
| Discount Type | Percent Off |
| Discount | 100 |
| Display Location | Below Cart Items |
| Checkbox Label | Add my free gift! |
| Description | You’ve unlocked a free sample pack with your order. Add it now before checkout. |
Required: This example needs a display rule to work correctly. Go to Display Conditions > Add rule and create a “Cart subtotal” rule with the condition “Greater than or equal to” and the value “75”. See the Rules Engine reference for detailed instructions.
Pro tip: Check the Auto Add Order Bump to Cart option in the Offer section. This automatically adds the free gift without requiring customers to check the box, which feels more like a reward than an offer.
Next steps
Now that you have a working Order Bump, you might want to explore:
- Order Bump placement locations to understand where bumps can appear
- Rules Engine reference to target specific customers or cart states
- Order Bumps overview for the complete settings reference
Need help?
If your Order Bump isn’t working as expected or you want advice on the best configuration for your store, reach out to our support team. We’re happy to help you set things up.