WooCommerce order bumps let you offer complementary products or upgrades right at checkout, when customers are already committed to buying. This guide walks you through creating your first bump, from the Quick Start wizard to a live offer on your checkout page. You’ll have a working order bump in about five minutes.
Prerequisites
Order Bumps require a Plus, Pro, or Agency plan. If you’re on the Basic plan, you can upgrade in your account or view pricing options.
Plan limits:
- Plus: Up to 2 published Order Bumps
- Pro and Agency: Unlimited Order Bumps
Only published bumps count toward the limit. Drafts don’t, and neither do the variants of an A/B test.
Step 1: Open the Order Bump editor
Go to WP Admin » CheckoutWC » Order Bumps. The page opens on its Settings tab: check that Enable Order Bumps is on (it is by default), because no bump displays while it is off. Then open the Manage Bumps tab and click Add New at the top of the screen. The Quick Start wizard will appear to help you configure the essentials.
You can also start a bump from the Checkout Editor (WP Admin » CheckoutWC » Checkout Editor). In the Slots section, click the + beside the slot where you want the bump, then choose + New order bump. The same wizard and editor open in a window over the Checkout Editor, with the bump’s Display Location already set to that slot. When you close the window, the slot list and the preview update to show the new bump.
Step 2: Complete the Quick Start wizard
The wizard collects four pieces of information to get you started:
Title
Give your Order Bump an internal name. This is for your reference only and won’t be displayed to customers. Use something descriptive like “Phone Case Upsell” or “Extended Warranty Offer” so you can identify it later.
Offer Product
Search for and select the product you want to offer, by name or SKU. This is what gets added to the customer’s cart when they accept the bump. By default, only published products are listed. Variations are listed under their parent product and labeled Variation: choose a variation to offer exactly that option, or choose the parent product to let customers pick the options themselves in a pop-up when they accept. A product hidden from your shop catalog is still listed, labeled Hidden (or Search only), because offering an item customers can’t find anywhere else is a legitimate use of a bump.
Discount Type
Choose between Percent Off or Amount Off. Percent discounts work well for higher-priced items, while fixed amounts are clearer for lower-priced add-ons.
Discount
Enter the discount value. For a 15% discount, select “Percent Off” and enter 15. For a $5 discount, select “Amount Off” and enter 5. Leave blank or enter 0 to offer the product at full price.
Click Continue to move to the full editor.
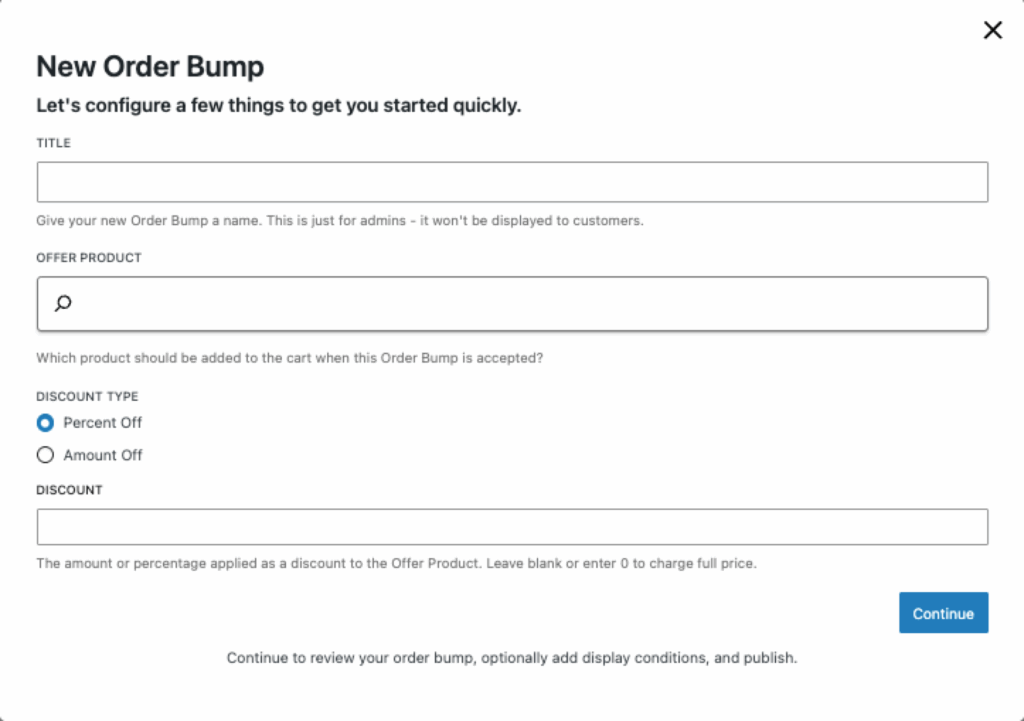
New order bump quick start configuration modal
Step 3: Configure display settings
After the wizard, you’ll see the Order Bump editor with a live preview on the left and all settings in the sidebar on the right. A few settings are worth reviewing before you publish:
Display Location
Choose where the bump appears. A bump created from CheckoutWC » Order Bumps starts on No Slot Assigned, which publishes without any warning but never displays anywhere, so choose a location before you publish. (A bump created from a slot in the Checkout Editor already has that slot set.) A good starting point is After Cart Summary Items (Checkout and Side Cart), which works well for most stores. See Order Bump placement locations for a full breakdown of each option.
That location also shows the bump in the side cart, but only when the Side Cart is switched on and its own Enable Order Bumps setting is on too (WP Admin » CheckoutWC » Side Cart). If either is off, the editor warns you and links to the side cart settings.
Display Conditions
Control when the bump appears based on cart contents, customer details, or other criteria. With no rules, the bump isn’t limited by who the customer is or what else is in the cart, and it is hidden only while the offer product is already in the cart. The checklist in Step 4 covers what else can keep it from showing. To target specific scenarios, click Add rule in the Display Conditions section. If you tick Use Order Bump As Upsell under Offer Type, the bump also waits until the product it replaces is in the cart.
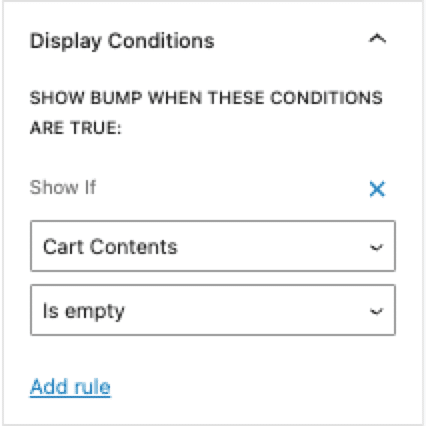
Configuring conditional logic for order bumps
Offer Language
Scroll down in the sidebar to find the copy settings. How many fields you see here depends on your Display Location. Place Order Click and Post Purchase One-Click bumps get five fields; every other location gets three, because the two heading fields only apply to the modal versions.
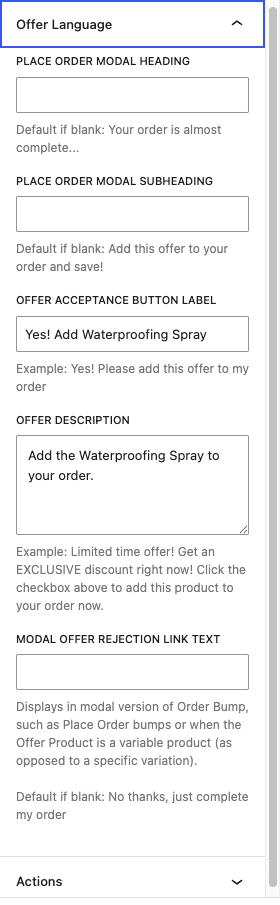
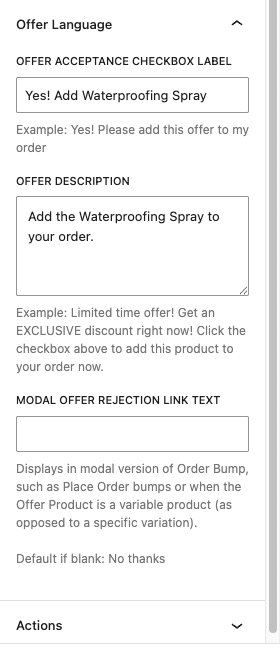
Offer Acceptance Checkbox Label
The text next to the checkbox customers click to accept the offer. It arrives pre-filled with “Yes! Please add this offer to my order”, and you can customize it to match your product. For example: “Yes! Add the protection plan” or “Add matching earrings for 20% off”.
On Place Order Click and Post Purchase One-Click bumps this same field is labeled Offer Acceptance Button Label, because the offer renders as a button in a modal rather than a checkbox in the cart. It is the same setting either way.
Offer Description
A short pitch that appears below the checkbox. This is your chance to explain the value. Keep it to one or two sentences. Example: “Most customers add this to protect their purchase. Cancel anytime if you change your mind.”
This field also arrives pre-filled, with “Limited time offer! Get an EXCLUSIVE discount right now! Click the checkbox above to add this product to your order now.” Both this and the acceptance label are required, so a bump will always show something here. Replace the placeholder copy before you publish, or that generic text goes live as-is.
Place Order Modal Heading
Only appears when Display Location is Place Order Click (Checkout) or Post Purchase One-Click (Thank You). It starts blank, and if you leave it blank the fallback depends on which of the two you picked:
- Place Order Click: “Your order is almost complete…”
- Post Purchase One-Click: “Wait [first name]! Here’s an exclusive offer to compliment your order!” with the customer’s real first name inserted at checkout.
Two things about that second one are worth knowing before you decide to leave it blank. The help text in the panel shows a raw %s where the name goes, which is a placeholder rather than literal text a customer would see. And “compliment” is the shipped spelling, where “complement” is meant. If either bothers you, type your own heading and neither applies.
Place Order Modal Subheading
Also limited to the two modal locations, also starts blank. Left blank it falls back to “Add this offer to your order and save!”
Modal Offer Rejection Link Text
The decline link, for example “No thanks”. Despite the name, this applies to more than Place Order bumps: it shows on any modal version of an order bump, which includes the case where your Offer Product is a variable product rather than a specific variation. So a bump in a checkout slot, such as After Cart Summary Items, will use it too when its Offer Product is a variable product.
Starts blank, and the fallback depends on the location: Place Order Click bumps use “No thanks, just complete my order”, everything else uses “No thanks”.
Step 4: Publish and test
Click Publish at the top of the editor to make your Order Bump live. Then add a product to your cart and go through checkout to see the bump in action.
You can also check it without leaving your admin. Open the Checkout Editor, use the Preview Cart control in the editor header to put the products that should trigger the bump into the preview, and look at the slot the bump sits in. A warning icon beside the bump explains most of the reasons it can’t reach customers: an offer product that no longer exists, isn’t published, has no price or is out of stock, an upsell whose replaced product is gone, or display conditions that limit who sees it.
If your bump doesn’t appear, check these common issues:
- The offer product is out of stock or not purchasable
- The offer product is already in the cart (bumps hide automatically in this case)
- You have display rules that aren’t being met (check the Display Conditions section)
- The Display Location is still set to No Slot Assigned
- Enable Order Bumps is off under CheckoutWC » Order Bumps » Settings
- The bump is in After Shipping Address or After Shipping Methods, and the order doesn’t need shipping (digital products or local pickup), so those slots don’t show
- You’ve reached your plan’s limit, so the bump couldn’t be published and is still a draft
- The offer product isn’t published: you’ll still see the bump while logged in as an administrator, but customers never will
Example WooCommerce order bump configurations
Here are three common Order Bump setups to give you ideas for your store:
Example 1: Complementary accessory
Scenario: You sell phones and want to offer a matching case.
| Setting | Value |
| Title | Phone Case Upsell |
| Offer Product | Premium Silicone Case |
| Discount Type | Percent Off |
| Discount | 15 |
| Display Location | After Cart Summary Items (Checkout and Side Cart) |
| Checkbox Label | Add a case and save 15% |
| Description | Protect your new phone from day one. This case fits perfectly and ships with your order. |
Optional: Add a display rule so this only shows when a phone is in the cart. Go to Display Conditions » Add rule, choose Cart Contents, then Contains (Products) and At least one of the selected, and select your phone products.
Example 2: Warranty or protection plan
Scenario: You sell electronics and want to offer extended protection.
| Setting | Value |
| Title | 2-Year Protection Plan |
| Offer Product | Extended Warranty (2 Years) |
| Discount Type | Percent Off |
| Discount | 0 (full price) |
| Display Location | Before Terms & Conditions |
| Checkbox Label | Protect my purchase for 2 years |
| Description | Covers accidental damage, defects, and normal wear. File claims online anytime. |
Why it works: Protection plans are high-margin products that customers expect to see at checkout. Placing the bump before the terms puts it right before the final purchase decision.
Example 3: Free gift at cart threshold
Scenario: You want to reward customers who spend $75 or more with a free sample.
| Setting | Value |
| Title | Free Sample Over $75 |
| Offer Product | Deluxe Sample Pack |
| Discount Type | Percent Off |
| Discount | 100 |
| Display Location | After Cart Summary Items (Checkout and Side Cart) |
| Checkbox Label | Add my free gift! |
| Description | You’ve unlocked a free sample pack with your order. Add it now before checkout. |
Required: This example needs a display rule to work correctly. Go to Display Conditions » Add rule and create a Cart Subtotal rule with the operator Is greater or equal to and the value 75. See the Rules Engine reference for detailed instructions.
Pro tip: Check the Auto Add Order Bump to Cart option in the Offer section. This automatically adds the free gift without requiring customers to check the box, which feels more like a reward than an offer.
Next steps
Now that you have a working Order Bump, you might want to explore:
- Order Bump placement locations to understand where bumps can appear
- Rules Engine reference to target specific customers or cart states
- Order Bumps overview for the complete settings reference
Need help?
If your Order Bump isn’t working as expected or you want advice on the best configuration for your store, reach out to our support team. We’re happy to help you set things up.