WooCommerce Black Friday checkout checklist for BFCM weekend
Table of Contents
- Test and lock the checkout now (10 days out)
- Place a test order on every payment gateway
- Test express wallets on real devices
- Update everything now, then freeze
- Rehearse changes on staging
- Check hosting and caching before the traffic arrives
- Turn on bot and card-testing protection
- Settle coupon rules and stacking
- Publish your shipping cutoffs
- Finalize offers and recovery the week before (November 20 to 26)
- Set up your Black Friday order bumps
- Set a free shipping threshold that matches your shipping rules
- Retime your abandoned cart emails for a four-day sale
- Do a mobile pass on a real phone
- Add trust and returns messaging near the pay button
- Check page speed on the pages that matter
- Check stock levels and out-of-stock behavior
- Watch the sale on the day (November 27 to 30)
- Watch orders and failed payments
- Check logs and scheduled actions
- Leave the checkout alone while it sells
- Recover and review after the sale (December 1 on)
- Recover abandoned carts
- Add post-purchase offers
- Ask for reviews
- Write a short look-back
A WooCommerce Black Friday checkout checklist comes down to four stretches: test and lock the checkout now, finalize offers and recovery emails the week before, watch orders on the day, and recover what you missed afterward. Black Friday is November 27 and Cyber Monday is November 30, so the next 10 days are the time to find a broken payment method, not the Friday morning it costs you sales.
Each item below names the exact WooCommerce or CheckoutWC screen to check and what a pass looks like. For store-wide prep such as email lists, ads, and inventory planning, see our holiday readiness checklist. This one stays on the checkout, where the sale is won or lost.
Test and lock the checkout now (10 days out)
Do these first. Anything you find now is cheap to fix, and anything you change after November 20 should be small.
Place a test order on every payment gateway
A gateway that worked in September can fail after a key rotation or an update. Put each gateway in its test or sandbox mode, place an order with a successful test card, then repeat with a decline card, and confirm the order lands in the right status with the right emails. Our guide to testing your WooCommerce checkout without real payments has the test card numbers and the steps for WooPayments, Stripe, and PayPal.
Check each of these on every pass:
- The order appears under WooCommerce » Orders with the status you expect.
- The customer and admin emails arrive and look right.
- Stock drops by the quantity ordered.
- A declined card shows a clear message and lets the shopper try again.
To tell whether a problem comes from CheckoutWC or from WooCommerce itself, add ?bypass-cfw=true to your checkout URL. That loads WooCommerce’s own checkout for one page load and changes no settings. Don’t deactivate CheckoutWC to test, because deactivating clears its scheduled tasks, including pending abandoned cart emails.
Switch every gateway back to live mode when you finish, and place one real low-value order on your main gateway to confirm live keys work.
Test express wallets on real devices
Apple Pay, Google Pay, and PayPal buttons cut the form out of checkout, which matters most on phones. They come from your gateway plugin, and CheckoutWC places them at the top of the first step. Open CheckoutWC » Express Checkout and look at the Detected Gateways table to see which of your gateways CheckoutWC supports. Then load your checkout on an iPhone and an Android phone with a product in the cart, and confirm the buttons show and open.
The box only appears when the cart needs payment and at least one gateway has shown a button, so test with a normal paid product, not a free one. If a button is missing, the supported express payment gateways page lists what each gateway needs, and our article on WooCommerce express checkout covers setup.
Update everything now, then freeze
Update WordPress, WooCommerce, your theme, CheckoutWC, and your gateway plugins this week, then stop. An update on Wednesday gives you time to test; an update on Black Friday gives you an outage with no time. Before you update, export your CheckoutWC settings from CheckoutWC » Advanced » Tools with Export Settings. The export leaves out your license key and integration secrets, and you can import it on another site to rebuild the same setup.
Take a full backup after the last update, and tell everyone with admin access that the freeze has started.
Rehearse changes on staging
If you still have a change in mind, such as a new gateway, a new template, or a theme tweak, make it on a staging copy first. CheckoutWC doesn’t count activations on local and common staging sites against your license, so staging costs you nothing extra. Don’t use the Checkout Editor’s Preview setting as a sandbox on the live site: in Preview, only logged-in administrators see CheckoutWC, and every customer gets WooCommerce’s standard checkout until you set it back to Live.
Check hosting and caching before the traffic arrives
Ask your host what your plan does at a traffic spike: PHP worker limits, resource caps, and whether they throttle or take the site down when you exceed them. Upgrading a plan the morning of the sale is slow, so ask now.
Then check caching. The cart, checkout, and My Account pages must never be served from a page cache, and neither should requests with ?wc-ajax= in the URL, which the checkout uses to update totals and place the order. Most hosts and caching plugins exclude these automatically; confirm yours does. CheckoutWC’s default template loader also sends headers telling browsers and caches not to store its checkout pages. Open a private window, add a product to the cart from a cached page, and confirm the side cart and checkout show that cart and no one else’s. If the checkout loads but the form never appears after you turned on script minifying or delay options, your optimization plugin is likely the cause, and the CheckoutWC troubleshooting guide walks through finding it.
Turn on bot and card-testing protection
Card testing, where a script pushes stolen card numbers through your checkout to see which work, hides well in sale traffic. It fills your orders list with failed payments and can trigger fees and gateway warnings. Our guides on stopping carding attacks without hurting conversions and using Cloudflare Turnstile against spam orders cover the background.
In CheckoutWC, the control is CheckoutWC » Integrations. Find Cloudflare Turnstile, turn on Enable Cloudflare Turnstile, and paste in the Site Key and Secret Key from your free Cloudflare account. Checkout protection is on by default; login and registration protection are off, so enable Enable on Login if bots are creating accounts. If either key is missing, Turnstile silently doesn’t appear, so test it: log out, open your checkout in a private window, and confirm the widget shows above the place order button and the order still goes through. If it looks cramped on phones, try the Compact size. Our Turnstile setup guide has the full steps.
Settle coupon rules and stacking
Most Black Friday coupon problems come from two offers stacking in a way you didn’t plan. Open Marketing » Coupons and review every code you plan to run. For each one, check these fields:
- Individual use only in the Usage restriction tab stops a code from combining with other coupons.
- Exclude sale items keeps a coupon from stacking on products you already marked down.
- Minimum spend and Maximum spend set the order value range.
- Usage limit per coupon and Usage limit per user under Usage limits cap how far a leaked code can travel.
- Coupon expiry date ends the code at the time you choose, so Monday night’s offer doesn’t run into Tuesday.
Then open WooCommerce » Settings » General and check Calculate coupon discounts sequentially. It changes how multiple coupons are applied to a cart, so decide on purpose rather than by default. Then place test orders that combine a coupon with a sale item, with free shipping, and with a second coupon, and confirm the totals. Our guide to WooCommerce coupons and discounts covers the settings in more depth.
Publish your shipping cutoffs
Gift buyers want to know if it will arrive in time. Decide your last order dates for standard and expedited shipping, and check that your shipping zones and rates still match your carrier agreements under WooCommerce » Settings » Shipping. Then put the dates where shoppers see them before paying. In CheckoutWC, add a custom trust badge in the Checkout Editor with your own words, such as your cutoff date for holiday delivery, and place it in a slot near the shipping methods or the place order button. See the trust badges item below for how to add one.
Finalize offers and recovery the week before (November 20 to 26)
The checkout is stable and frozen. This week you decide what shoppers are offered, and you set up the emails that catch the ones who leave.
Set up your Black Friday order bumps
Order bumps add to the cart’s value at the moment a shopper has already decided to buy. For a sale weekend, pick one or two simple offers that make sense next to your best sellers: an accessory, a refill, or a gift wrap add-on. Our article on WooCommerce order bumps has examples that work. In CheckoutWC, go to CheckoutWC » Order Bumps. If you have none yet, the Add your first order bump card drafts one from a product customers often buy alongside other products in your last 90 days of orders.
The Rules Engine decides who sees which bump, using cart contents, customer history, and more. Check that each bump’s product is in stock and priced for the sale. If you want to compare two versions of an offer, the A/B testing feature (turn on Enable A/B Testing under CheckoutWC » A/B Testing » Settings) needs time to collect visitors, so start it now or leave it for after the sale. Set a reminder to switch sale-only bumps to draft on Tuesday.
Set a free shipping threshold that matches your shipping rules
A free shipping bar nudges shoppers to add one more item. In CheckoutWC, turn on Enable free shipping & rewards bar in CheckoutWC » Side Cart and add up to three tiers: free shipping, a free gift, or a custom message. Set the threshold a little above your average order value, so it asks for one extra item rather than a second order. Our walkthrough on turning a free shipping bar into a rewards bar shows the setup.
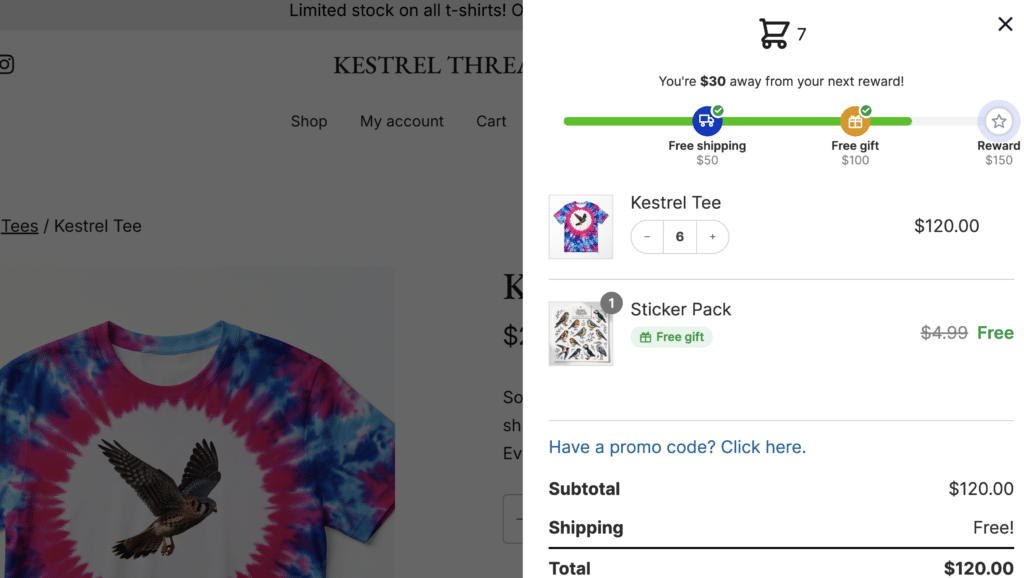
One setting trips up many stores. A free shipping tier only displays progress; it doesn’t make shipping free. You also need a Free shipping method under WooCommerce » Settings » Shipping with A minimum order amount that matches the tier. If the method’s Apply minimum order rule before coupon discount box is off, coupon discounts come off first, so a shopper using a 20 percent code may not reach free shipping at the amount you printed. CheckoutWC shows a warning on the side cart settings when the two don’t match, so read it. Then add a product at the threshold, apply your sale coupon, and confirm the checkout shows free shipping.
Retime your abandoned cart emails for a four-day sale
The default recovery sequence assumes a normal week. CheckoutWC’s three sample emails go out at 3 hours, 2 days, and 4 days, and a 4-day email sent on Friday arrives after Cyber Monday ends. Open CheckoutWC » Cart Recovery. On the Emails tab, set Send After shorter for the sale: one reminder within an hour or two, a second the next day, and a last one before the offer ends. Each time counts from when the customer started checking out, not from the previous email, so set each one from the start of the sequence.
Only published emails send, and the samples are created as drafts. Back on Settings, confirm Enable Abandoned Cart Tracking is on, and check Cart Is Abandoned After X Minutes (the default is 15). Use Send Preview on each email to see it in an inbox. If another cart recovery plugin is active, turn its emails off so customers don’t get two sets. Recovery links bring back the cart, but not coupons from the original cart, so print the code in the email if the offer needs one. Our guides on WooCommerce abandoned cart recovery and the cart recovery documentation cover the emails and merge tags. CheckoutWC doesn’t ask shoppers for separate consent to receive these emails, so check what your customers’ countries require.

The simplicity of Shopify with the power of WooCommerce. Replace your WooCommerce checkout page with CheckoutWC to boost sales and reduce cart abandonment.
Do a mobile pass on a real phone
Most of a sale weekend’s traffic arrives on phones, so test the checkout with your thumb, not a resized desktop window. Add a product, open the side cart, go through checkout, and pay with a wallet. Look for fields that are hard to tap and a keyboard that covers the button. Our article on making your WooCommerce mobile checkout faster to finish covers what to look for.
In CheckoutWC, the cart summary sits collapsed at the top of the checkout on a phone, with the total showing. Under CheckoutWC » Pages » Checkout, the Mobile Options section controls how it looks. In the Checkout Editor, use the device toggles and Preview Cart to see the checkout with different carts before you test it on the real device. Apply a coupon on the phone too.
Add trust and returns messaging near the pay button
Put your returns policy, guarantee, and delivery promise where they are about to enter a card. In CheckoutWC, go to CheckoutWC » Checkout Editor and open Badges. Turn on Trust Badges, since badges in slots only show with it on.
Then open Slots, expand the slot you want, click +, choose + New trust badge, and select Custom badge to write your own words, such as “Free returns for 30 days.” A badge collection gives you a row of ready-made payment and security icons with no artwork to source. If your returns window differs on sale items, say so. Our article on adding a guaranteed safe checkout badge has ideas for wording, and the trust badges documentation covers every option.
Check page speed on the pages that matter
Test the product page, cart, and checkout on a mobile connection, with the page cache warm and then cold. If checkout takes noticeably longer than your product pages, the usual causes are heavy third-party scripts, an overloaded host, or an optimization plugin working against the checkout. Our guide to finding and fixing a slow WooCommerce checkout walks through the checks.
Check stock levels and out-of-stock behavior
An oversold item is a refund email and an unhappy customer. Open WooCommerce » Settings » Products » Inventory and review four settings:
- Hold stock (minutes): how long an unpaid order reserves stock before WooCommerce cancels it. A long hold during a rush ties up stock in orders that never get paid; a very short one can cancel a customer who is still entering a card.
- Low stock threshold and Out of stock threshold: the quantities that trigger alerts and the out-of-stock status.
- Notifications: who gets the low stock and out-of-stock emails. Make sure someone reads that inbox this weekend.
- Out of stock visibility: whether items that sell out vanish from the catalog or stay visible.
Then decide what a sold-out best seller should do. Hiding it removes it from the catalog; leaving it visible with an alternative can keep the sale alive. Our article on offering an in-stock swap on an out-of-stock product shows one approach.
Watch the sale on the day (November 27 to 30)
Your job on the day is to notice problems within minutes, not hours.
Watch orders and failed payments
Open WooCommerce » Orders and filter by Failed and Pending payment. A few failures are normal. A sudden run of them, all from one gateway, means the gateway is the problem. A run of failed orders with different random card numbers and similar details is card testing, and Turnstile is your first defense. Your gateway’s own dashboard shows declines and fraud flags too.
Check at set times, such as every hour on Friday and Monday morning, and place one order from a private window mid-morning to confirm the whole path still works.
Check logs and scheduled actions
If emails or recovery messages stop, look at the background jobs. In WooCommerce » Status » Scheduled Actions, filter by the group checkoutwc. The cfw_acr_check_carts action should be Pending and due within about 5 minutes. A long list under Past-due means WordPress cron isn’t running, which stalls cart recovery emails and releases for post-purchase offers. Our cron guide explains how to set up a real server cron job. Do that before the sale, not during it.
For errors, open WooCommerce » Status » Logs and look at the checkout-wc source. CheckoutWC logs failed checkout requests there even with debug logging off, so a cluster of entries tells you something broke. The error text a customer sees maps to a cause: a (500) means a PHP error, “Server response could not be parsed” usually means a plugin printed HTML into the response, and a timeout points to performance. The troubleshooting guide lists each message and its fix.
Leave the checkout alone while it sells
Change nothing unless something is broken, and when it is, change one thing and test it right away. Specifically, don’t:
- Update plugins, themes, or WordPress.
- Change caching, minify, or script-delay settings.
- Switch the checkout template or the template loader.
- Add a new payment gateway or reconfigure an existing one.
- Import settings or run a plugin that touches checkout.
- Start a new A/B test, since a mid-sale test splits the traffic you most want to convert.
Safe changes include coupon expiry dates, sale copy, stock quantities, and a badge message. For an urgent CheckoutWC setting change, try it on staging first if you can, then make it on the live site and place a test order straight away. Leave the Checkout Editor on Live: switching it to Preview mid-sale gives every customer WooCommerce’s standard checkout instead of yours.
Recover and review after the sale (December 1 on)
The sale ends Monday night, but some of its revenue is still in carts and thank you pages.
Recover abandoned carts
Open the Report tab under CheckoutWC » Cart Recovery to see tracked carts, which were marked abandoned, and which were recovered. A cart counts as recovered when its order reaches a recovered status (Processing and Completed by default), as long as at least one email had been sent. Carts are marked lost 30 days after the last email. If the offer has ended, update the remaining emails so they don’t promise a discount that no longer exists.
Add post-purchase offers
Once a customer has paid, a thank you page offer is one click away from an extra sale with no card to re-enter. CheckoutWC’s post-purchase one-click offers charge the payment method the customer just used and add the item to the same order. They need a gateway plugin that supports it: the docs list Payment Plugins for Stripe and Payment Plugins for PayPal. Our article on WooCommerce one click upsells and the one-click offer documentation cover setup.
Ask for reviews
Black Friday brings buyers who have never ordered from you, and a review from one of them helps the next shopper. Send a review request after the order arrives, using whatever email tool you already use for order follow-ups. Reviews also feed back into the checkout: CheckoutWC’s review badges show WooCommerce product reviews as trust badges, under Badges in the Checkout Editor. You choose the minimum star rating and how many reviews show.
Write a short look-back
While it is fresh, write down what happened:
- Which gateway, device, or coupon caused problems, and what fixed them.
- Which order bump or free shipping tier earned the most, using your analytics and the order bump A/B stats if you ran a test.
- How many abandoned carts the recovery emails brought back.
- What you would test earlier next year, and what you would never touch again.
Store the note where you will find it next October.
A good Black Friday checkout needs few new features. It needs the existing ones tested, timed, and left alone. If you want the order bumps, rewards bar, cart recovery, express checkout, and Turnstile in one plugin, CheckoutWC is $249 a year or $899 lifetime for one site, with staging and local sites free.